How to register an OAuth app for Amazon Seller Central
Amazon Seller Central provides access to the Selling Partner API (SP-API), a REST-based API that helps Amazon selling partners programmatically access their data on orders, shipments, payments, and much more.
Register as a developer with Amazon
1. Create a developer account and register your application
- Go to the Amazon Selling Partner page
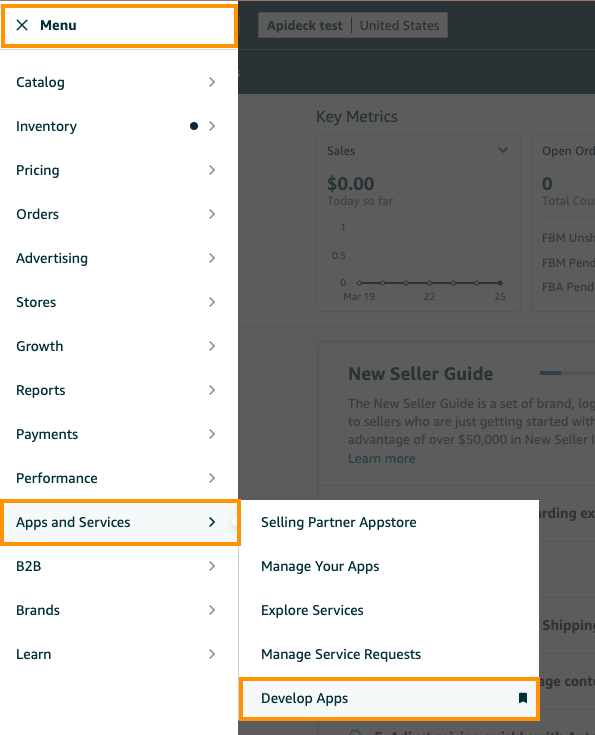
- Click the Develop Apps button from the top left corner menu under "Apps and Services"

- Fill out the registration form with your details
- Accept the terms and conditions
- Navigate to Developer Central section
- Click + Add new app client

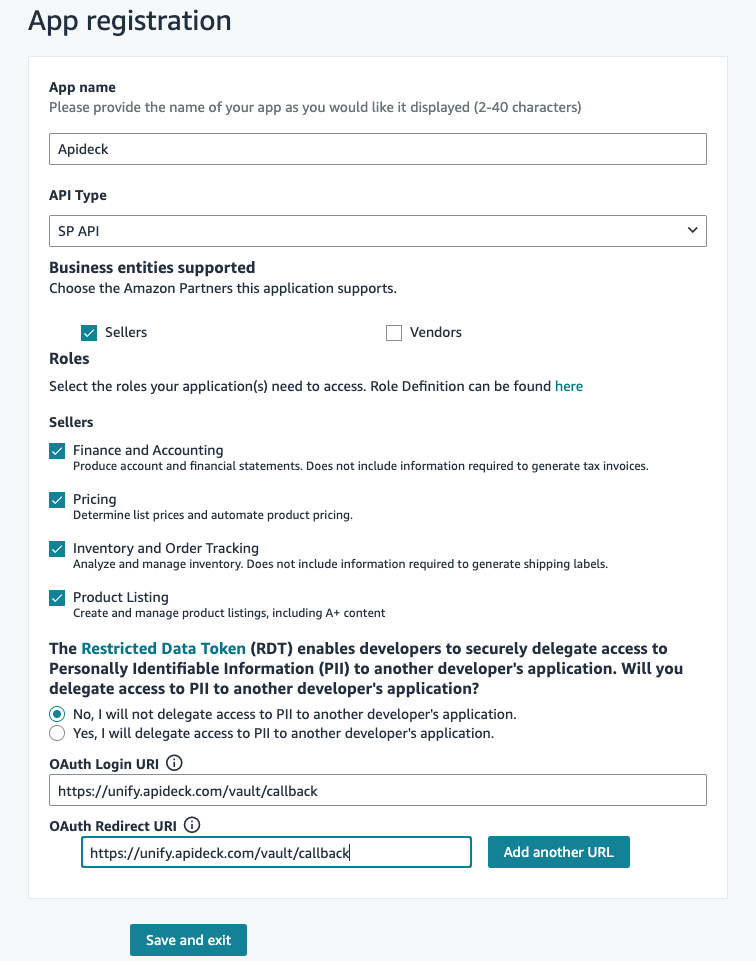
- Fill in the application details:
- Application name: Enter a meaningful name (typically your company name)
- Application type: Select the appropriate type (SP API)
- Business entities supported: Select the appropriate type (Sellers)
- Roles: Select the appropriate roles. We suggest to select all roles for uninterrupted access.
- OAuth Login URI: Enter
https://unify.apideck.com/vault/callbackas the OAuth Login URI - Redirect URIs: Enter
https://unify.apideck.com/vault/callbackas the redirect URI - Click on Save and exit button.

2. Get your credentials
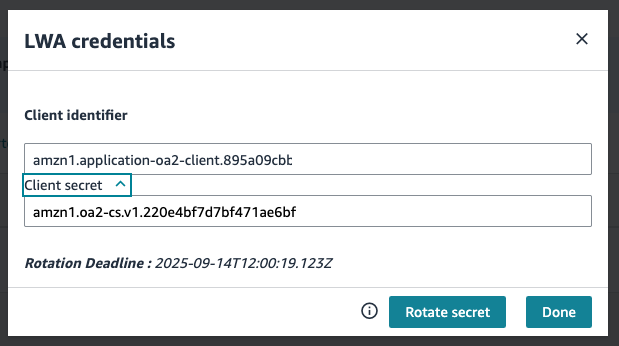
After your application is registered, on Developer Central you'll receive:

- Client ID: A unique identifier for your application
- Client Secret: A secret key used to authenticate your application

- Application ID: A unique ID for your SP-API application (format: amzn1.sellerapps.app.*)

Make note of these credentials as you'll need them for the Apideck configuration.
Configure in Apideck
Head over to the Apideck dashboard for Amazon Seller Central
Enter the following credentials to set up the connection:
- Client ID: The Client ID from your SP-API application
- Client Secret: The Client Secret from your SP-API application
- Server URL: The server URL for the API. For Europe, this is
https://sellingpartnerapi-eu.amazon.com - Application ID: The Application ID from your SP-API application
Once you've entered the credentials, click Save settings. After a connection is established, you can use the connection to retrieve data from Amazon Seller Central.
Testing the connection
To test your configuration:
- Create a test session in Apideck Vault
- Connect to Amazon Seller Central using the OAuth flow
- Make a test API call to verify the connection is working properly
Troubleshooting
Error: Invalid Client ID or Client Secret
If you receive an error about invalid credentials:
- Double-check that you've copied the correct Client ID and Client Secret
- Ensure there are no extra spaces or characters in the credentials
- Verify that your application has been approved by Amazon
Error: Invalid Redirect URI
If you encounter redirect URI errors:
- Verify that you've added
https://unify.apideck.com/vault/callbackto your application's redirect URIs - Check for any typos in the redirect URI configuration
Error: Insufficient Permissions
If you receive permission errors:
- Review the data access permissions you've configured for your application
- Make sure you've selected all the necessary API sections your application needs
Resolve 400 Errors
There are many possible reasons for a 400 response when making API calls. Here are the most common causes and solutions:
For more detailed information, see the Amazon SP-API documentation on resolving 400 errors.
Permissions and Credentials
Ensure the following:
- Required roles are approved for your profile and application
- The seller account is active
If a seller account isn't active and you're receiving 400 errors:
- Contact the seller and request that they navigate to Seller Central > Settings > Account Info > Charge Information
- If the Charge Information page displays a banner requesting a credit card update, ask the seller to update their credit card information
- Allow 48 hours for the updates to propagate through all Amazon systems
Note: If a seller account has not been used for 90 or more days, the account will be marked dormant, and the seller will be advised to update their credit card. Allow for a 48-hour waiting period to ensure a successful update. Afterwards, API calls can be made by that account.
Rate Limits
Rate limits apply per account-application pair. The following rate limits apply to order-related operations:
For more information, see the Amazon SP-API Orders API rate limits documentation.
Orders List (getOrders)
- Rate limit: 0.0167 requests per second
- Burst: 20 requests
- Scope: Per account-application pair
Single Order (getOrder)
- Rate limit: 0.5 requests per second
- Burst: 30 requests
- Scope: Per account-application pair
Order Line Items on Single Order (getOrderItems)
- Rate limit: 0.5 requests per second
- Burst: 30 requests
- Scope: Per account-application pair
Additional resources
For more information about using the Amazon Seller Central connector with Apideck, visit our documentation.