Zoho Books – Configuration Guide
Zoho Books is cloud-based accounting software in which you can record, audit and analyze all financial transactions easily. With secure data storage, easy navigation and customizable features, Zoho Books provide a head start in accounting for small businesses.

How to Create OAuth Credentials for Zoho Books
This guide walks you through creating your own Zoho Books OAuth app and adding it to Apideck, so your consumers can connect their Zoho Books organizations to your integration.
Zoho Books is a cloud accounting platform covering invoicing, expenses, inventory, and financial reporting. Through Apideck's Accounting API you can read and write invoices, customers, bills, payments, and other accounting records.
Prerequisites
Before you begin, make sure you have:
- A Zoho account with access to Zoho Books, sign up for a free trial if you do not have one
- An Apideck account with access to the Apideck Dashboard
- Permission to create OAuth clients in the Zoho API Console for your Zoho account
Enable the Zoho Books Connector in Apideck
- Navigate to the Apideck Dashboard
- Enable the Zoho Books connector if it's not already enabled
Getting Your OAuth Credentials
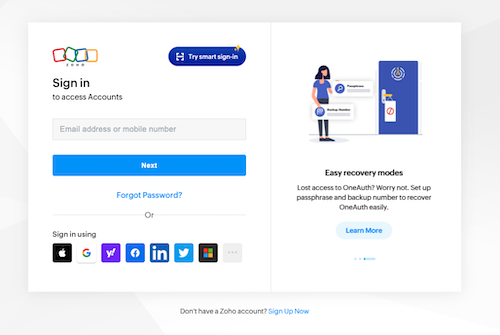
Step 1: Sign in to Zoho API Console
- Go to https://api-console.zoho.com/
- Sign in with your Zoho account credentials
Step 2: Create a New OAuth Application
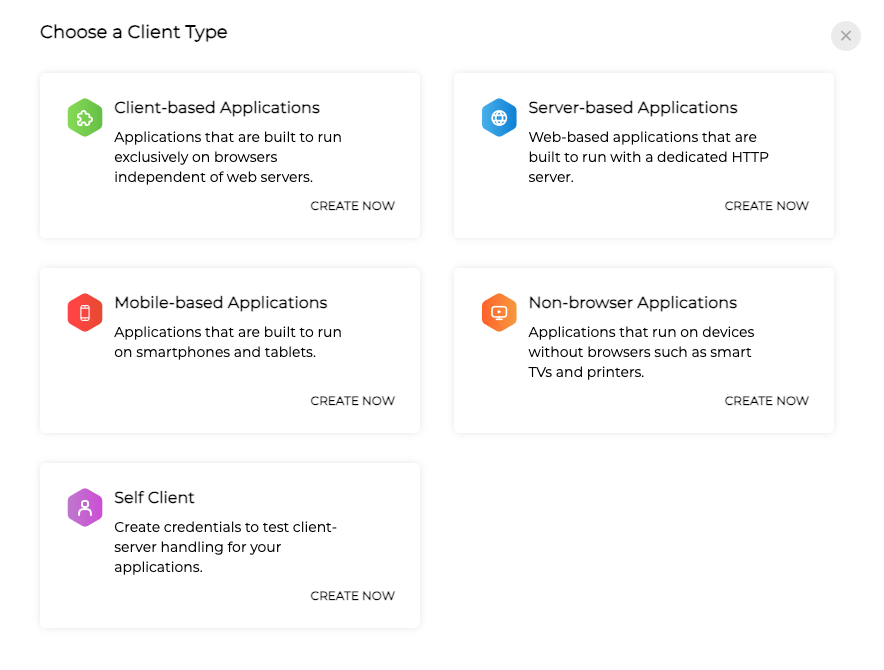
- On the applications overview page, click the "Add client" button in the top right corner

- Select "Server-based Applications" as the client type
Step 3: Configure Application Details
Fill in the application details form:
- Client Name: Enter a descriptive name (e.g., "Apideck Integration"). This name will be shown to users when they authorize your app to access their Zoho Books account.
- Client Type: Should be set to "Server-based Applications" (selected in the previous step).
- Homepage URL: Enter your company's website URL or your SaaS product URL.
- Authorized Redirect URIs:
https://unify.apideck.com/vault/callback
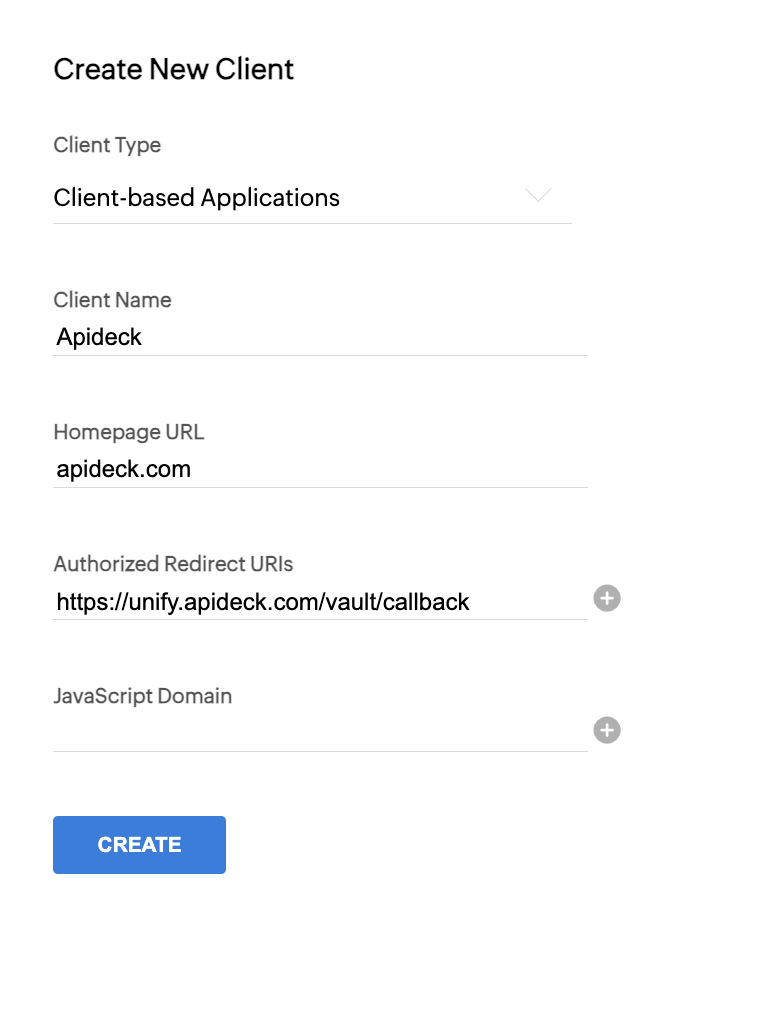
💡 TIP: The redirect URI must match exactly. Make sure there are no trailing slashes or extra characters.
Step 4: Get Your Client Credentials
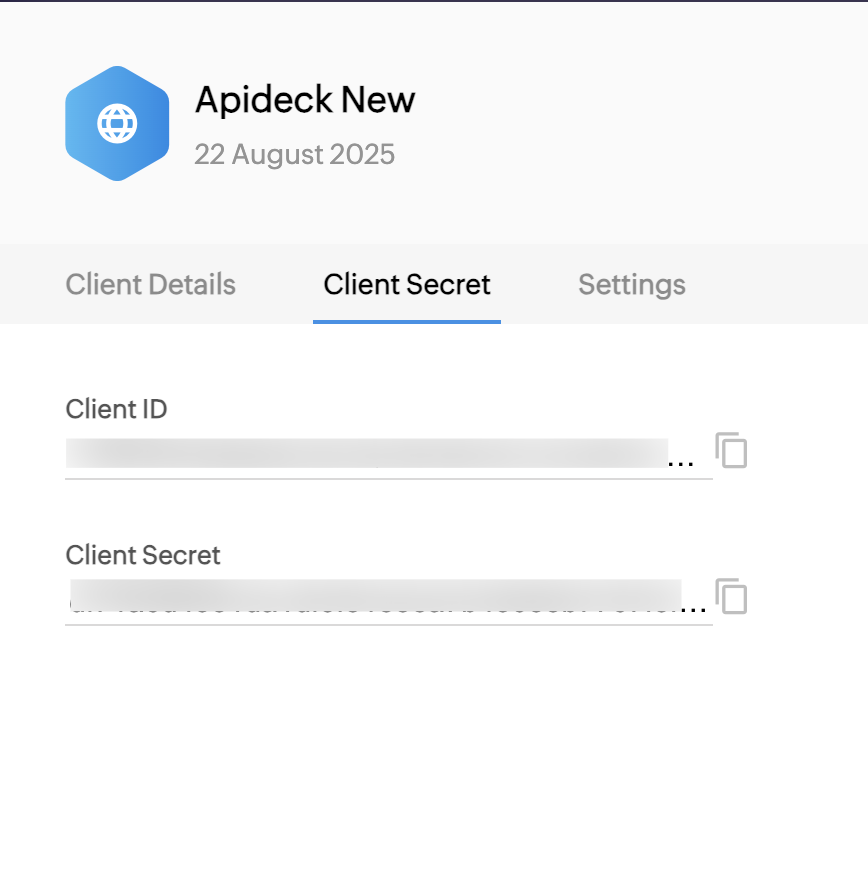
After creating the application, Zoho will display your OAuth 2.0 credentials:
You'll see:
- Client ID: A unique identifier for your application
- Client Secret: A secret key used for authentication
Step 5: Configure Data Center Settings
Zoho hosts accounts in region-specific data centers (US, EU, IN, AU, and others), and an OAuth client only works in the data centers you enable for it.
- Click on "Settings" for your newly created application
- Enable every data center where your customers' Zoho Books accounts are hosted: a consumer whose account lives in a data center you did not enable cannot authorize your app
- Select "Use the same OAuth credentials for all data centers"
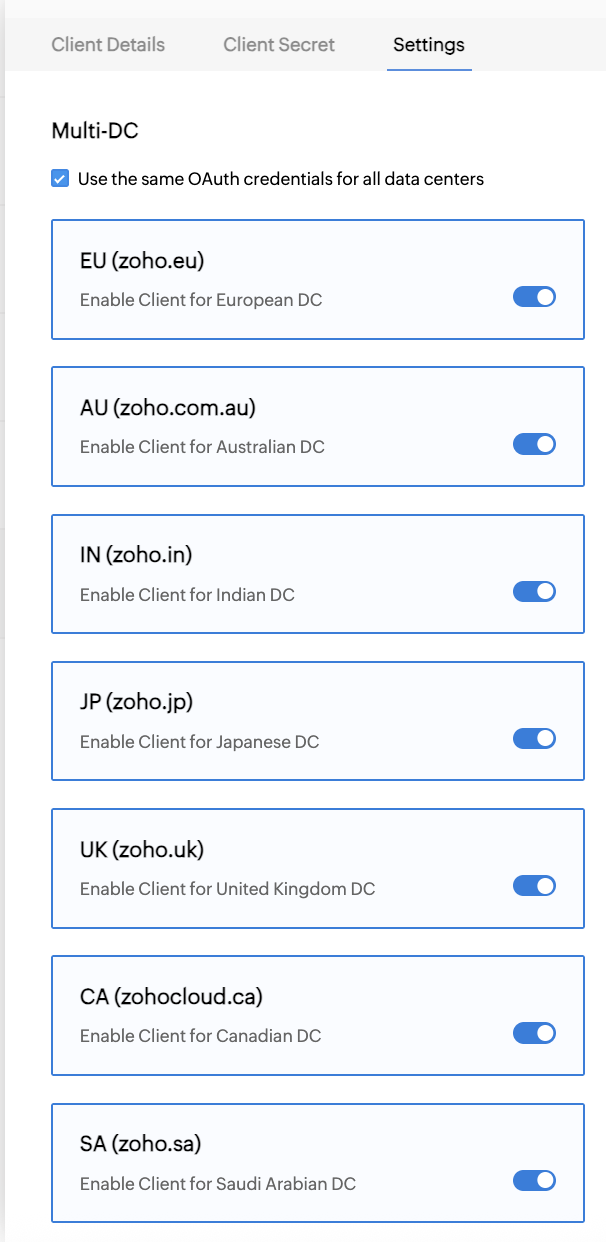
💡 IMPORTANT: Your Client ID is shared across data centers, but by default Zoho generates a different Client Secret per data center. The Apideck connector settings hold one Client ID and one Client Secret, so you must choose the option to use the same credentials everywhere. See Zoho's Multi-DC support documentation for the full flow.
Because of that per-data-center behaviour, re-copy the Client Secret from the Zoho API Console after you complete this step: a value noted in Step 4 may no longer be the one your client uses.
You do not have to tell Apideck which region a consumer is in: the correct Zoho data center is detected during authorization and the resulting API domain and accounts server are stored on the connection automatically.
Configure in Apideck
Now that you have your Zoho Books OAuth credentials, configure them in Apideck:
-
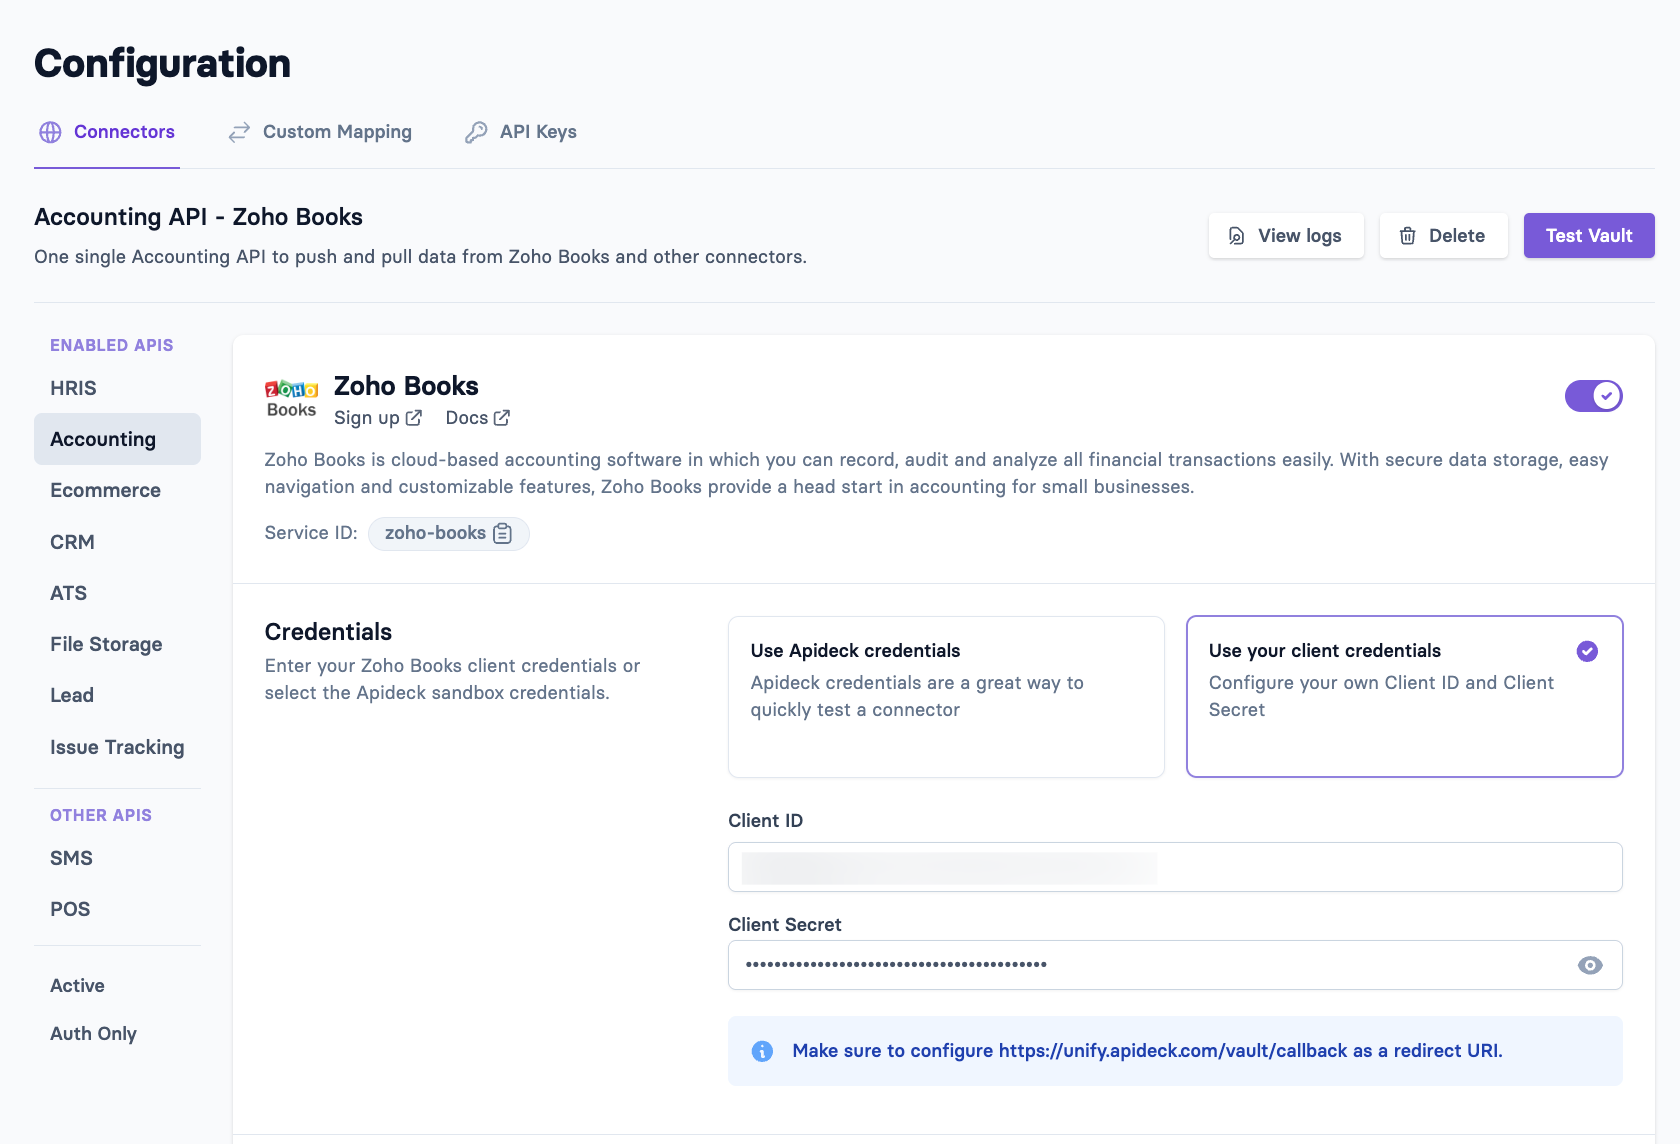
Navigate to Apideck Dashboard > Configuration > Accounting > Zoho Books
-
Enter your OAuth credentials:
- Client ID →
client_id: Paste the Client ID from your Zoho application - Client Secret →
client_secret: Paste the Client Secret from your Zoho application
- Client ID →
- Configure Scopes: This is an important step for Zoho Books integration
💡 IMPORTANT: You have two options for scope configuration:
- Option 1 (Full Access): Assign the
ZohoBooks.fullaccess.allscope. This grants full access to all Zoho Books resources and operations, so you won't need to add scopes separately. This is the scope the connector requests by default.

- Option 2 (Assign scopes separately): Assign the
ZohoBooks.settings.READscope. This scope is required to retrieve Organization IDs and allow consumers to select their organization from a dropdown when they authorize the connection. Then add the per-resource scopes your integration needs by picking them from the scope list in the Apideck Dashboard, which shows the tokens available for this connector. Do not compose a scope name from an Apideck resource name: the two do not map one-to-one. For example, bothcustomersandsuppliersare covered by theZohoBooks.contacts.*scopes, andpaymentsbyZohoBooks.customerpayments.*. If you are unsure which entry covers a resource, use Option 1 instead. Leaving outZohoBooks.settings.READleaves the organization dropdown empty and the connection cannot be completed.
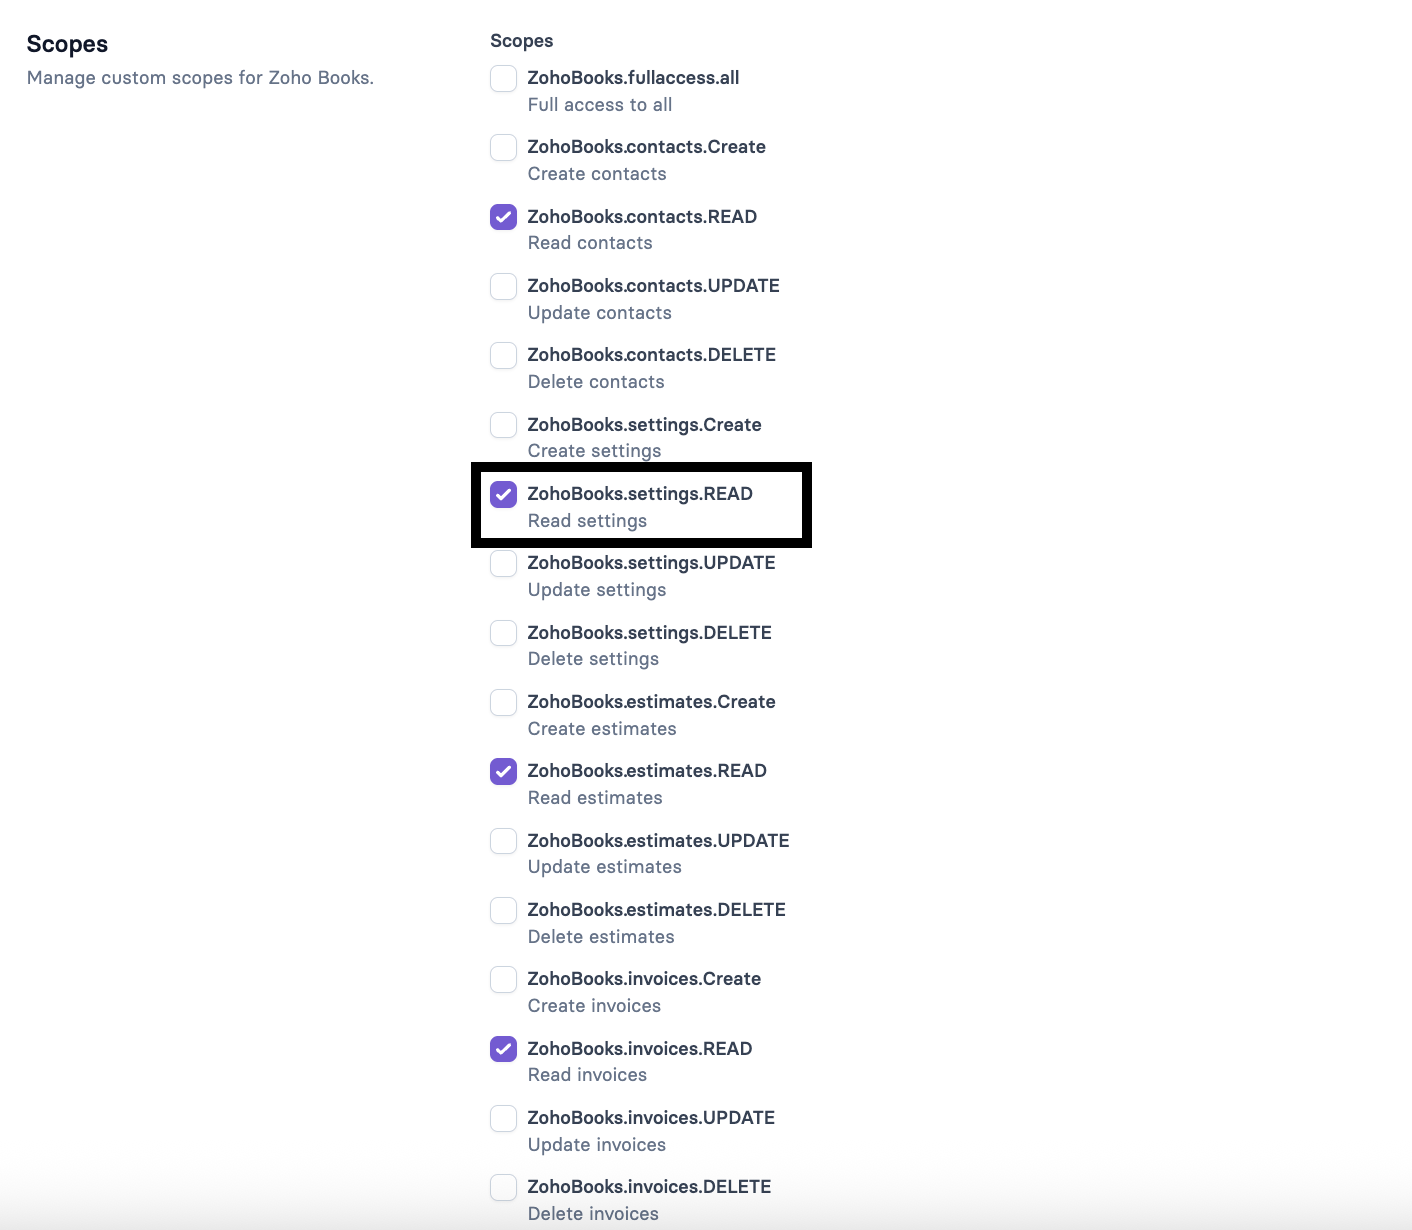
Whichever option you pick, only grant the scopes your integration actually uses: consumers see the requested scopes on Zoho's consent screen.
- Click "Save settings" to save your credentials and scopes
Apideck requests offline access with a forced consent prompt on every authorization, so each new connection returns a refresh token that Apideck uses to refresh access tokens for you. One Zoho platform limit can still retire a refresh token as new authorizations accumulate. See the known limits in the Zoho Books overview.
Hand Off to Your Consumers
Once your credentials and scopes are saved, nothing else is passed between you and your consumers:
- Your consumers never see or enter your Client ID or Client Secret, and you never handle their Zoho credentials.
- They authorize through Vault, sign in to Zoho, approve the scopes you configured, and pick their Organization ID from a dropdown.
- Each Zoho Books organization is authorized separately, so a consumer with multiple organizations creates one connection per organization.
Test Your Connection
- Click "Test Vault" in the Apideck Dashboard
- Click on "Authorize" for your Zoho Books connection
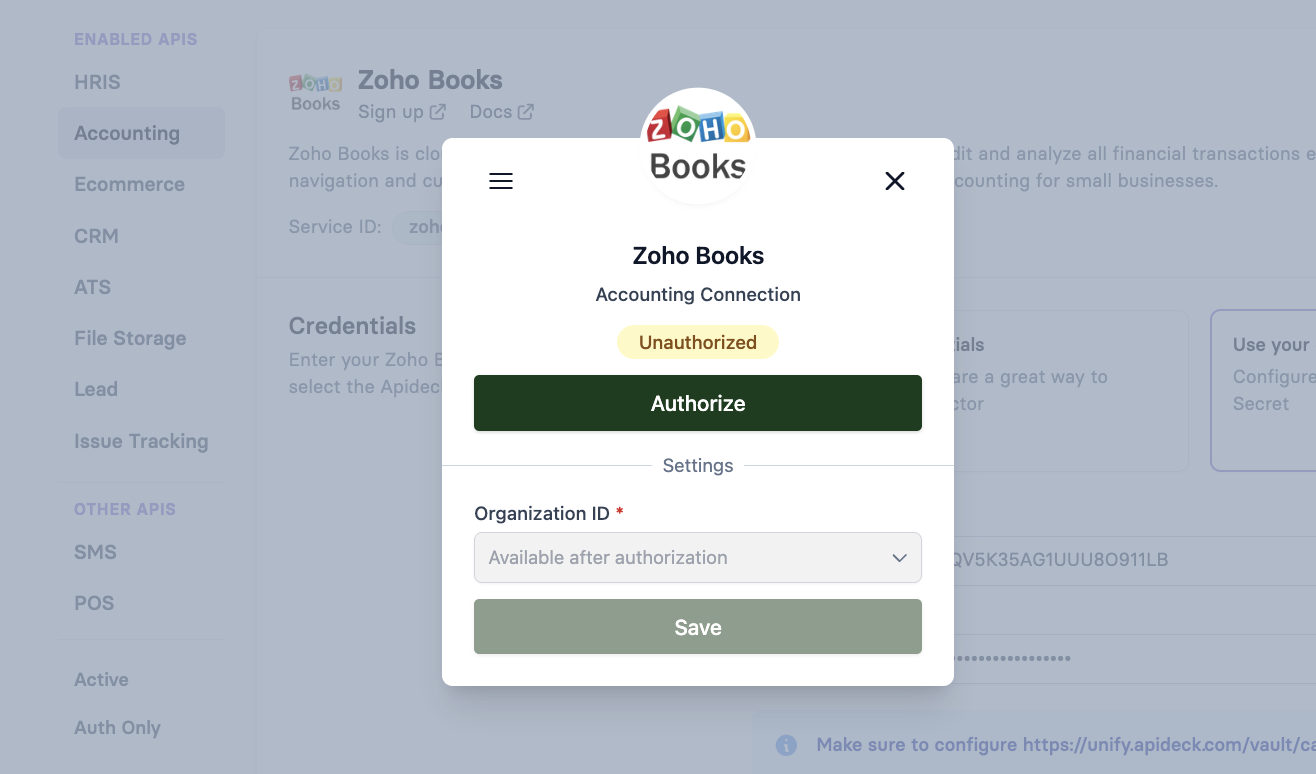
- You'll be redirected to Zoho to authorize the application access
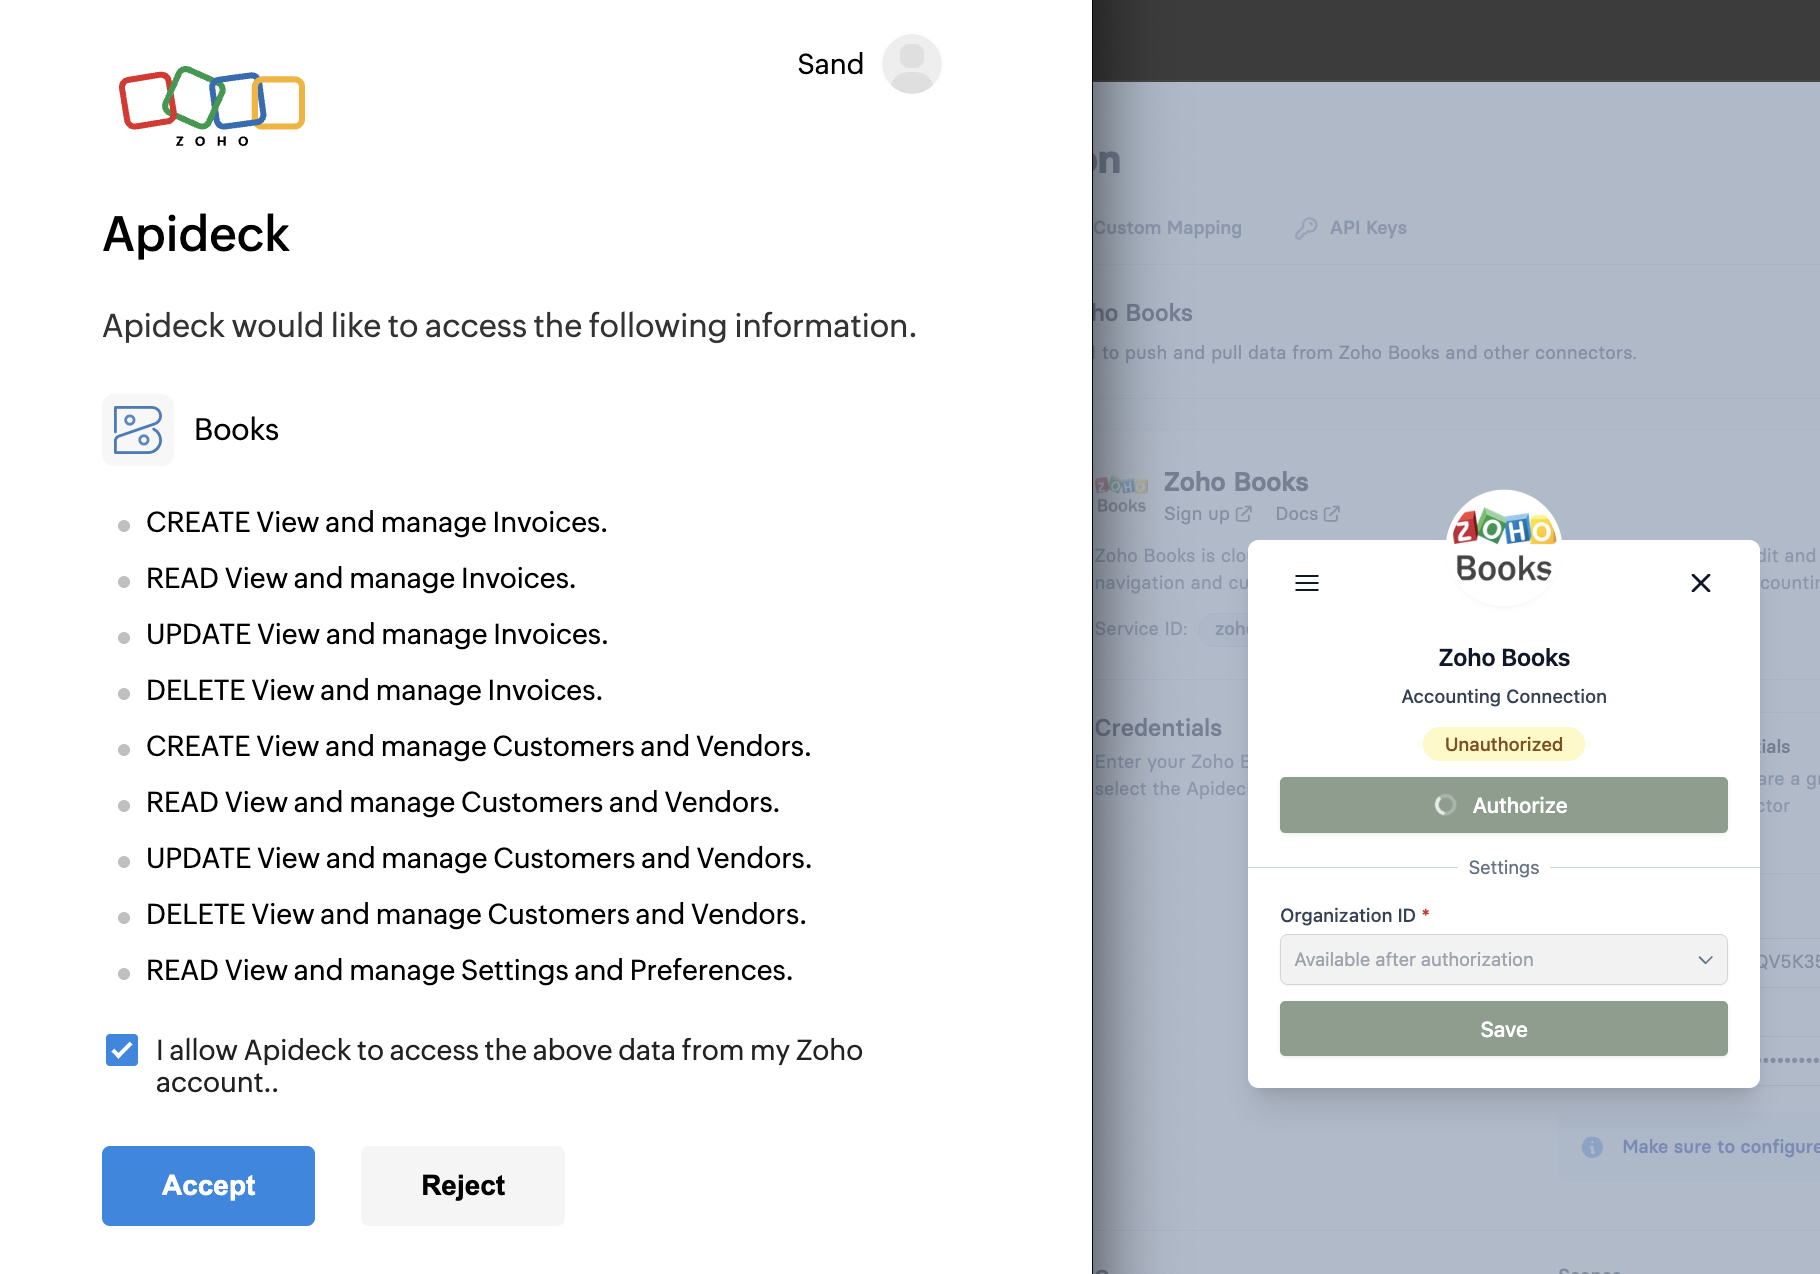
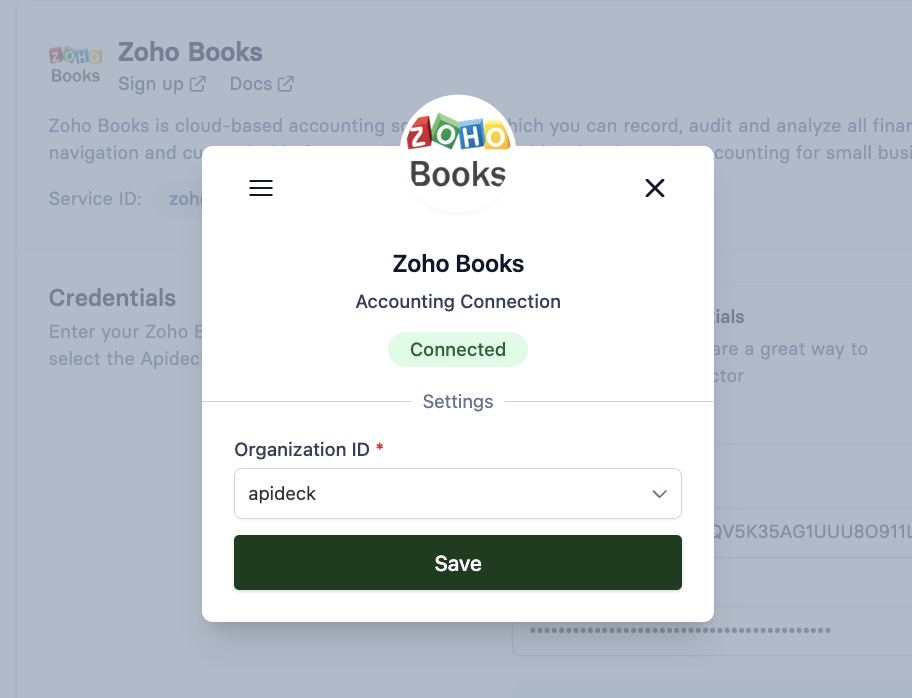
- After authorization, you'll be redirected back to Apideck where you can select your Organization ID from the dropdown
- Click "Save" and your connection status will change to Connected.
For development, authorize a dedicated test organization rather than one holding live books.
Do Your First API Call
- Test the connection by making a request to get invoices:
- Replace:
{APIDECK_APP_ID}with your Apideck application ID{APIDECK_API_KEY}with your Apideck API key
- You'll receive a list of invoices from your Zoho Books account
Configure Virtual Webhooks
Zoho Books changes reach your application through Apideck's virtual webhooks: Apideck polls Zoho Books on your behalf and emits unified events, so you do not have to register anything in Zoho Books.
How Virtual Webhooks Work
Apideck periodically checks for created, updated, and deleted records on the supported accounting resources and delivers them to your webhook endpoint. Polling defaults to every 24 hours, and the interval is configurable per resource. Tighten it for the resources that need fresher data.
Configure Webhooks in Apideck
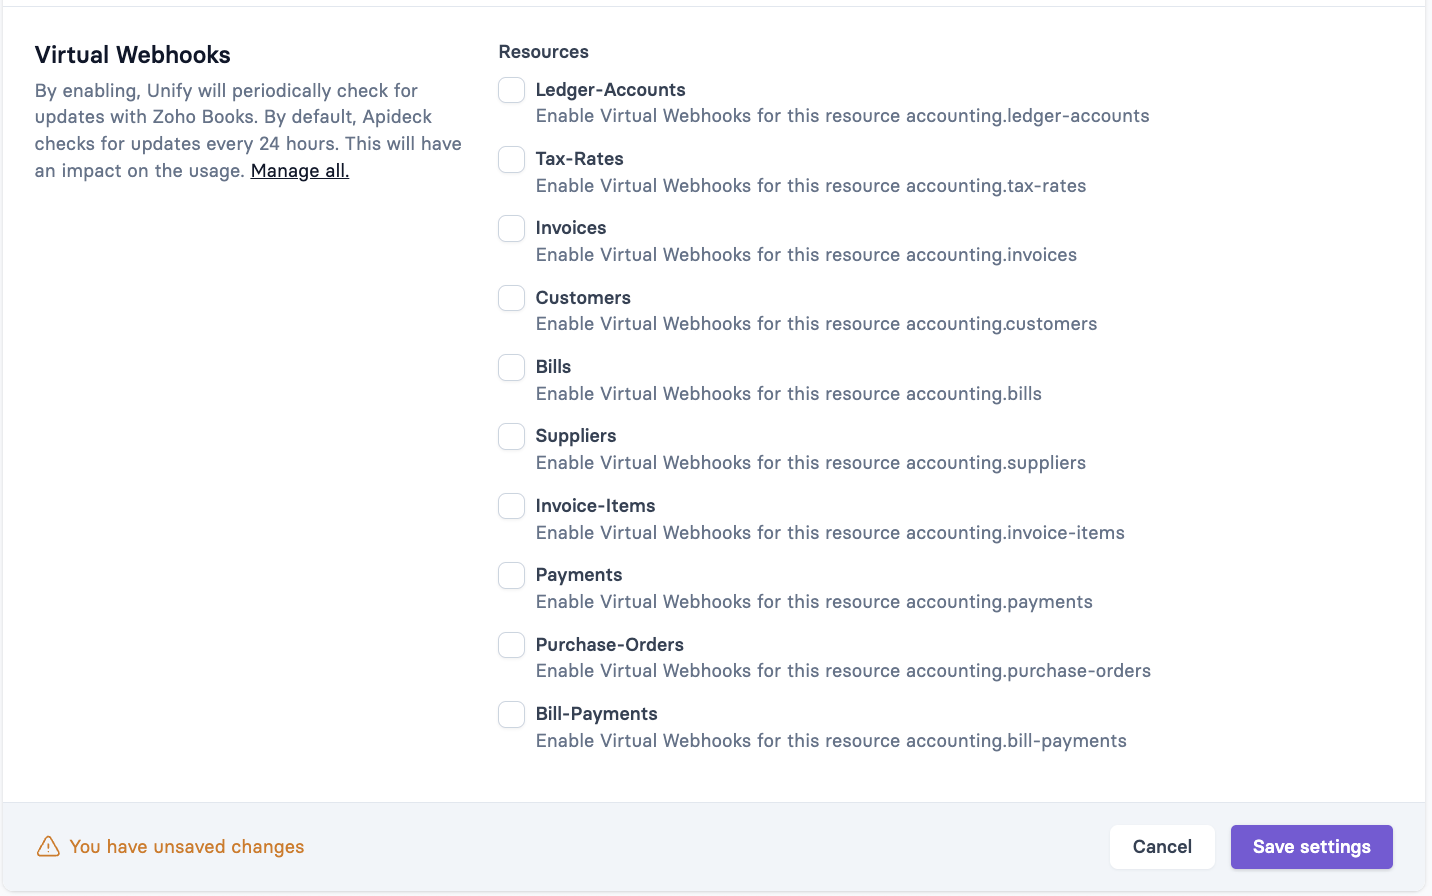
- Navigate to Apideck Dashboard > Configuration > Accounting > Zoho Books
- Scroll to the Webhooks section
- Enable virtual webhooks for the resources you want to receive notifications for
- Adjust the check interval per resource if the default is not frequent enough
- Save settings
Token Handling
Apideck manages the token lifecycle for every connection created with your OAuth app: you do not implement any of this. Two Zoho platform limits are worth knowing about when you debug an authorization:
- Authorization (grant) codes are single-use and valid for 2–3 minutes. An interrupted or replayed callback has to be restarted from the authorize step.
- Access-token minting is throttled per refresh token: Zoho issues at most 10 access tokens per refresh token in any 10-minute window and stores at most 15, invalidating the oldest beyond that. Apideck's automatic refresh operates within these limits.
FAQ and Troubleshooting
The redirect URI is rejected, or Zoho shows an invalid redirect uri error.
The Authorized Redirect URI in your Zoho client must be exactly https://unify.apideck.com/vault/callback, no trailing slash, no extra path, and https. Re-check it in the Zoho API Console under your client's settings.
A consumer gets an invalid client or unknown client error while everyone else connects fine. Their Zoho Books account is almost certainly in a data center you have not enabled, or that data center has its own Client Secret. Return to Step 5, enable the data center, and confirm the same-credentials option is selected.
The Organization ID dropdown is empty after authorization.
This happens when you chose Option 2 and ZohoBooks.settings.READ is not in your scope list: without it Apideck cannot list the consumer's organizations. Add it in the Apideck Dashboard, save, and have the consumer authorize again so the new scope is granted. Option 1 (ZohoBooks.fullaccess.all) already covers it.
A consumer wants to connect a second Zoho Books organization. Create a second connection and authorize it separately: one connection maps to one organization.
Do I need to change my scopes after adding a new resource to my integration? Only if you use Option 2. Adding a scope means existing connections must re-authorize before they can use it, because Zoho grants scopes at consent time.
Where do I check whether a connection is still healthy? Connection state and request logs are in the Apideck Dashboard. A consumer can revoke your app from their Zoho account at any time, which shows up as a failing connection that has to be re-authorized.
Still stuck? Contact Apideck Support, or check Zoho's own Zoho Books OAuth documentation.