# How to connect to Workday
To create a connection with Workday, you have to complete 2 steps.
1. [Create Integration System User](#1-create-integration-system-user-isu)
2. [Vault Connection Setup](#2-vault-connection-setup)
### Prerequisites
- **Admin access to Workday** - You need administrator privileges to create integration users and set up security permissions.
## 1. Create Integration System User (ISU)
The first step is to set up an Integration System User (ISU) in Workday. This way, your Apideck usage will be logged as one user. This also allows you to limit permissions to Apideck. Select only the required permissions for your integration use case.
If you encounter 403 errors when using Unify, ensure your ISU has enough permissions.
### Create Integration System User (ISU)
Navigate to the **Create Integration System User** task and configure a Workday user for Apideck.
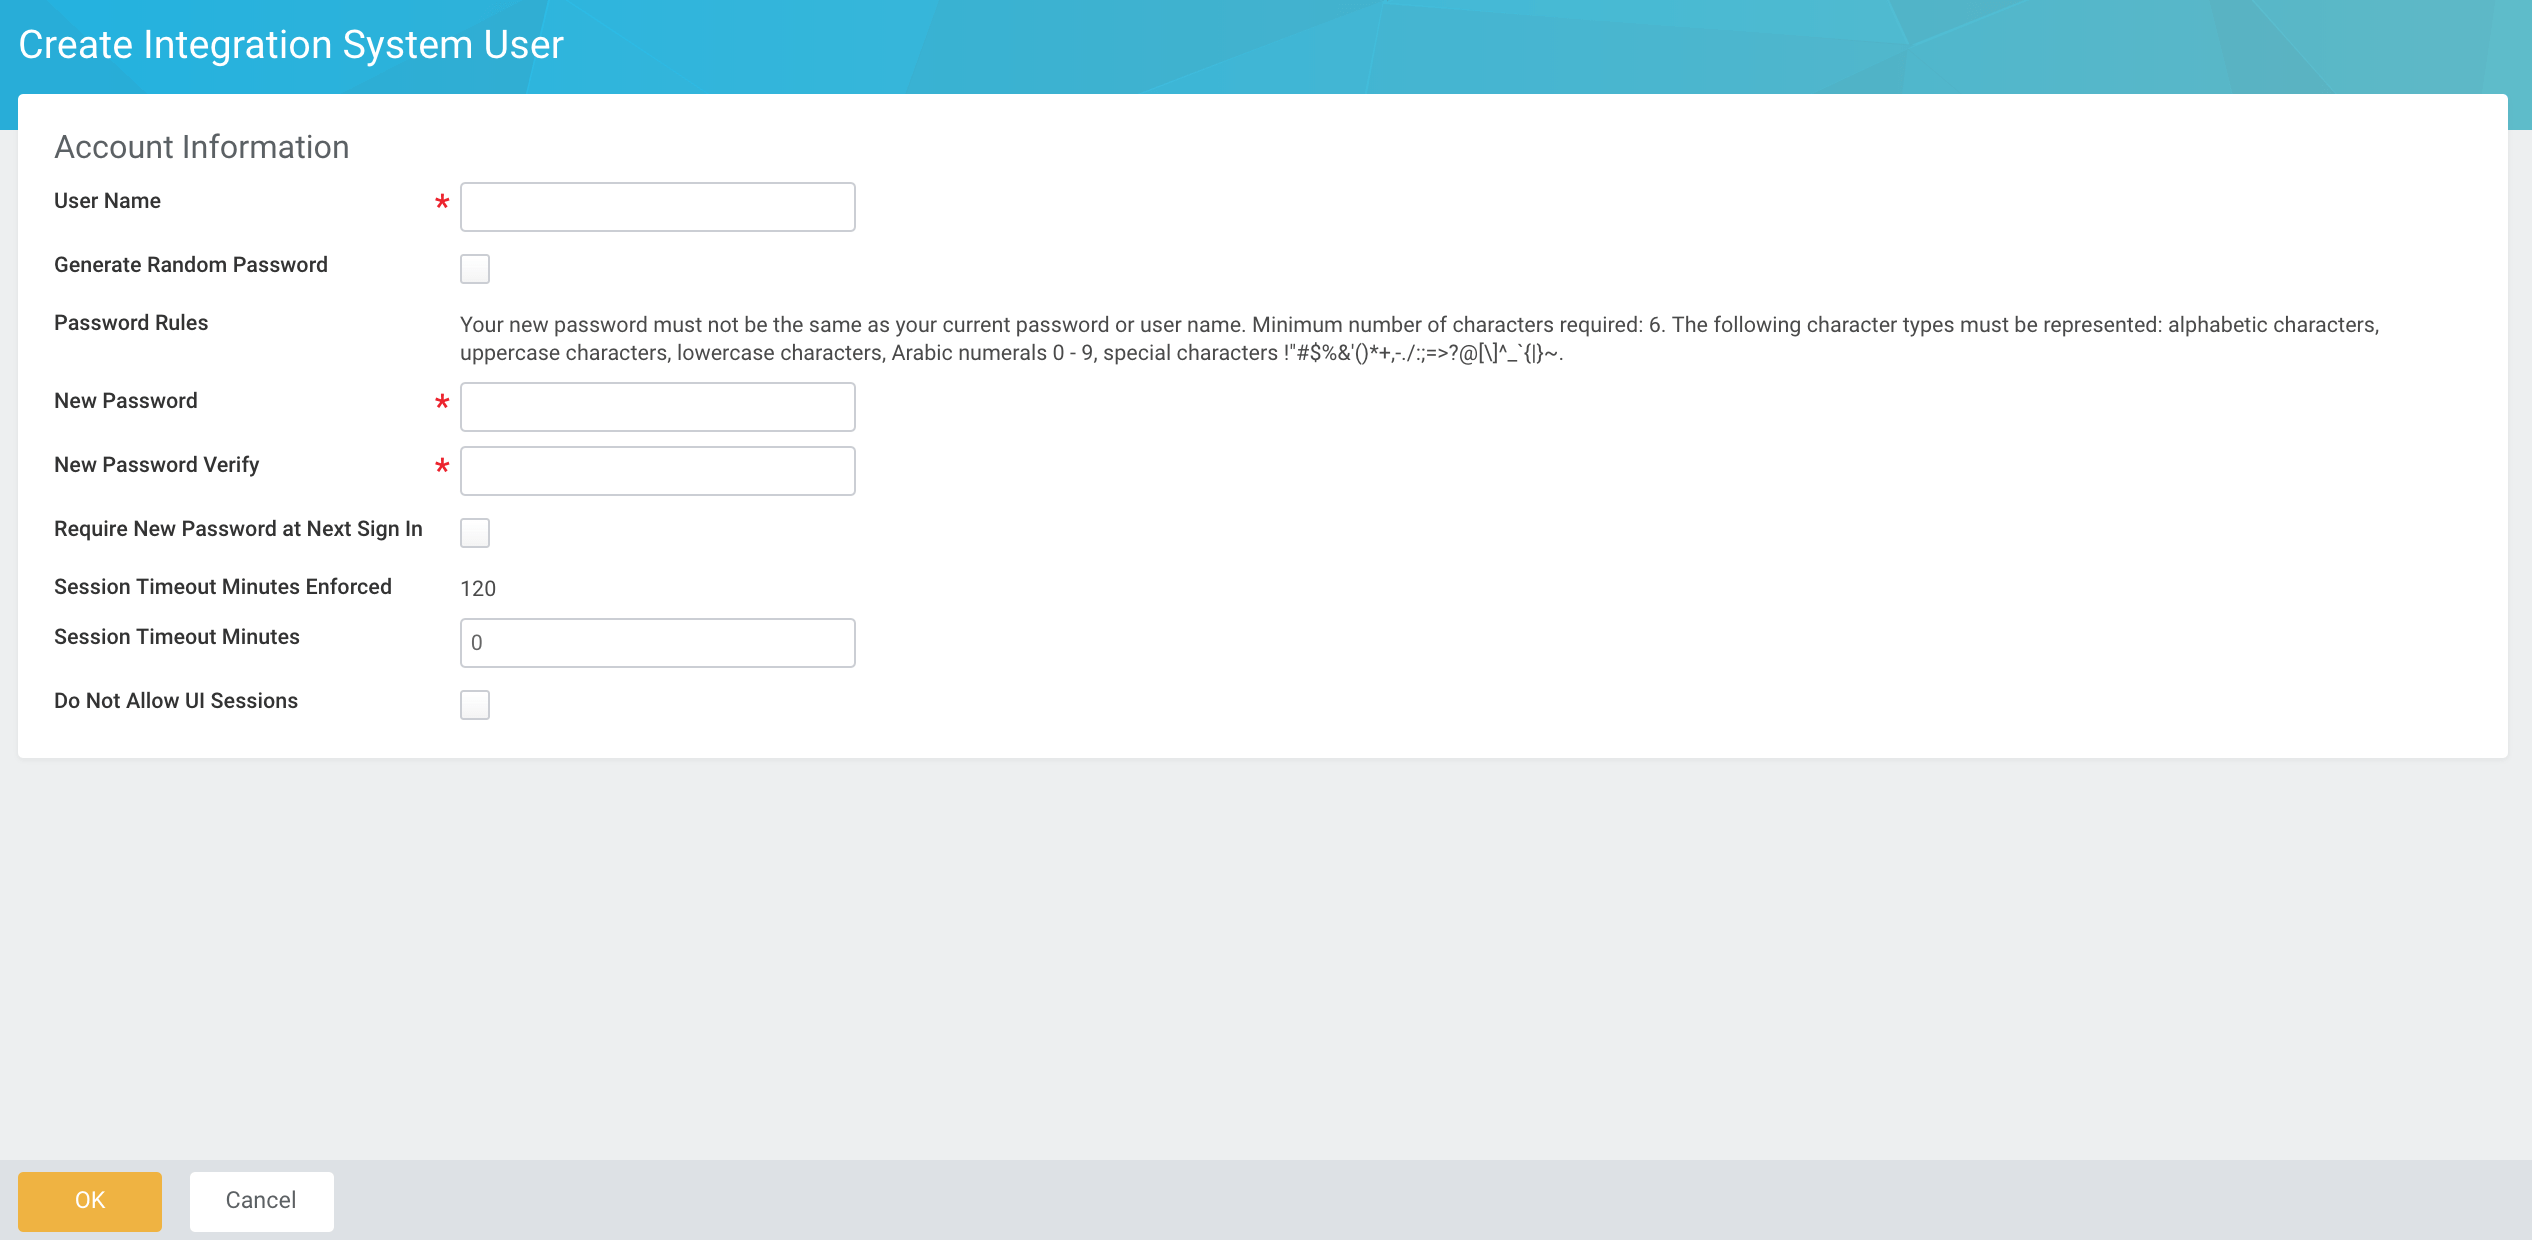
Set the Session Timeout Minutes to 0 to prevent session expiration.
Navigate to the **Maintain Password Rules** task and add the ISU to the System Users exempt from a password expiration.
Optionally, enable the **Do Not Allow UI Sessions** checkbox to block the ISU from logging in through the Workday UI.
### Create a Security Group
Navigate to the **Create Security Group** task in Workday to create an Integration System Security Group.
On the Create Security Group page, select `Integration System Security Group (Unconstrained)` from the Type of Tenanted Security Group pull-down menu.
Make sure to select the **Integration System User (ISU)** you created in the previous step.
### Grant permissions to the Security Group
The next step is to grant permissions to your newly created security group.
For each domain you want to grant access to:
1. Navigate to the **Maintain Permissions for Security Group**
2. Make sure the operation is **Maintain** and select your security group.

_Please note that the permissions listed below are suggested to access the full HRIS or ATS or Accounting Workday data. If you only want to use a subset of the data, you can limit the permissions to the required domains._
Required domains for the Workday **HRIS** integration:
- Person Data: Personal Data
- Person Data: Name
- Person Data: Home Contact Information
- Person Data: Work Contact Information
- Worker Data: Compensation
- Worker Data: Workers
- Worker Data: All Positions
- Worker Data: Current Staffing Information
- Worker Data: Public Worker Reports
- Worker Data: Employment Data
- Worker Data: Organization Information
- Worker Data: Time Off
- Worker Data: All Worker's Positions Past and Present
Required domains for the Workday **ATS** integration:
- Job Requisition Data
- Candidate Data: Job Application
- Candidate Data: Personal Information
- Candidate Data: Other Information
- Pre-Hire Process Data: Name and Contact Information
- Person Data: Personal Data
- Person Data: Name
- Person Data: Home Contact Information
- Person Data: Work Contact Information
- Manage: Location
- Worker Data: Public Worker Reports
Required domains for Workday **ACCOUNTING** integration:
#### Read operations
- Reports: Customer (Get_Customers)
- Process: Customer Invoice - View (Get_Customer_Invoices)
- Process: Customer Invoice (NEW)
- Set Up: Customer Categories
- Set Up: Revenue Categories
- Set Up: Spend Categories
- Set Up: Supplier Categories
- Process: Journals - View
- Process: Journals (NEW)
- Set Up: Accounts
- Reports: Supplier
- Manage: Organization Integration
- Set Up: Sale Item
- Set Up: Purchase Item
- Set Up: Bank Entity
- Process: Purchase Order - View
- Process: Supplier Invoice - View
- Set Up: Project Tracking
- Set Up: Tax
- Process: Customer Invoice Payment
- Process: Credit Card
- Process: Credit Card Files
#### Write Operations
**Make sure to grant both `get` and `put` access to the required domains**
1. Navigate to **Edit Business Process Security Policy**
2. Select **Business Process Type** mentioned below:
- For Invoice, **Customer Invoice Event**
- For Purchase Order, **Purchase Order Event**
- For Supplier, **Supplier Event**
- For Bills, **Supplier Invoice Event**
- For Customers, **Customer Event**
- For Projects, **Create Project**
3. Search for **Initiating Action**
- For Invoice, **Submit Customer Invoice (Web Service)**
- For Purchase Order, **Submit Purchase Order (Web Service)**
- For Supplier, **Submit Supplier (Web Service)**
- For Customer, **Submit Customer (Web Service)**
- For Bills, **Submit Supplier Invoice (Web Service)**
- For Projects, **Submit Project (Web Service)**
4. Select and add your security group to it
Also, grant access to the following security policies:
- Integration Build
- Integration Process
- Integration Debug
- Integration Event
Lastly, activate these permissions by navigating to the **Activate Pending Security Policy Changes** task.
## 2. Vault Connection Setup
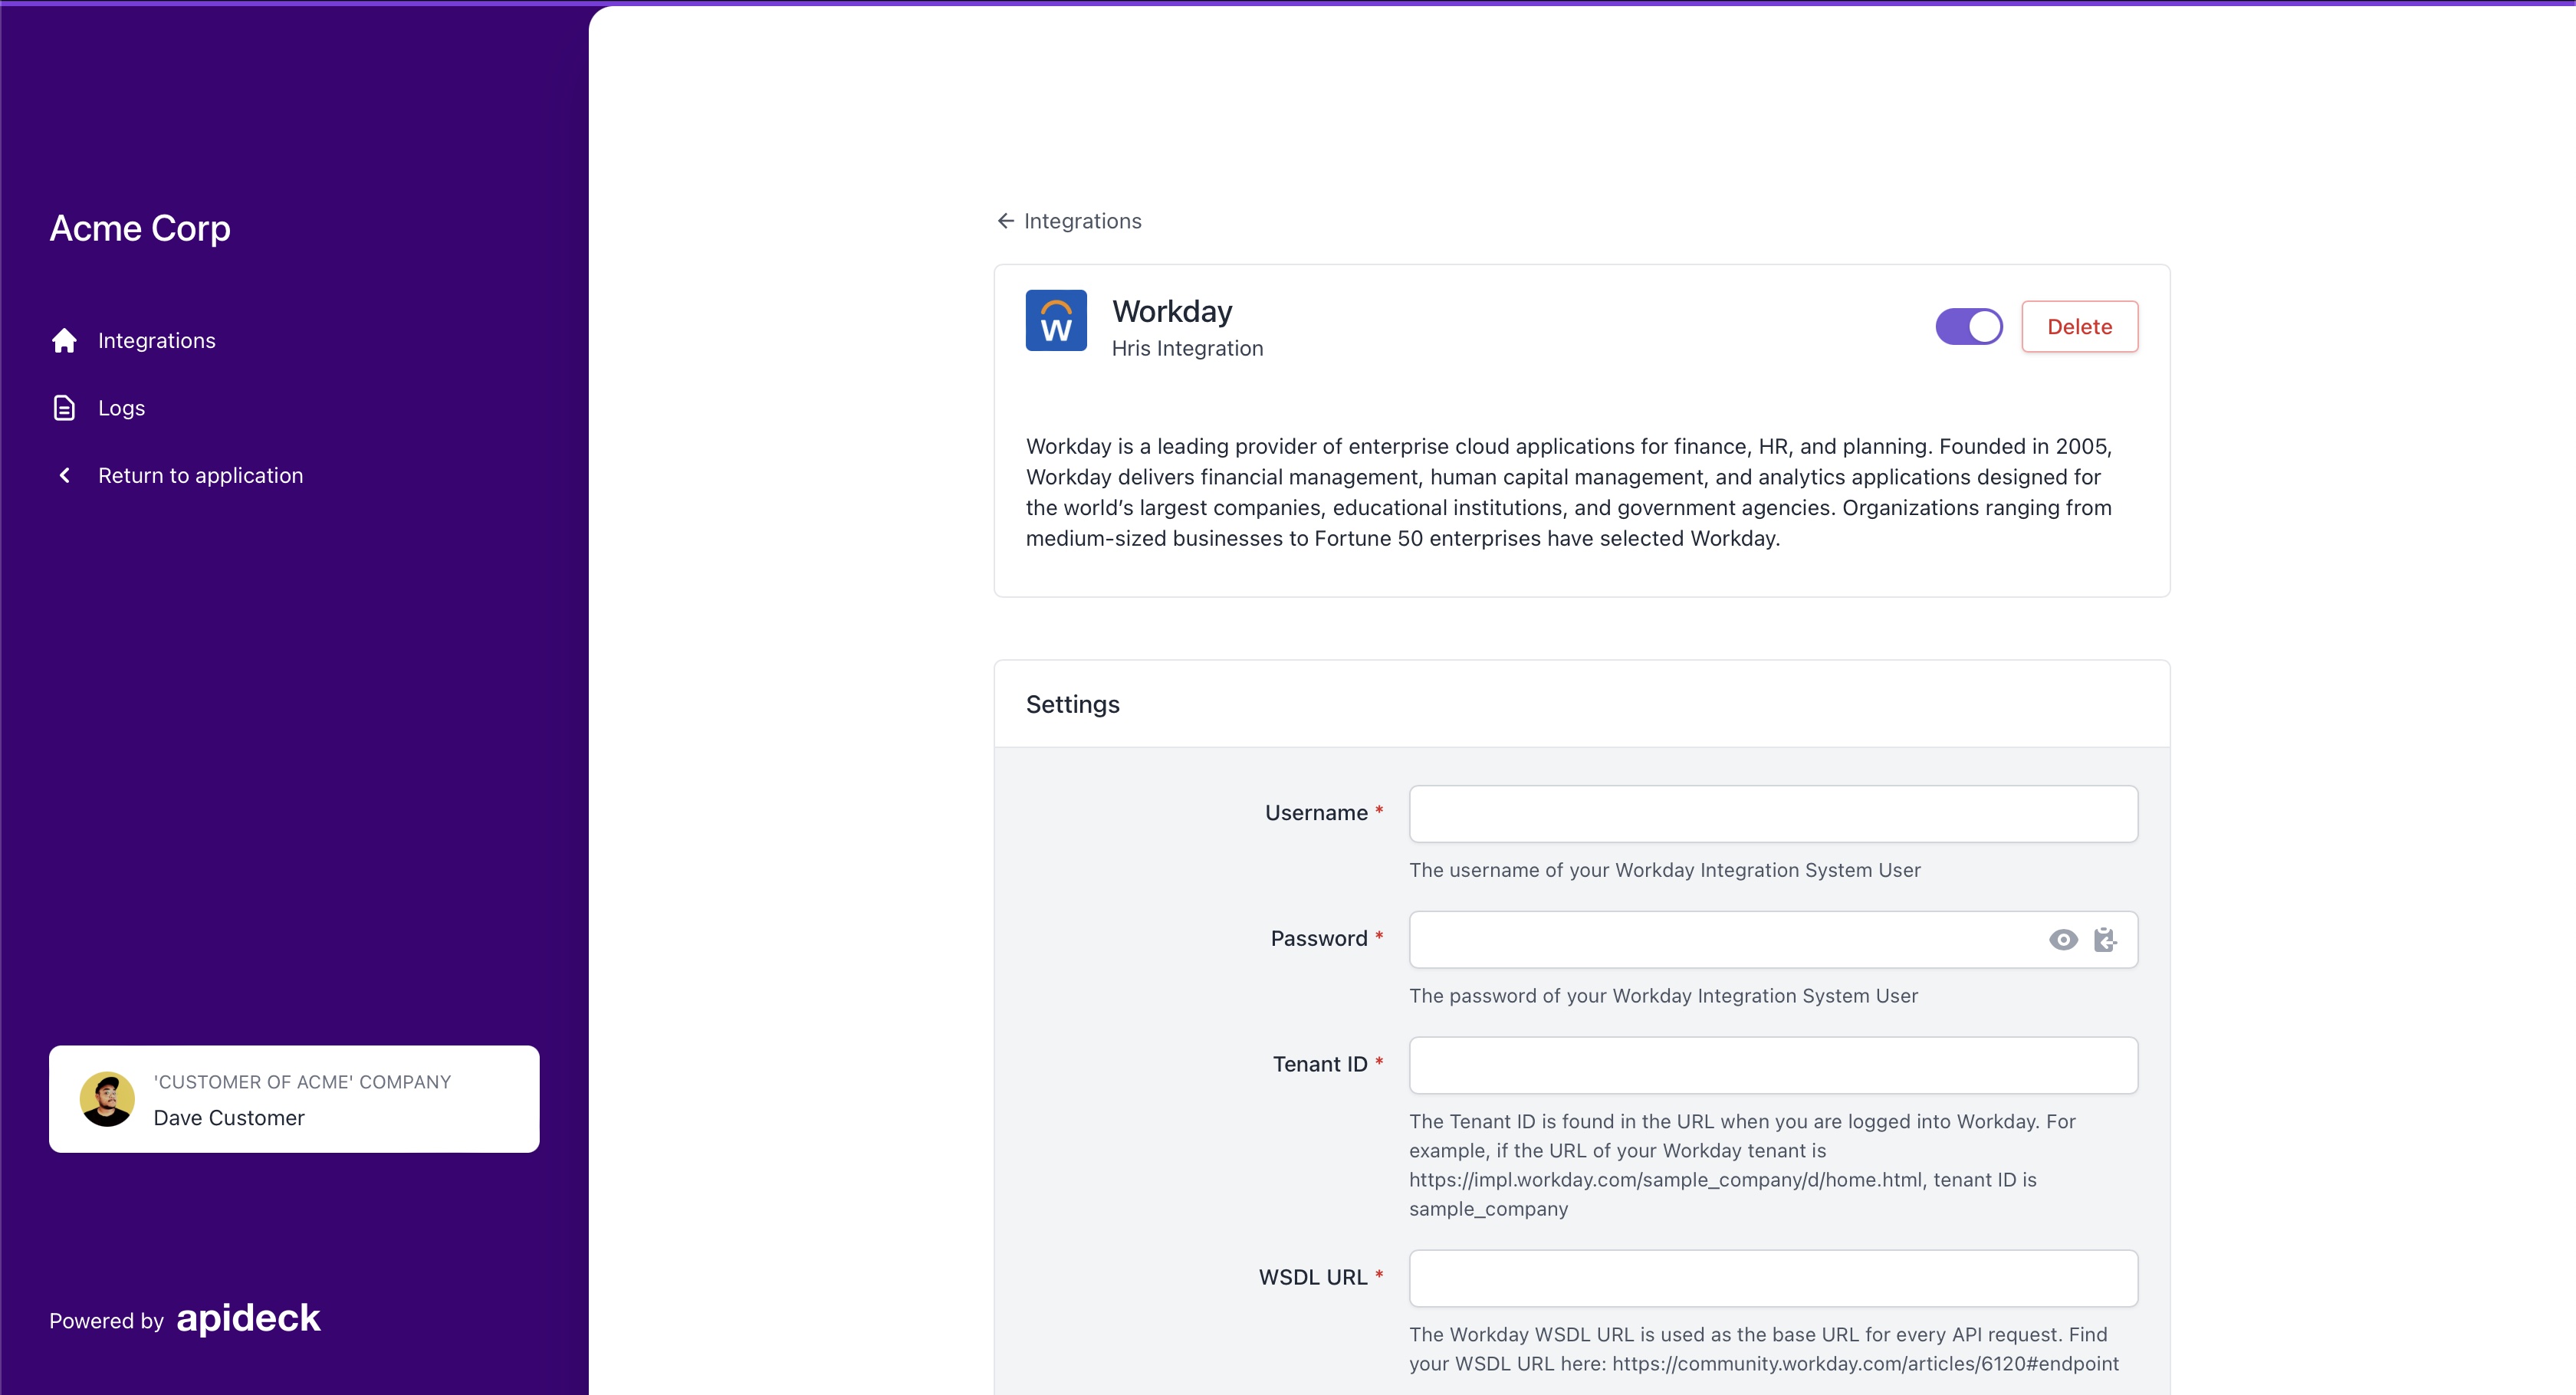
Now that you've created an ISU, you're ready to fill out your credentials in Vault.
| Field | Description |
| -------------------- | ------------------------------------------------------------------------------------------------------------------------------------------------------------------------------------------------------------------------------------------------------------------------------------------------------------------------------------------------------------------------------------------------------------------------------------------------------------------------------------------------------------------------------------------------------------------------------------------------------------------------------------------------------------------------------------------------------------------------------------------------------------------------------- |
| Username (required) | The username of your Workday Integration Services User (ISU) created in step 1 |
| Password (required) | The password of your Workday Integration Services User (ISU) created in step 1 |
| Tenant ID (required) | The Tenant ID is found in the URL when you are logged into Workday. For example, if the URL of your Workday UI is https://impl.workday.com/sample_company/d/home.html, your tenant ID is sample_company |
| WSDL URL (required) | The Workday WSDL URL is used as the base URL for every API request. To find your WSDL URL:
1. Login to Workday with a user that has access to the Public Web Services report.
2. Search for `Public Web Services` and click the Public Web Services report.
3. Click on the `Human Resources (Public)` > Web Service > View WSDL.
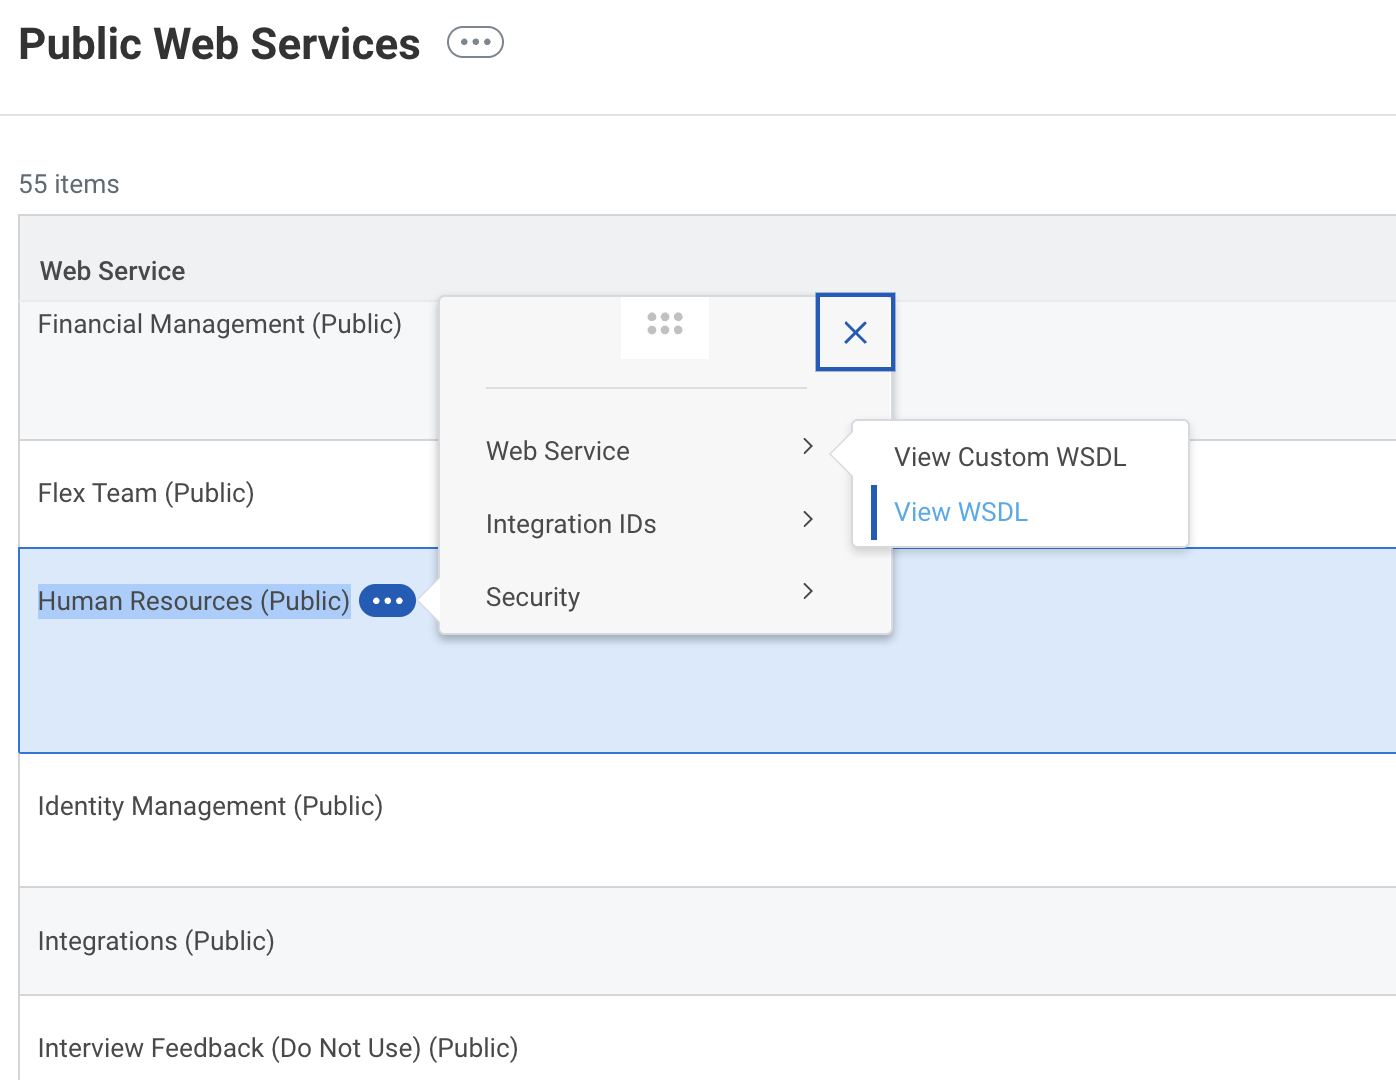
4. Scroll down to the bottom of the page and you will find the service endpoint in the @location attribute within the `soapbind:address` element.
 |
Click **Save** after completing the form. Your Workday account is now connected.