How to connect to Paychex
As a client of Paychex, you can create and manage your application used for connecting to your Paychex Flex data.
Step 1: Prerequisites
Before you begin, make sure you have the following:
- A Paychex account with permissions to manage connected applications. This is available to users that have a role such as a Super Admin or a Security Admin.
Step 2: Login into Paychex
- Navigate to the Paychex Flex login.
- Sign in with your Paychex account.
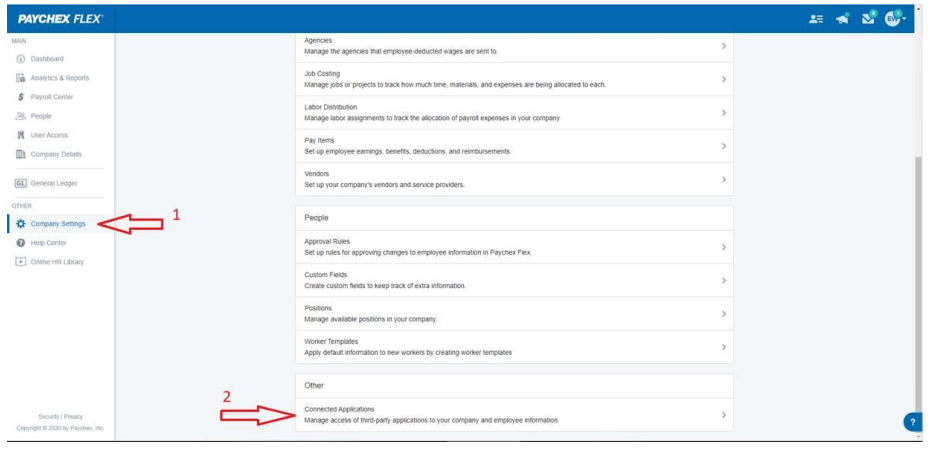
- Navigate to Company Settings -> Connected Applications

Advanced: If you plan on creating a solution that involves several other client ID’s, it’s a good idea to decide under which client account you want to ‘Manage’ the entire integration on. This is the one that you create the app on and start with (also referred to as a 'Parent' account), then after creation, you can link other 'Child' accounts to this app, as needed.
Step 3: Create an app
Click Create 'Create App’ in your Paychex Flex account. Just name your app, give it a brief description and choose the access levels to the data you want to share.
Keep the Client ID and secret stored for the next steps.
Step 4: Vault Connection Setup
Go back to Vault to paste the API key. Now that you've created an API key with access to your Paychex data, you can fill out your credentials in Vault.
Click Save after completing the form. If the Client ID and secret is correctly configured, it will validate the connection and show a success message.
Your Paychex account is now connected 🎉.
Need more information? Visit: https://developer.paychex.com/client