## Connect to NetSuite
This guide will walk you through the process of setting up NetSuite User Roles to get Access Tokens using Token-Based Authentication. Access tokens are used to authenticate requests to NetSuite APIs, which enables you to integrate NetSuite with other applications.
By following these steps, you can grant specific NetSuite User Roles access to generate Access Tokens and use them to access NetSuite APIs securely.
**Steps:**
1. [Create a role with the right permissions](#create-a-new-user-role)
2. [Assign the role to a new user](#assign-a-user)
3. [Create an application](#create-application-for-a-consumer-key-&-secret)
4. [Create access tokens](#create-access-tokens)
5. [Find your Account ID](#find-your-account-id)
6. [Configure the Netsuite connection](#configure-the-netsuite-connection)
Info: This guide assumes you have a basic understanding of NetSuite and its interface.
### Create a new User role
To grant access to the Netsuite, you need to create a user role to get Access Tokens using Token-Based Authentication
1. User Roles to get Access Tokens using Token-Based Authentication:
2. Log in to your NetSuite account as an administrator.
3. Go to **Setup** > **Users/Roles** > **Manage Roles**.
4. Click on the 'New' button to create a new role.
Give the role a name (e.g. _Integration Role_).
5. Under the 'Permissions' tab, select the appropriate permissions that you want to grant to this role.
Note that the role must have the necessary permissions to perform the tasks that the integration will be used for.
We recommend to review the permission levels for the various sections:
For "Transactions","Lists" we recommend to set the permission to "View" to allow reading data and "Full" to allow creating and/or modifying data.
For "Lists","Currencies" we recommend to set the permission to "View" to allow reading data and "Full" to allow creating and/or modifying data.
For "Setup", the only option is "None" or "Full", please set it to "Full" to grant access to the Netsuite instance.
For more details about the Netsuite permission levels, please refer to the [Access Levels page](https://system.netsuite.com/app/help/helpcenter.nl?fid=section_1550000000.html) in NetSuite Help Center.
**Important for Projects Functionality**: To enable customer-to-project mapping and full project management features, ensure the following permissions are granted:
- **Lists > Projects**: Required for accessing job/project records
- **Transactions > Time Entry/Time Tracking**: Needed for project time management
- **Lists > Customers**: Required for customer-project relationship mapping
**Important for Financial Reports (Profit & Loss, Balance Sheet)**: These reports use the SOAP `getPostingTransactionSummary` API which only requires "Financial Statements" permission. Ensure the following permission is granted:
- **Reports > Financial Statements**: View access required for financial report queries
- **Lists > Accounts**: View access for chart of accounts data (used for account name enrichment)
**Transactions**
| TRANSACTIONS PERMISSION | LEVEL |
| --------------------------------------- | --------- |
| Access Payment Audit Log | View/Full |
| Audit Trail | View/Full |
| Automated Cash Application | View/Full |
| Bill Purchase Orders | View/Full |
| Bills | View/Full |
| Calculate Time | View/Full |
| Cash Sale | View/Full |
| Cash Sale Refund | View/Full |
| Check | View/Full |
| Credit Card | View/Full |
| Credit Card Refund | View/Full |
| Credit Memo | View/Full |
| Credit Returns | View/Full |
| Customer Deposit | View/Full |
| Customer Payment | View/Full |
| Customer Refund | View/Full |
| Deposit | View/Full |
| Deposit Application | View/Full |
| Edit Forecast | View/Full |
| Enter Opening Balances | View/Full |
| Enter Vendor Credits | View/Full |
| Estimate | View/Full |
| Expense Report | View/Full |
| Finance Charge | View/Full |
| Find Transaction | View/Full |
| Fulfill Orders | View/Full |
| Generate Price Lists | View/Full |
| Generate Statements | View/Full |
| Import Online Banking File | View/Full |
| Invoice | View/Full |
| Invoice Approval | View/Full |
| Invoice Sales Orders | View/Full |
| Item Fulfillment | View/Full |
| Item Receipt | View/Full |
| Make Journal Entry | View/Full |
| Matching Rules for Online Banking | View/Full |
| Opportunity | View/Full |
| Pay Bills | View/Full |
| Payments | View/Full |
| Pay Sales Tax | View/Full |
| Post Vendor Bill Variances | View/Full |
| Posting Period on Transactions | View/Full |
| Purchase Order | View/Full |
| Receive Order | View/Full |
| Receive Returns | View/Full |
| Reconcile | Edit |
| Refund Returns | View/Full |
| Return Auth. Approval | View/Full |
| Return Authorization | View/Full |
| Sales Order | View/Full |
| Sales Order Approval | View/Full |
| Set Up Budgets | View/Full |
| Statement Charge | View/Full |
| System Journal | View/Full |
| Timer | View/Full |
| Time Entry | View/Full |
| Time Tracking | View/Full |
| Track Time | View/Full |
| Transfer Funds | View/Full |
| Vendor Bill Approval | View/Full |
| Vendor Payment Approval | View/Full |
| Vendor Return Auth. Approval | View/Full |
| Vendor Return Authorization | View/Full |
| Vendor Returns | View/Full |
| View Gateway Asynchronous Notifications | View/Full |
| View Payment Events | View/Full |
**Reports**
| REPORTS PERMISSIONS | LEVEL |
| ----------------------- | ----- |
| SuiteAnalytics Workbook | Edit |
| Financial Statements | View |
**List**
| LISTS PERMISSIONS | LEVEL |
| ------------------- | --------- |
| Accounts | View/Full |
| Classes | View/Full |
| Companies | View/Full |
| Contacts | View/Full |
| Currency | View/Full |
| Customers | View/Full |
| Documents and Files | View/Full |
| Departments | View/Full |
| Items | View/Full |
| Locations | View/Full |
| Projects | View/Full |
| Subsidiaries | View/Full |
| Tax Records | View/Full |
| Vendors | View/Full |
**Setup**
| SETUP PERMISSIONS | LEVEL |
| -------------------------- | ----- |
| Accounting Lists | Full |
| Accounting Management | Full |
| Deleted Records | Full |
| Log in using Access Tokens | Full |
| Other Lists | Full |
| REST Web Services | Full |
| SOAP Web Services | Full |
> **Note**: Financial reports (Profit & Loss, Balance Sheet) use the SOAP `getPostingTransactionSummary` API which only requires the **Financial Statements** permission under Reports. This is a less restrictive permission than SuiteQL which requires "SuiteAnalytics Workbook". Without Financial Statements permission, these endpoints will return 401 Unauthorized errors.
### Assign a user to the role
It is recommended that you create a separate user for this purpose instead of assigning the role to an existing user. It helps with better tracking and auditing operations.
1. Click **Lists > Employees > New**
2. Enter the employee details (e.g. _Integration User_), and email address.

3. Click **Access** tab

- select **Give Access**.
- Enable **Manually Assign or Change Password** and specify a password.
4. Under **Roles**, select the role that you created in Step "[Create a new User role](#create-a-new-user-role)" from the drop down list (e.g. _Integration Role_) and click **Add**.

### Create an Application
Once the role is set up, you can follow these steps to generate the consumer Key & Secret:
1. Log in to your NetSuite account with a user who has been assigned the role (e.g _Integration Role_) that has access.
2. Go to **Setup** > **Integrations** > **Manage integrations**.
 3. Click the 'New' button to create a new integration or select an existing integration that you want to use.

- **Name**: Enter a meaningful name (for example, _Integration App_)
- **Authentication**: Under the 'Authentication' section,
- select '**Token-Based Authentication**.'
- For **TBA: Authorization flow** set `https://unify.apideck.com/vault/callback` as callback URL.
- **Oauth 2.0**: Under the 'Oauth 2.0\*\*' section,
- Check "**Authorization Code grant**"
- Check "**REST API service**s"
- Set `https://unify.apideck.com/vault/callback` as the **redirect URI.**
Click the 'Save' button to save the changes.
4. Once saved, the Consumer Key and Consumer Secret will be generated.
**💡 REMARK**: Copy the "Consumer Key" and the "Consumer secret". You can not access this information once you exit this screen.
### Create Access tokens
Create a New Access Token with the Role just created.
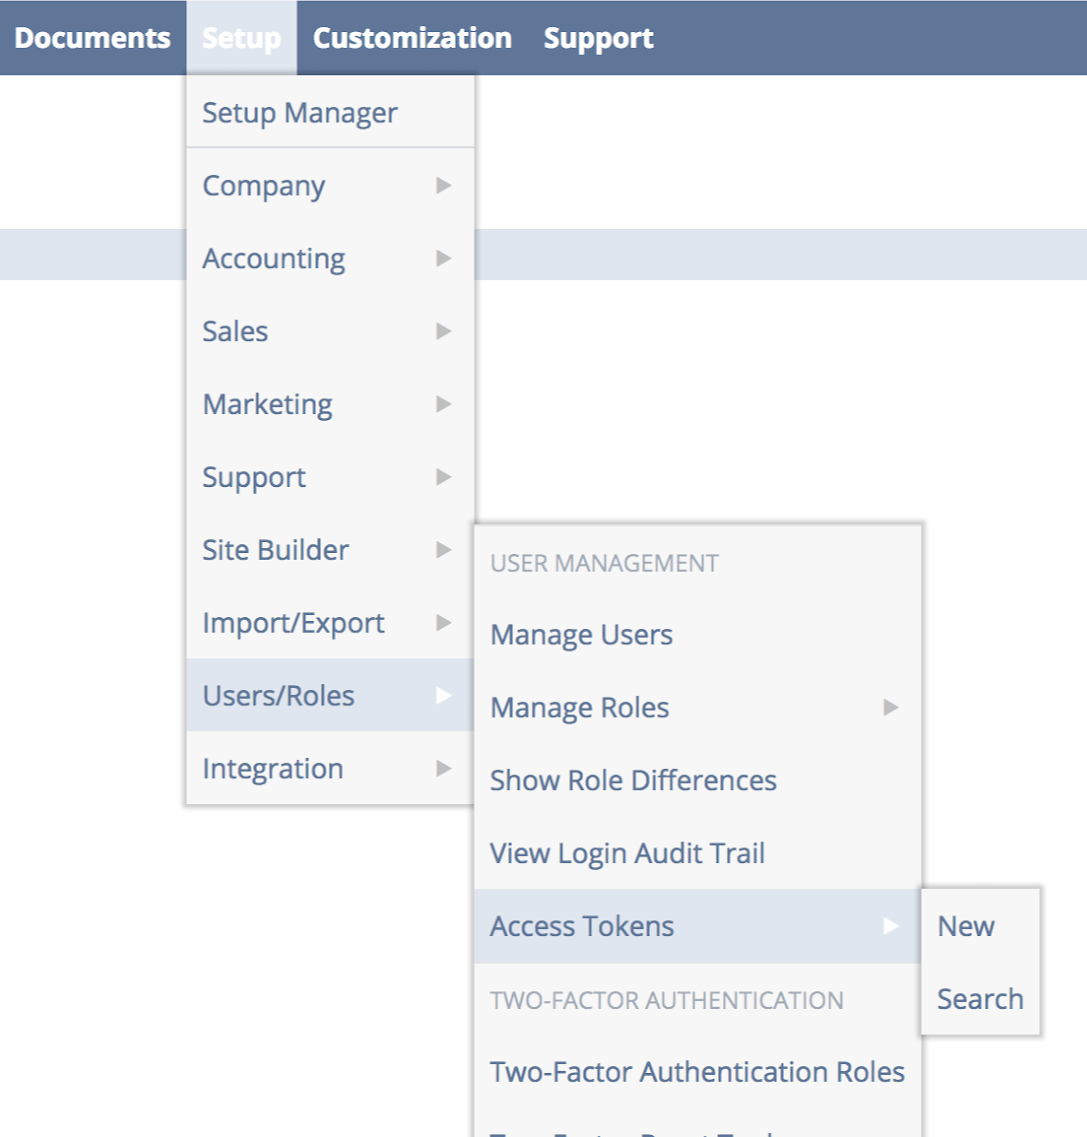
1. Go to **Setup** > **Users/Roles** > **Access Tokens**.
3. Click the 'New' button to create a new integration or select an existing integration that you want to use.

- **Name**: Enter a meaningful name (for example, _Integration App_)
- **Authentication**: Under the 'Authentication' section,
- select '**Token-Based Authentication**.'
- For **TBA: Authorization flow** set `https://unify.apideck.com/vault/callback` as callback URL.
- **Oauth 2.0**: Under the 'Oauth 2.0\*\*' section,
- Check "**Authorization Code grant**"
- Check "**REST API service**s"
- Set `https://unify.apideck.com/vault/callback` as the **redirect URI.**
Click the 'Save' button to save the changes.
4. Once saved, the Consumer Key and Consumer Secret will be generated.
**💡 REMARK**: Copy the "Consumer Key" and the "Consumer secret". You can not access this information once you exit this screen.
### Create Access tokens
Create a New Access Token with the Role just created.
1. Go to **Setup** > **Users/Roles** > **Access Tokens**.
 2. Click the 'New' button to create a new Access token
3. Complete the form

- Select the "**Application name**" that you have created in the previous step (e.g. _Integration App_).
- Select the "**User**", which we created in the previous steps (e.g. _Integration User_)
- Give the token a recognizable "**token name**", for example _Integration Token_
- Click the 'Save' button to save the changes.
4- Once saved, the Account **Token ID** and **Secret** will be generated.
**💡 REMARK**: Copy the "Token Id" and the "Token secret". You can not access this information once you exit this screen.
### Find your Account ID
1. Go to **Setup** > **Company** > **Company Information**
2. Copy the Account ID

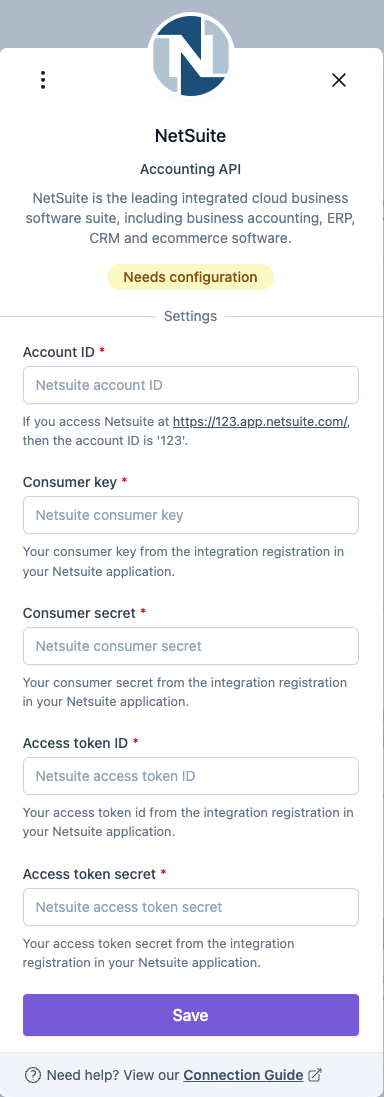
### Configure the Netsuite connection
Enter the Account ID, Consumer Key, Consumer Secret, Token ID and Token Secret to get started with the integration.
2. Click the 'New' button to create a new Access token
3. Complete the form

- Select the "**Application name**" that you have created in the previous step (e.g. _Integration App_).
- Select the "**User**", which we created in the previous steps (e.g. _Integration User_)
- Give the token a recognizable "**token name**", for example _Integration Token_
- Click the 'Save' button to save the changes.
4- Once saved, the Account **Token ID** and **Secret** will be generated.
**💡 REMARK**: Copy the "Token Id" and the "Token secret". You can not access this information once you exit this screen.
### Find your Account ID
1. Go to **Setup** > **Company** > **Company Information**
2. Copy the Account ID

### Configure the Netsuite connection
Enter the Account ID, Consumer Key, Consumer Secret, Token ID and Token Secret to get started with the integration.