Apideck Integration Connectivity Bundle: Setup Guide
This guide walks you through installing the Apideck Integration Connectivity bundle (ID: 705521) in your NetSuite account and connecting it to Apideck Vault. The bundle replaces the lengthy manual setup: instead of building a role from scratch and creating your own Integration Record, the bundle installs everything automatically in about a minute.
Because the Integration Record it installs is already configured with Apideck's Consumer Key and Secret, you supply only your own account-side credentials: 3 fields instead of 5. NetSuite uses Token-Based Authentication, so there is no authorize-and-redirect step: you create the access token yourself in the NetSuite UI and paste it into Vault.
Watch the full setup walkthrough: Loom video
What you need:
- NetSuite Administrator access
- Access to Apideck Vault
What the bundle installs:
| Object | What it does |
|---|---|
| Role: Apideck Unify | A web-services-only role carrying the core 39 permissions for the standard Apideck accounting resources |
| Integration Record: Apideck Unify | Pre-configured for Token-Based Authentication using Apideck's shared credentials |
No SuiteScripts, no custom records, no other changes to your account.
Permissions installed on the Apideck Unify role:
| Area | Permission | Level |
|---|---|---|
| Setup | Log in using Access Tokens | Full |
| Setup | SOAP Web Services | Full |
| Setup | REST Web Services | Full |
| Setup | Accounting Lists | Full |
| Setup | Allow JS/HTML Uploads | Full |
| Setup | Manage Accounting Periods | Full |
| Setup | Accounting Management | Full |
| Setup | Deleted Records | Full |
| Setup | Other Lists | Full |
| Reports | SuiteAnalytics Workbook | Edit |
| Reports | Financial Statements | View |
| Lists | Accounts | Full |
| Lists | Classes | Full |
| Lists | Currency | Full |
| Lists | Customers | Full |
| Lists | Departments | Full |
| Lists | Documents and Files | Full |
| Lists | Employee Records | Full |
| Lists | Expense Categories | Full |
| Lists | Items | Full |
| Lists | Locations | Full |
| Lists | Projects | Full |
| Lists | Subsidiaries | Full |
| Lists | Tax Records | Full |
| Lists | Vendors | Full |
| Transactions | Bills | Full |
| Transactions | Credit Card Charge | Full |
| Transactions | Credit Memo | Full |
| Transactions | Customer Payment | Full |
| Transactions | Estimate | Full |
| Transactions | Expense Report | Full |
| Transactions | Find Transaction | View |
| Transactions | Invoice | Full |
| Transactions | Make Journal Entry | Full |
| Transactions | Pay Bills | Full |
| Transactions | Customer Refund | Full |
| Transactions | Cash Sale Refund | Full |
| Transactions | Credit Card Refund | Full |
| Transactions | Purchase Order | Full |
NetSuite filters records a role cannot see instead of returning an error, so a list call for a resource whose permission is missing answers
200 OKwith an emptydataarray: the connection looks healthy and returns nothing. On a SuiteTax account, tax-rate reads useLists → Sales Tax Itemsinstead (see the optional features table below).
Extra permissions for optional features (add manually to the Apideck Unify role after installing):
| Feature | Permission | Category | Level |
|---|---|---|---|
| Bank feeds | Custom Record Entries | Lists | Full |
| Bank feeds | Custom Record Types | Setup | Full |
| Bank feeds | SuiteScript | Setup | Full |
| SuiteTax accounts, UK, EU, and other VAT regions (per-line tax on expenses) | Tax Details Tab | Lists | Full |
| SuiteTax-enabled accounts (tax-rate reads) | Sales Tax Items | Lists | Full |
Bank feeds requires its own separate Apideck bundle (installed separately from bundle 705521). See the Apideck Bank Feed for NetSuite setup guide for the full installation steps, including these role permissions.
On a SuiteTax account? SuiteTax is supported, but the connection has to know about it: set the SuiteTax enabled setting to Yes in Step 5 so tax-rate data is read from NetSuite's sales tax items, which is why a SuiteTax-enabled account also needs the
Lists → Sales Tax Itemspermission above. See Optional connection settings in the Connection Guide.
Step 1: Install the bundle
-
Log in to NetSuite as an Administrator.
-
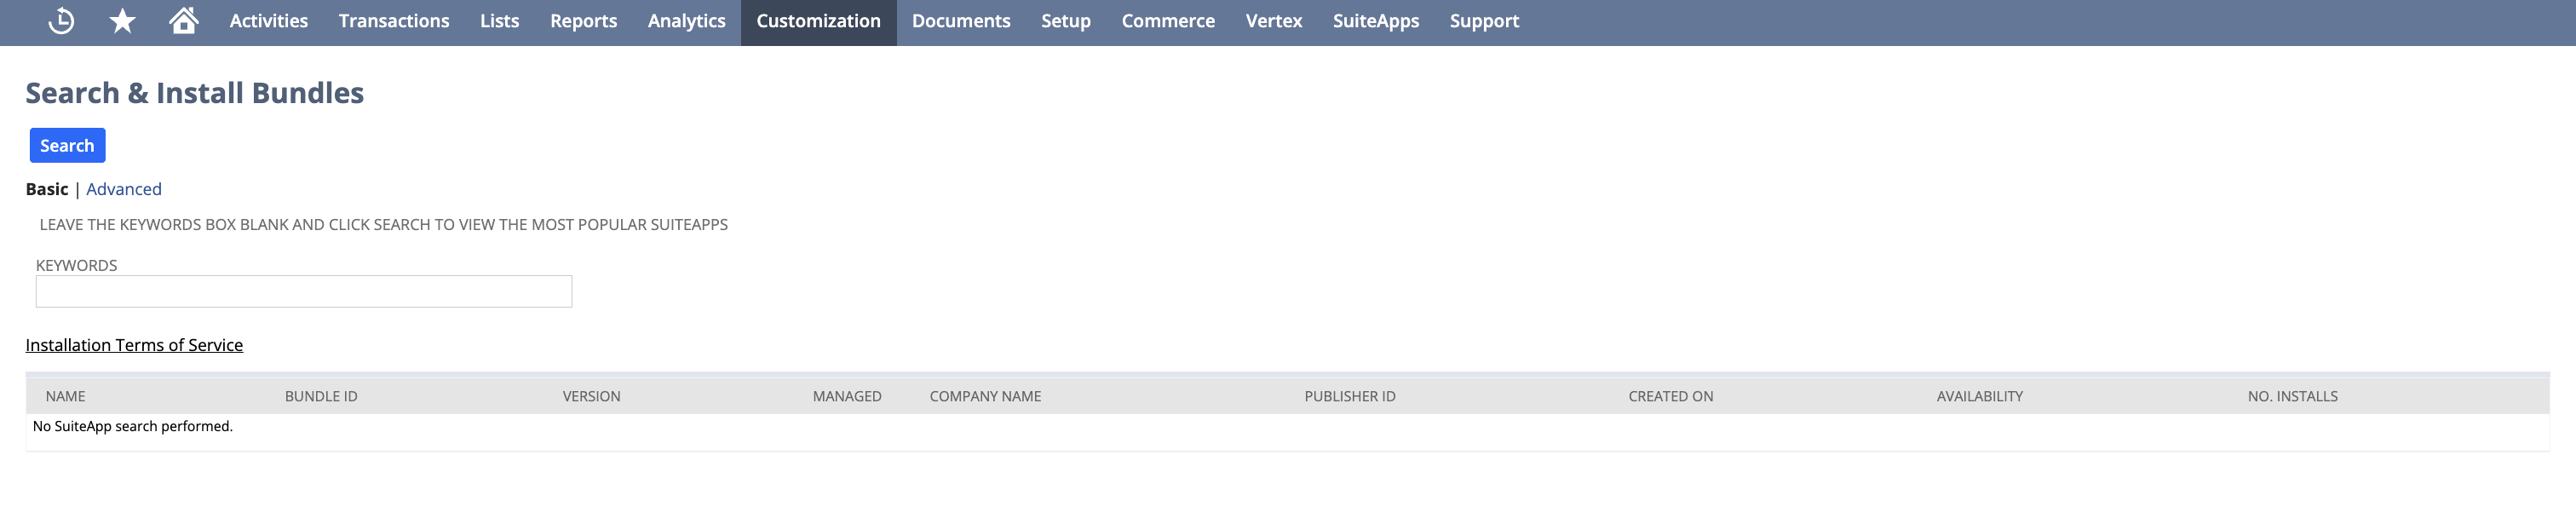
Go to Customization → SuiteBundler → Search & Install Bundles.
-
In the search box, enter bundle ID 705521 and click Search.

-
Click on Apideck Integration Connectivity in the results.
-
Click Install.
-
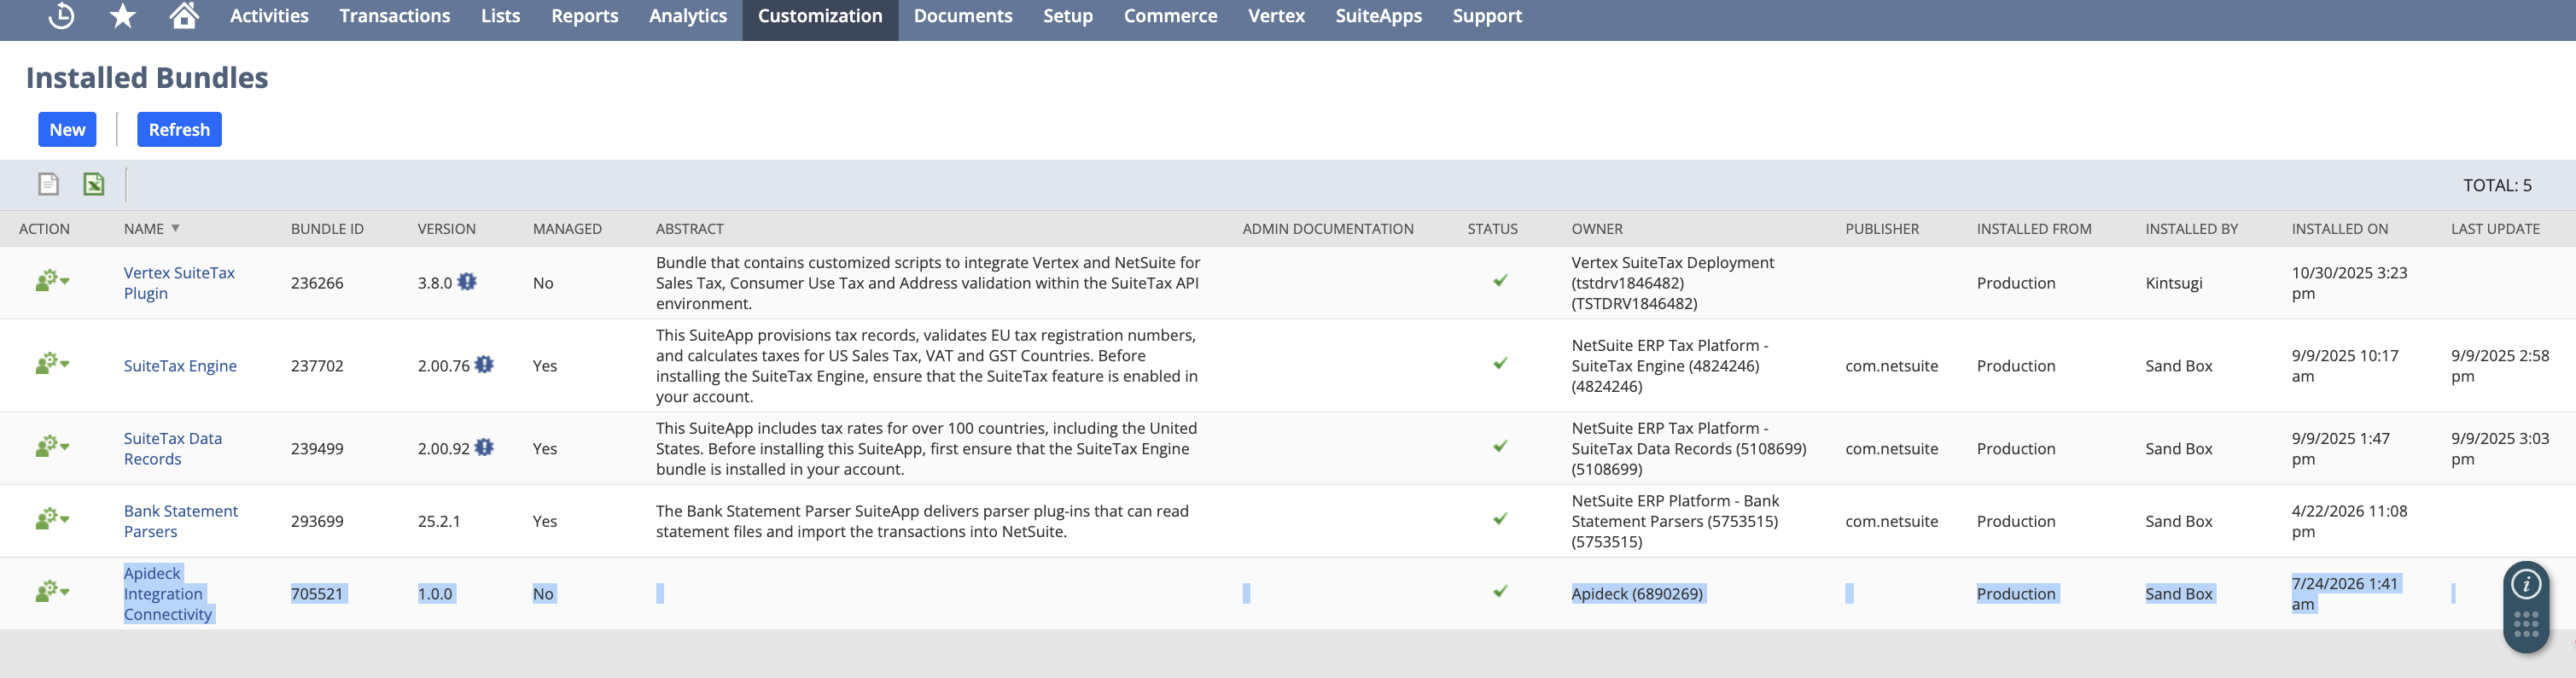
Wait for the installation to complete. You can monitor progress at Customization → SuiteBundler → Installed Bundles.
-
Confirm both objects are installed:
- Go to Setup → Users/Roles → Manage Roles; you should see Apideck Unify in the list.
- Go to Setup → Integrations → Manage Integrations; you should see Apideck Unify in the list.
The bundle is unmanaged, meaning you can inspect or extend the role at any time. Go to Setup → Users/Roles → Manage Roles, find Apideck Unify, and add extra permissions if your account uses features beyond the standard Apideck accounting scope.
Step 2: Create a dedicated integration user
It is recommended to create a separate NetSuite user specifically for the Apideck integration. This makes it easier to track and audit API activity.
-
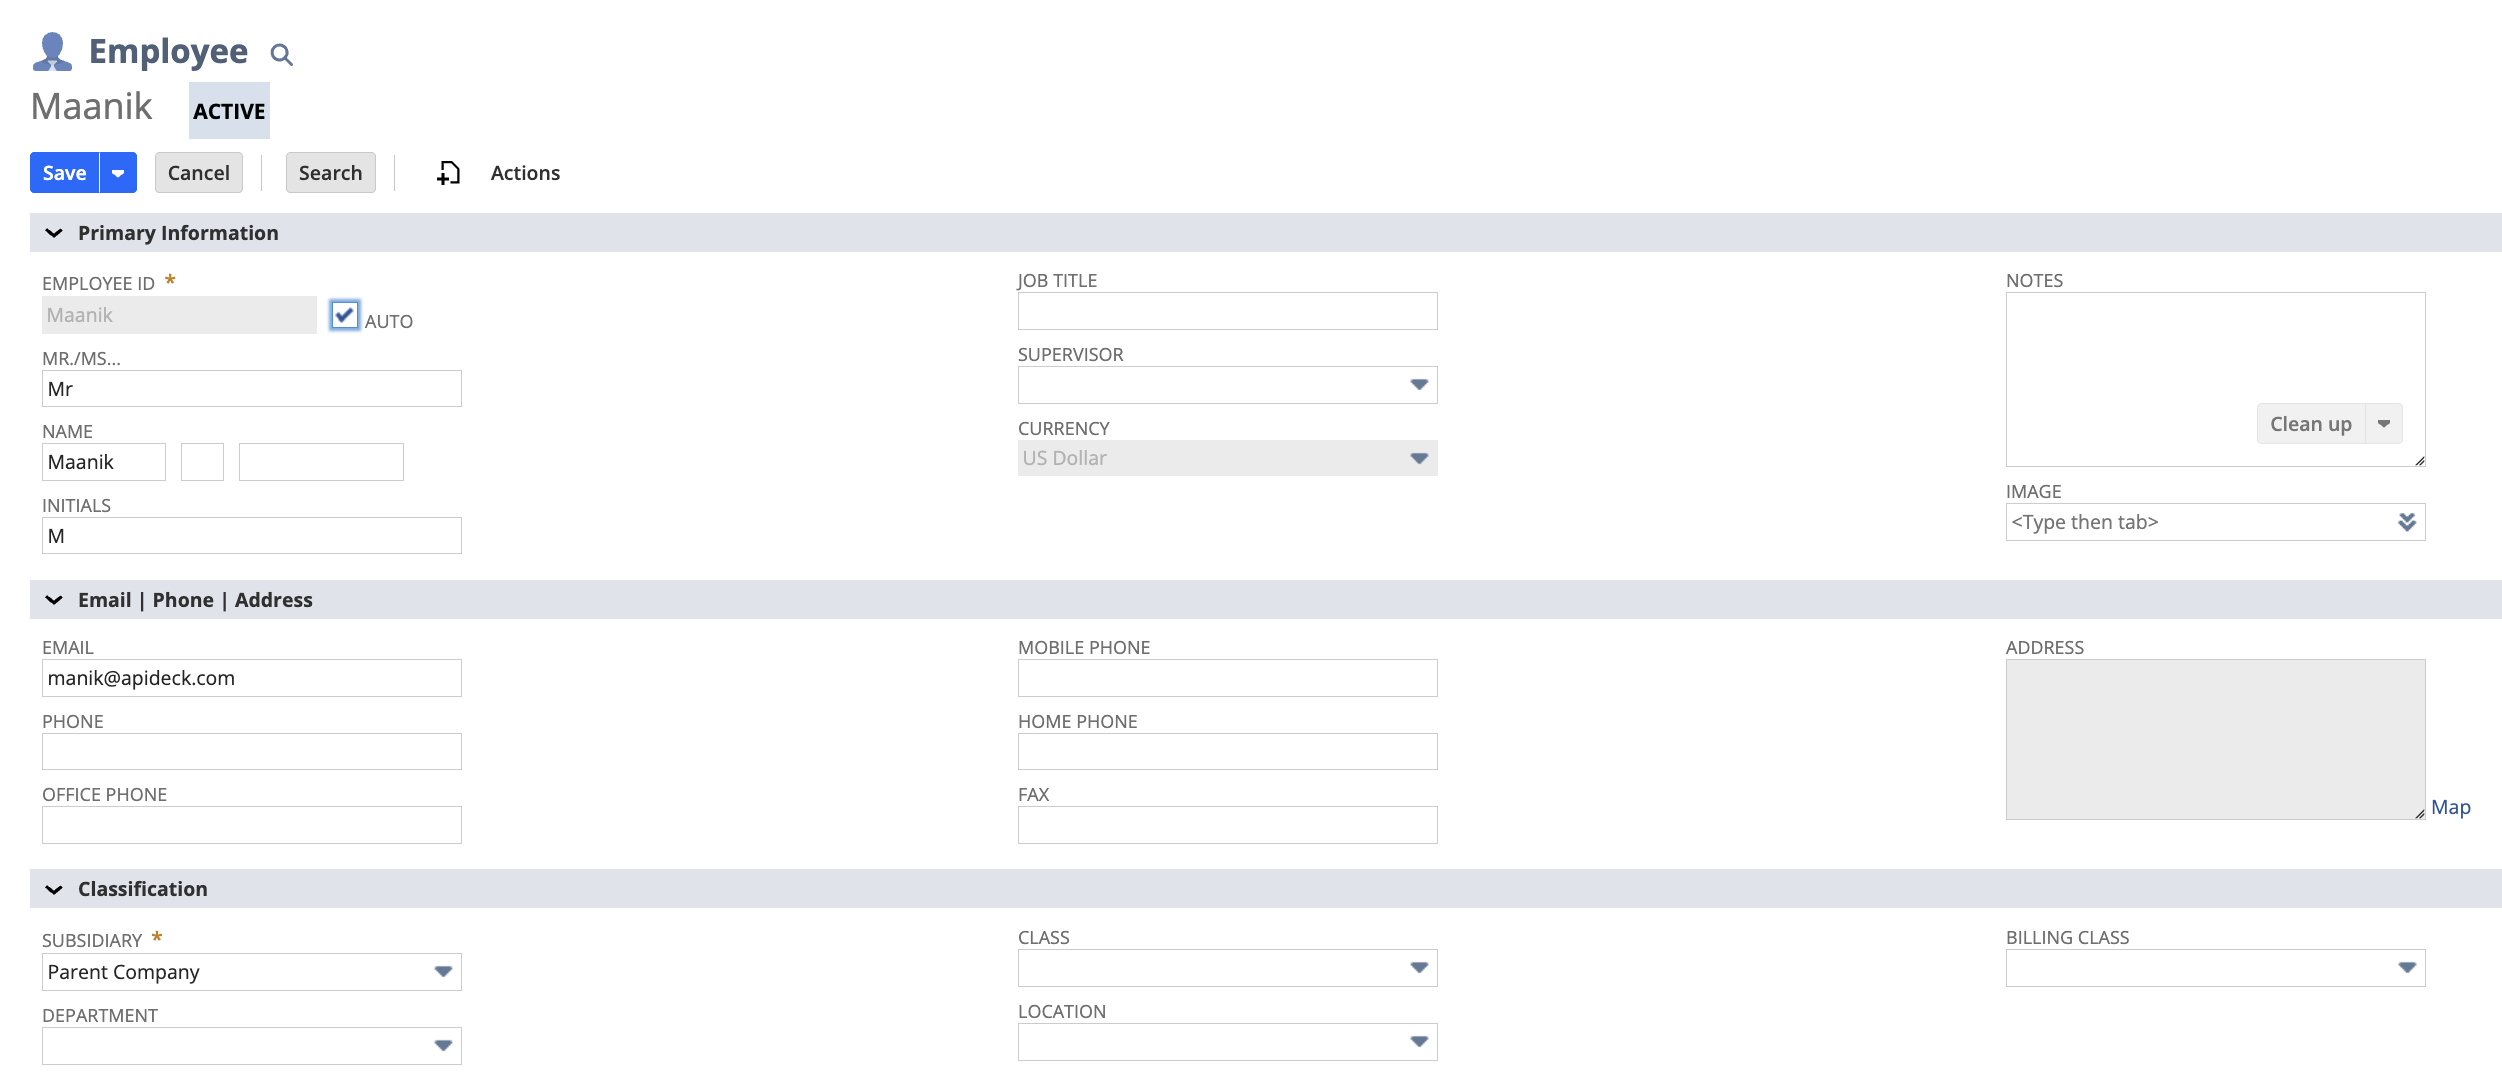
Go to Lists → Employees → New (or Lists → Employees → Employees → New depending on your account).
-
Enter the employee details:
- Name: e.g. Apideck Integration User
- Email: a valid email address
-
Click the Access tab.
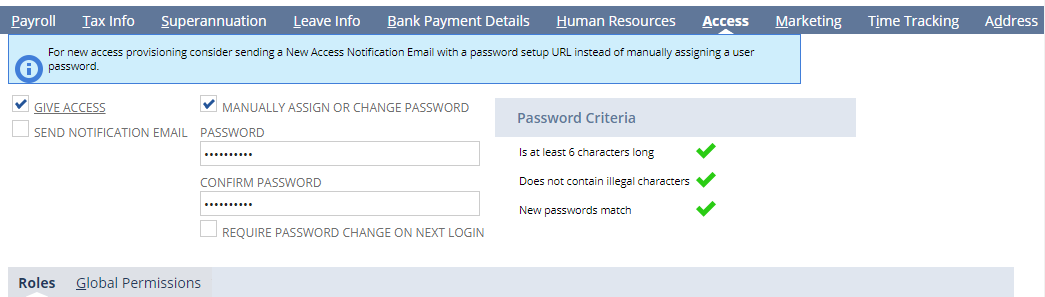
- Check Give Access.
- Check Manually Assign or Change Password and set a password.
-
Under Roles, click the dropdown and select Apideck Unify, then click Add.

-
Click Save.
Step 3: Create an Access Token
-
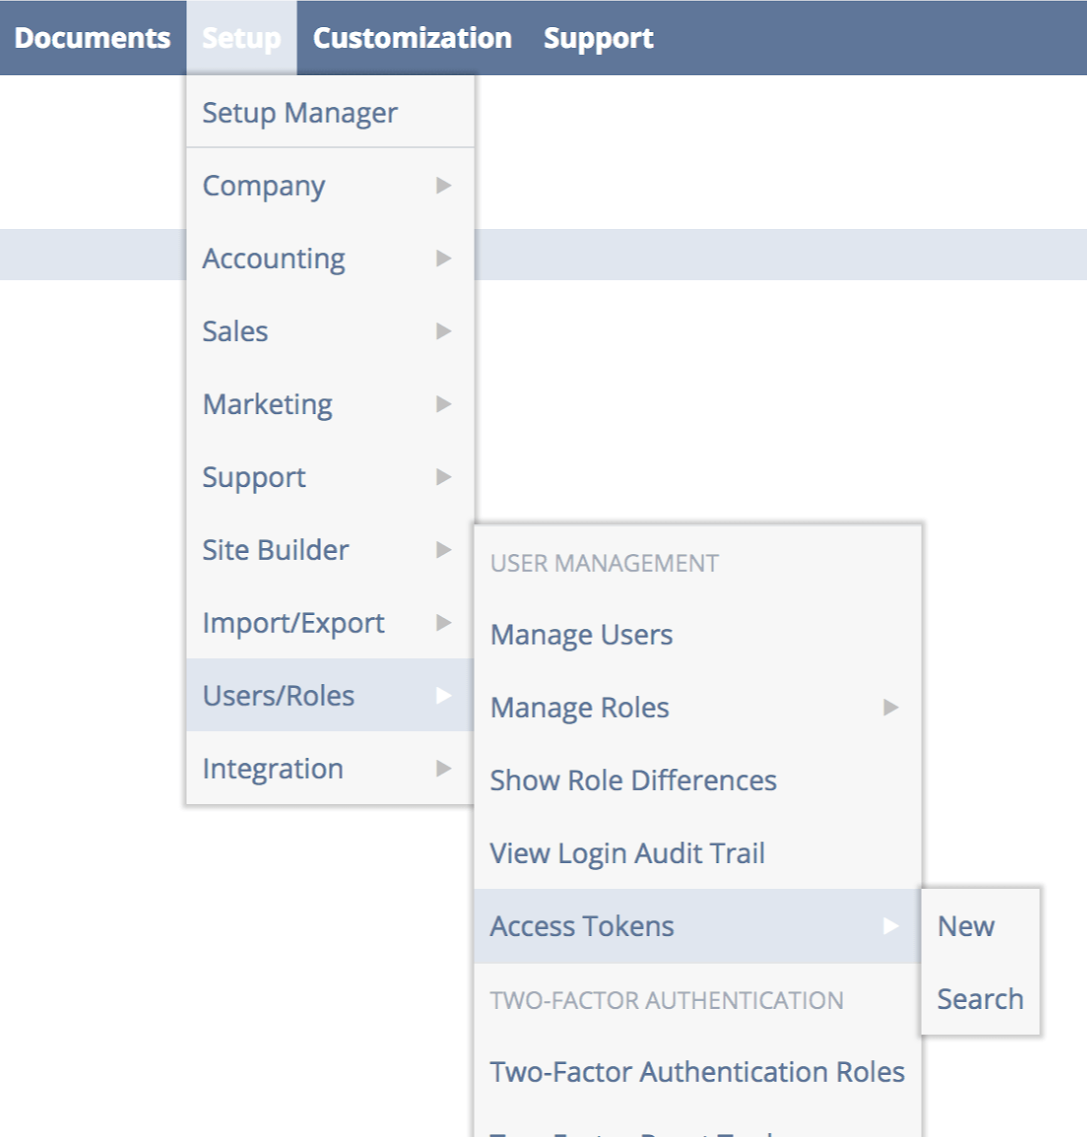
Go to Setup → Users/Roles → Access Tokens.
-
Click New.
-
Fill in the form:
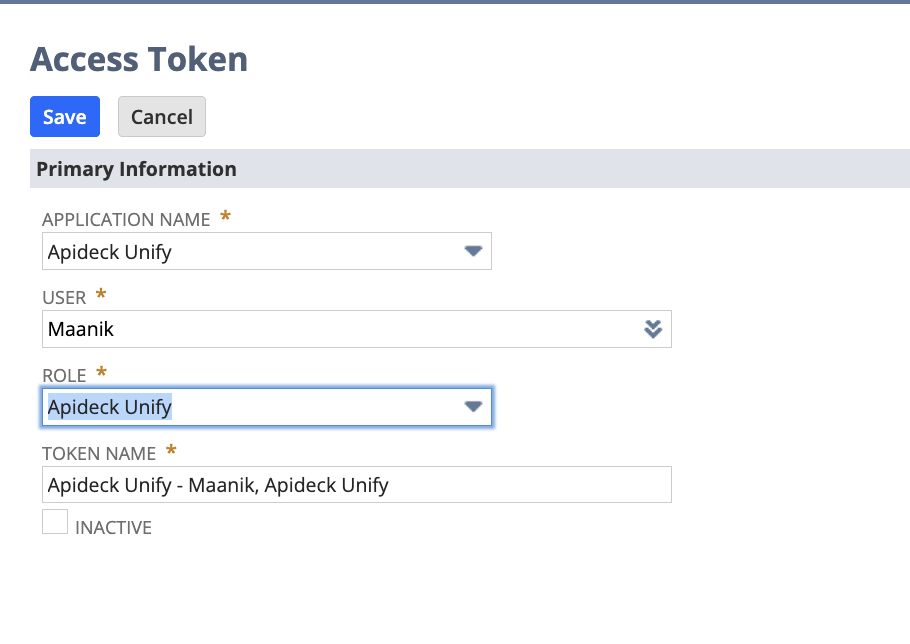
- Application: select Apideck Unify ← installed by the bundle
- User: select the integration user you created in Step 2
- Role: select Apideck Unify ← installed by the bundle
- Token Name: e.g. Apideck Token
-
Click Save.
-
Copy the Token ID and Token Secret shown on the confirmation screen.
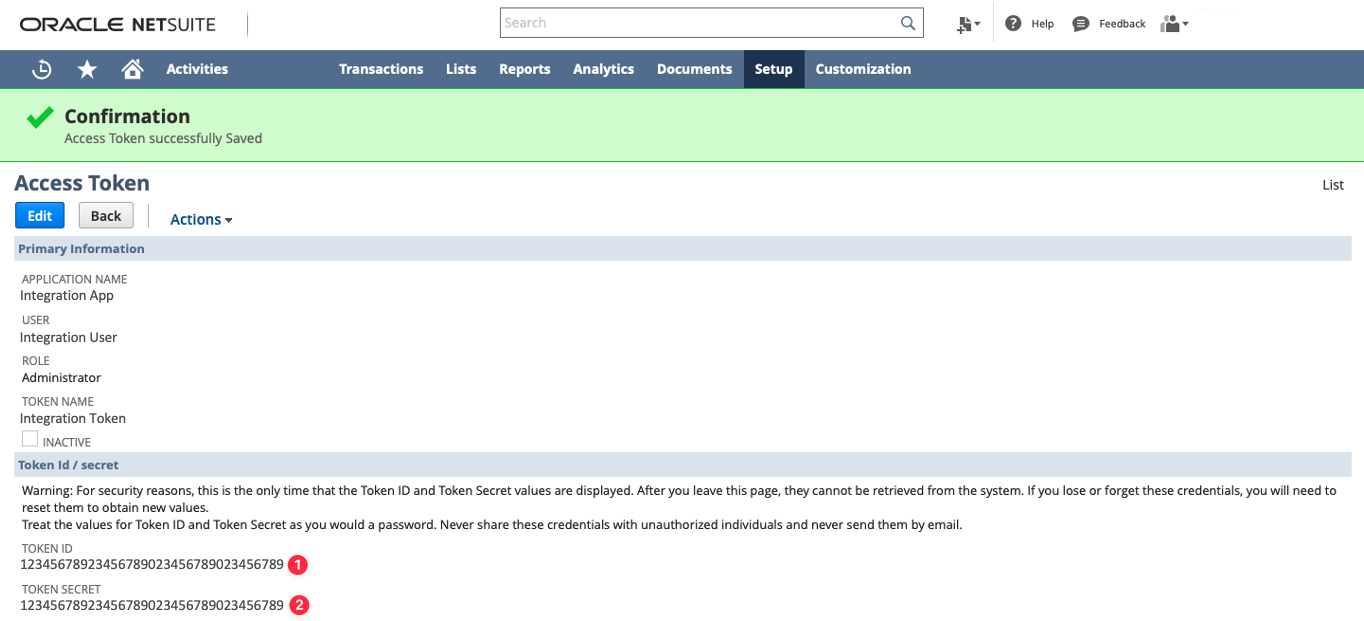
Important: This is the only time these values are shown. Copy them now. You cannot retrieve them again. A lost secret can only be replaced by creating a new access token.
The token itself does not expire: the connection keeps working until someone regenerates or revokes the token, or removes the Integration Record.
Step 4: Find your Account ID
-
Go to Setup → Company → Company Information.
-
Copy the Account ID shown on the page.
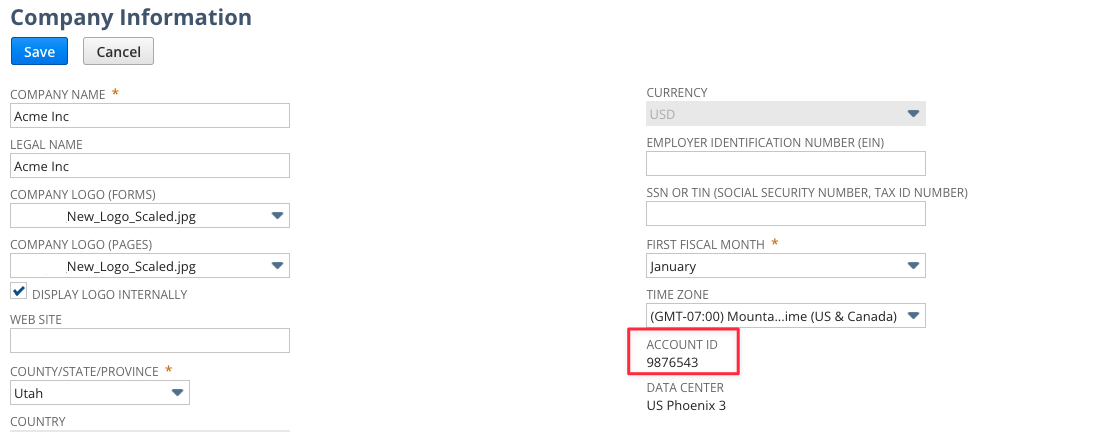
Sandbox account IDs typically end with
_SB1,_SB2, or_SB3. The Account ID is what selects the instance the connection reaches, so a sandbox and a production connection differ only by this value.
Step 5: Configure the connection in Vault
Open your Apideck Vault and create or edit your NetSuite connection. You only need 3 fields:
| Field | Value |
|---|---|
| Account ID | Copied in Step 4 |
| Access token ID | The Token ID copied in Step 3 |
| Access token secret | The Token Secret copied in Step 3 |
Leave Consumer Key and Consumer Secret blank: Apideck fills these automatically from the Apideck Unify Integration Record installed by the bundle.
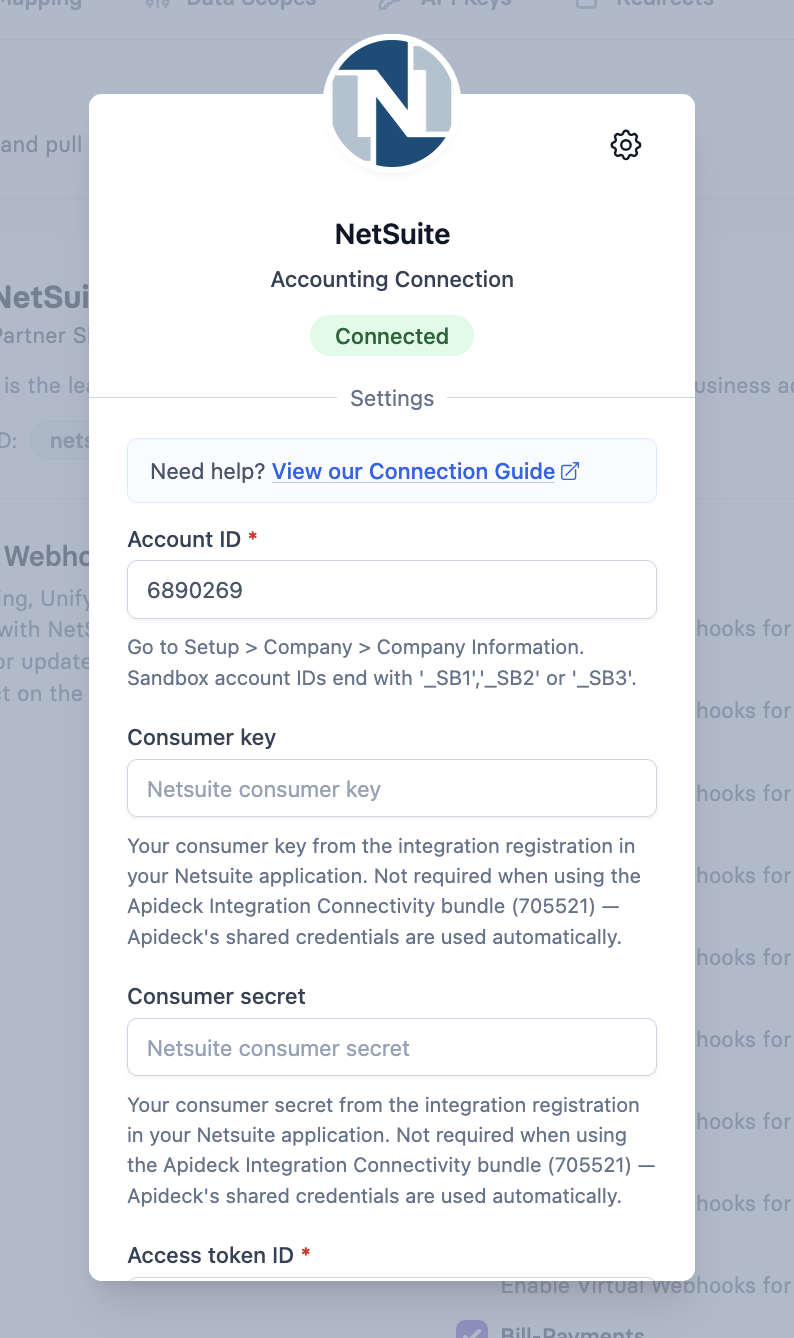
If SuiteTax is enabled on your NetSuite account, also set SuiteTax enabled to Yes on this form. The other optional settings on the connection (integration user time zone, attachments folder, bank feed RESTlet IDs) are described in the Connection Guide.
Click Save. The connection should move to Callable status within a few seconds.
Troubleshooting
"Invalid configuration" after saving
- Check that the Apideck Unify role is assigned to the integration user (Step 2, item 4).
- Check that you selected Apideck Unify as both the Application and Role when creating the Access Token (Step 3).
- Confirm your Account ID is correct: sandbox IDs include the
_SB1suffix.
"Apideck Unify" not appearing in Application or Role dropdown
- The bundle may not have finished installing. Go to Customization → SuiteBundler → Installed Bundles and check the status.
- The integration user must have the Apideck Unify role assigned before the Access Token dropdown shows it.
Role not visible in Manage Roles
- Go to Customization → SuiteBundler → Installed Bundles and confirm bundle 705521 shows status Installed. If it failed, click Install again.
Reads succeed but a resource returns an empty list
- A missing permission is filtered silently by NetSuite rather than returned as an error. Compare the role against the permission tables in the Connection Guide, and check whether any feature-scoped optional permissions (bank feeds, Tax Details Tab, Sales Tax Items for SuiteTax) need adding for the resources you use.
Still stuck? Contact Apideck Support.
Existing customers
If you already have consumer_key and consumer_secret set in your Vault connection, you do not need to change anything. The connector continues to use your own credentials: the bundle fallback only applies when those fields are left blank.
After a sandbox refresh
Refreshing a NetSuite sandbox does not carry the Integration Record and access token over. Re-install or verify the bundle, recreate the access token (Step 3), and update the Token ID and Token Secret on the connection. This is expected NetSuite behaviour.
Updating the bundle
When Apideck publishes a new version of bundle 705521, apply it from Customization → SuiteBundler → Installed Bundles: click the bundle name and follow the update prompts. New permissions are added to the Apideck Unify role automatically.
Important: A bundle update resets the Apideck Unify role to the new bundle definition: any permissions you added manually will be removed. After updating, go to Setup → Users/Roles → Manage Roles → Apideck Unify and re-add your manually-added permissions (bank feed permissions; Tax Details Tab and Sales Tax Items for SuiteTax accounts).
What's next
Once your connection is Callable you can start making API calls through the Apideck Accounting API. Role permissions, optional connection settings and per-resource notes are covered in the NetSuite Connection Guide, and connector-specific behaviour per resource is listed on the NetSuite gotchas page.
For bank feed setup (pushing bank statements into NetSuite's Match Bank Data workflow), see the dedicated Apideck Bank Feed for NetSuite setup guide.