NetSuite – Connection Guide
NetSuite is the leading integrated cloud business software suite, including business accounting, ERP, CRM and ecommerce software.

Connect to NetSuite
This guide will walk you through the process of setting up NetSuite User Roles to get Access Tokens using Token-Based Authentication. Access tokens are used to authenticate requests to NetSuite APIs, which enables you to integrate NetSuite with other applications.
By following these steps, you can grant specific NetSuite User Roles access to generate Access Tokens and use them to access NetSuite APIs securely.
NetSuite uses Token-Based Authentication (TBA), so there is no authorize-and-redirect flow: you create the access token yourself in the NetSuite UI and paste the credentials into your Apideck Vault connection.
Steps: bundle path (recommended):
- Install the Apideck Integration bundle
- Assign the role to a new user
- Create access tokens: select Apideck Unify as Application and Role
- Find your Account ID
- Configure the connection: only 3 fields needed (Account ID, Token ID, Token Secret)
Steps: manual path (existing customers or restricted accounts):
- Create the role manually
- Assign the role to a new user
- Create an application (consumer key & secret)
- Create access tokens
- Find your Account ID
- Configure the connection: all 5 fields needed
Info: This guide assumes you have a basic understanding of NetSuite and its interface.
Prerequisites
- NetSuite Administrator access: creating roles, integration records and access tokens, and installing a bundle, all require it.
- The SuiteTalk web services and Token-Based Authentication features enabled on the account, at Setup → Company → Enable Features → SuiteCloud: SOAP Web Services, REST Web Services and Token-Based Authentication. Both web services features are needed: Apideck validates the connection over SOAP, while filtered list calls run as SuiteQL over REST. See Oracle's Token-Based Authentication guide and SuiteTalk Web Services overview.
- Access to your Apideck Vault to enter the credentials once they exist.
- On OneWorld accounts, decide whether this connection should read from one subsidiary or from all of them. That is the optional Default Subsidiary setting on the same Vault form (see Optional connection settings), not a separate connection, and you can change it later. See Oracle's OneWorld multi-subsidiary documentation.
NetSuite shows the Consumer Key/Secret and the Token ID/Secret exactly once, on the screen where they are created. Copy them straight away: a lost secret can only be regenerated, never retrieved.
Recommended: install the Apideck Integration bundle
Apideck publishes a NetSuite SuiteBundle that ships a pre-built least-privilege Apideck Unify role covering the core 39 permissions for the standard Apideck accounting resources, plus an Apideck Unify Integration Record pre-configured for Token-Based Authentication. Installing the bundle takes about a minute and replaces the manual role build described in the "Alternative" section below.
Because that Integration Record already carries Apideck's Consumer Key and Secret, you never have to create or handle them; you supply only your own account-side credentials (Account ID, Token ID, Token Secret).
For the full step-by-step walkthrough with screenshots, see the dedicated Apideck Integration Connectivity Bundle Setup Guide.
Quick summary:
- Go to Customization → SuiteBundler → Search & Install Bundles, search for bundle ID 705521 and click Install.
- Create a dedicated integration user and assign the Apideck Unify role to them.
- Create an Access Token: select Apideck Unify as both the Application and Role.
- In Vault, enter only 3 fields: Account ID, Token ID, Token Secret. Leave Consumer Key and Consumer Secret blank.
The full list of the 39 permissions installed by the bundle, and the permissions some operations and NetSuite features need you to add to the role by hand, is in the Bundle Setup Guide.
The bundle is unmanaged, so once installed you can inspect the role at Setup → Users/Roles → Manage Roles and add extra permissions if your account uses features outside the standard Apideck accounting scope.
Bundle updates: When Apideck publishes a new bundle version, apply it from Customization → SuiteBundler → Installed Bundles. New permissions are added automatically. Any permissions you added manually to the role, such as bank feed permissions or Tax Details Tab for SuiteTax (UK, EU, and other VAT regions), will be removed by the update and must be re-added manually afterwards.
Alternative: create the role manually
Use this path only if your NetSuite account policy blocks installing unmanaged bundles, or if you need permissions beyond what the bundle ships. The bundle is the recommended default. See the previous section.
On this path you also create your own Integration Record, so the connection needs all 5 credentials (Account ID, Consumer Key, Consumer Secret, Token ID, Token Secret).
To grant access to the Netsuite, you need to create a user role to get Access Tokens using Token-Based Authentication
-
Log in to your NetSuite account as an administrator.
-
Go to Setup > Users/Roles > Manage Roles.

-
Click on the 'New' button to create a new role.
 Give the role a name (e.g. Integration Role).
 -
Under the 'Permissions' tab, select the appropriate permissions that you want to grant to this role.
 Note that the role must have the necessary permissions to perform the tasks that the integration will be used for.
We recommend to review the permission levels for the various sections:
For "Transactions","Lists" we recommend to set the permission to "View" to allow reading data and "Full" to allow creating and/or modifying data. For "Lists","Currencies" we recommend to set the permission to "View" to allow reading data and "Full" to allow creating and/or modifying data. For "Setup", the only option is "None" or "Full", please set it to "Full" to grant access to the Netsuite instance.
For more details about the Netsuite permission levels, please refer to the Access Levels page in NetSuite Help Center.
Important for Projects Functionality: To enable customer-to-project mapping and full project management features, ensure the following permissions are granted:
- Lists > Projects: Required for accessing job/project records
- Lists > Customers: Required for customer-project relationship mapping
Important for Financial Reports (Profit & Loss, Balance Sheet): These reports use the SOAP
getPostingTransactionSummaryAPI which only requires "Financial Statements" permission. Ensure the following permission is granted:- Reports > Financial Statements: View access required for financial report queries
- Lists > Accounts: View access for chart of accounts data (used for account name enrichment)
Important for filtered list calls (SuiteQL access): any list call with a
filter[*]parameter (e.g.filter[updated_since],filter[id_since]) oninvoices,bills, orcredit-notesis routed through NetSuite's REST/SuiteQL endpoint instead of SOAP. SuiteQL has its own access checks on every table touched by the query (thetransactiontable plus thecustomerJOIN), so on top of the standard Setup permissions the role must include:PERMISSION AREA LEVEL SuiteAnalytics Workbook Reports Edit Find Transaction Transactions View Invoice / Bill / Credit Memo Transactions View (per resource used) Customers Lists View The address subrecords joined into the invoice list (
transactionBillingAddress,transactionShippingAddress) inherit access from the parenttransactionrecord: there is no separateLists > Addresspermission to grant.If a permission is missing, NetSuite does not say which one in a single response. Each missing permission produces a distinct symptom:
What's missing Symptom on filtered list calls SuiteAnalytics Workbook 400 Bad Request: Invalid search query. Your current role does not have permission to perform this action.Find Transaction 400 Bad Request: Invalid search query. Search error occurred: Record 'transaction' was not found.Customers 400 Bad Request: Invalid search query. Search error occurred: Record 'customer' was not found.Invoice / Bill / Credit Memo (per type) 200 OKwithdata: []: query succeeds but every row of the corresponding type is silently filtered out, so the integration looks healthy while returning nothingThe Setup permissions
REST Web Services,SOAP Web ServicesandLog in using Access Tokensare needed for any Apideck connection (Apideck validates the connection through a SOAP call before any SuiteQL request runs); they are listed in the Setup table further below. Non-filter list calls andGET /accounting/{resource}/{id}calls go through SOAP and don't require SuiteAnalytics Workbook or Find Transaction.See Syncing large NetSuite transaction datasets for why filtered list calls are the recommended path for large datasets.
Transactions
TRANSACTIONS PERMISSION LEVEL Access Payment Audit Log View/Full Audit Trail View/Full Automated Cash Application View/Full Bill Purchase Orders View/Full Bills View/Full Calculate Time View/Full Cash Sale View/Full Cash Sale Refund View/Full Check View/Full Credit Card View/Full Credit Card Refund View/Full Credit Memo View/Full Credit Returns View/Full Customer Deposit View/Full Customer Payment View/Full Customer Refund View/Full Deposit View/Full Deposit Application View/Full Edit Forecast View/Full Enter Opening Balances View/Full Enter Vendor Credits View/Full Estimate View/Full Expense Report View/Full Finance Charge View/Full Find Transaction View/Full Fulfill Orders View/Full Generate Price Lists View/Full Generate Statements View/Full Import Online Banking File View/Full Invoice View/Full Invoice Approval View/Full Invoice Sales Orders View/Full Item Fulfillment View/Full Item Receipt View/Full Make Journal Entry View/Full Matching Rules for Online Banking View/Full Opportunity View/Full Pay Bills View/Full Payments View/Full Pay Sales Tax View/Full Post Vendor Bill Variances View/Full Posting Period on Transactions View/Full Purchase Order View/Full Receive Order View/Full Receive Returns View/Full Reconcile Edit Refund Returns View/Full Return Auth. Approval View/Full Return Authorization View/Full Sales Order View/Full Sales Order Approval View/Full Set Up Budgets View/Full Statement Charge View/Full System Journal View/Full Timer View/Full Time Entry View/Full Time Tracking View/Full Track Time View/Full Transfer Funds View/Full Vendor Bill Approval View/Full Vendor Payment Approval View/Full Vendor Return Auth. Approval View/Full Vendor Return Authorization View/Full Vendor Returns View/Full View Gateway Asynchronous Notifications View/Full View Payment Events View/Full Reports
REPORTS PERMISSIONS LEVEL SuiteAnalytics Workbook Edit Financial Statements View List
LISTS PERMISSIONS LEVEL Accounts View/Full Classes View/Full Companies View/Full Contacts View/Full Currency View/Full Customers View/Full Documents and Files Create (or Full) Departments View/Full Employee Records View/Full Expense Categories View/Full Items View/Full Locations View/Full Projects View/Full Sales Tax Items Full: SuiteTax-enabled accounts (tax-rate reads) Subsidiaries View/Full Tax Details Tab Full Tax Records View/Full Vendors View/Full Important for Invoice Items writes: The
Lists → Currencypermission (View) is required forPOST /accounting/invoice-itemsandPATCH /accounting/invoice-items/{id}. The connector resolves thecurrencyISO code to a NetSuite internal ID via an internalcurrenciesAllcall during every write. Without this permission that call is denied, the currency cannot be resolved, and the write returns a400error with a message indicating the currency could not be resolved. Grant View access at minimum; Full is required if you also create or modify currencies.If you cannot grant this permission, supply the NetSuite internal currency id directly via pass_through, which bypasses the lookup entirely:
You can set any other record field the same way using
listAcct:-prefixed keys in compact-XML shape (e.g."listAcct:isTaxable": { "_text": "true" }). Any otherextend_objectkey (e.g. a barecurrency) is rejected with a clear error, because for SOAP connectors it would serialize outside the request envelope and break the request: usecurrency_id, alistAcct:key, orpass_through.extend_pathswith a full JSONPath instead.Important for per-line tax on expenses (SuiteTax): The
Lists → Tax Details Tabpermission is required forPOST /accounting/expensesandPATCH /accounting/expenses/{id}whenever a line carriesline_items[].tax_rateand the connection has SuiteTax enabled (the SuiteTax enabled connection setting, see Optional connection settings).Expenses post to a NetSuite Credit Card Charge, which is a SuiteTax-only record. The legacy per-line
taxCodefield is a no-op there, so the connector applies each line's tax code by writing a tax-details override block on the record instead. NetSuite's tax engine refuses that block unless the role holds this permission.Without it the write fails as a tax-engine error rather than a permission error, so the message does not obviously point at a role setting:
Unable to save the transaction due to an error being reported by the tax calculation
engine: A User Error Has Occurred: Permission Violation: You need the
'Lists -> Tax Details Tab' permission to access this page.
Grant Full. Unlike most
Listspermissions this is not aView/Fullpair: it is only consulted when writing the tax-details block, soViewadds nothing: reading an expense's per-linetax_rateworks without this permission at all.Fullis also the level confirmed working in practice.This is separate from
Lists → Tax Records, which covers the tax code and tax type records themselves; both are needed.If you are narrowing an existing role's permissions, keep this one. Removing it does not surface until an expense is created with per-line tax rates, and the failure above gives no hint that a permission was removed.
Each line must also send both
tax_rate.idandtax_rate.ratefor per-line tax to apply. See the expenses gotchas.Setup
SETUP PERMISSIONS LEVEL Accounting Lists Full Accounting Management Full Deleted Records Full Log in using Access Tokens Full Other Lists Full REST Web Services Full SOAP Web Services Full Note: Financial reports (Profit & Loss, Balance Sheet) use the SOAP
getPostingTransactionSummaryAPI which only requires the Financial Statements permission under Reports. This is a less restrictive permission than SuiteQL which requires "SuiteAnalytics Workbook". Without Financial Statements permission, these endpoints will return 401 Unauthorized errors.
Assign a user to the role
It is recommended that you create a separate user for this purpose instead of assigning the role to an existing user. It helps with better tracking and auditing operations.
-
Click Lists > Employees > New
-
Enter the employee details (e.g. Integration User), and email address.

-
Click Access tab

-
select Give Access.
-
Enable Manually Assign or Change Password and specify a password.
-
-
Under Roles, select the appropriate role from the dropdown and click Add.
- Bundle path: select Apideck Unify (installed by the bundle)
- Manual path: select the role you created (e.g. Integration Role)

Create an Application
Bundle path users: skip this section. The bundle installs the Apideck Unify Integration Record which provides the Consumer Key and Secret automatically. You do not need to create your own application. Continue to Create access tokens.
Once the role is set up, you can follow these steps to generate the consumer Key & Secret:
-
Log in to your NetSuite account as an administrator: creating an Integration Record requires Administrator access, not the integration role you just created.
-
Go to Setup > Integrations > Manage integrations.

-
Click the 'New' button to create a new integration or select an existing integration that you want to use.

- Name: Enter a meaningful name (for example, Integration App)
- Authentication: Under the 'Authentication' section,
- Check 'Token-Based Authentication'
- Check 'TBA: Authorization Flow' (leave Callback URL blank)
- OAuth 2.0: Leave all OAuth 2.0 options unchecked: Apideck uses Token-Based Authentication only
Click the 'Save' button to save the changes.
-
Once saved, the Consumer Key and Consumer Secret will be generated.
💡 REMARK: Copy the "Consumer Key" and the "Consumer secret". You can not access this information once you exit this screen.

Create Access tokens
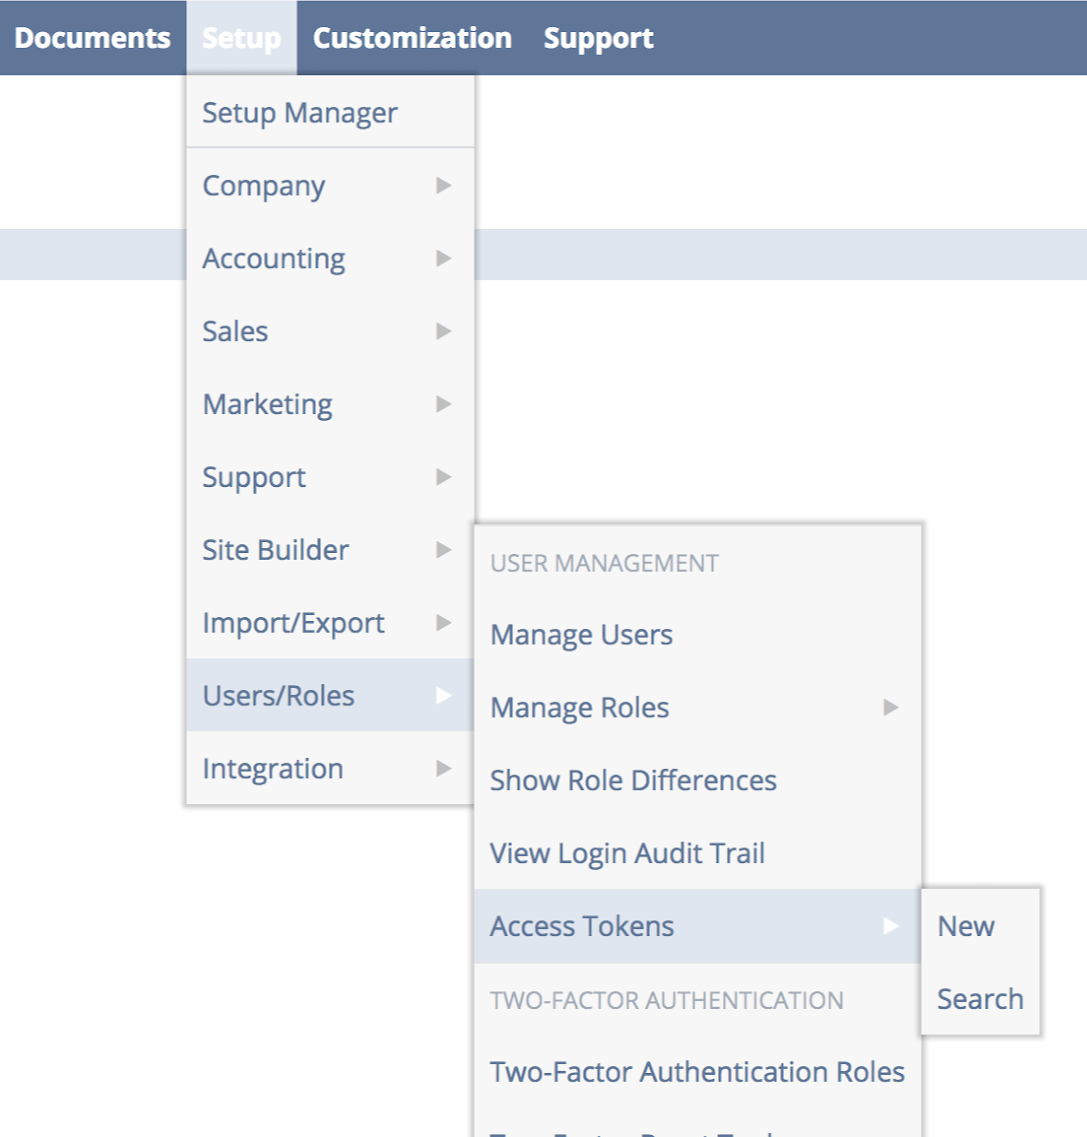
Create a New Access Token with the Role just created.
- Go to Setup > Users/Roles > Access Tokens.
-
Click the 'New' button to create a new Access token
-
Complete the form

-
Select the "Application name":
- Bundle path: select Apideck Unify (installed by the bundle)
- Manual path: select the application you created in the previous step (e.g. Integration App)
-
Select the "User", which we created in the previous steps (e.g. Integration User)
-
Select the "Role":
- Bundle path: select Apideck Unify
- Manual path: select the role you created (e.g. Integration Role)
-
Give the token a recognizable "token name", for example Integration Token
-
Click the 'Save' button to save the changes.
-
-
Once saved, the Account Token ID and Secret will be generated.
💡 REMARK: Copy the "Token Id" and the "Token secret". You can not access this information once you exit this screen.
Find your Account ID
-
Go to Setup > Company > Company Information
-
Copy the Account ID

The Account ID alone determines which NetSuite instance the connection reaches: sandbox account IDs carry a suffix such as _SB1, _SB2 or _SB3.
Configure the Netsuite connection
Bundle path: only 3 fields are required:
| Field | Where to find it |
|---|---|
| Account ID | Setup → Company → Company Information |
| Token ID | Generated when you created the access token |
| Token Secret | Generated when you created the access token |
Leave Consumer Key and Consumer Secret blank: Apideck fills these automatically from the Apideck Unify Integration Record installed by the bundle.
Manual path: all 5 fields are required:
| Field | Where to find it |
|---|---|
| Account ID | Setup → Company → Company Information |
| Consumer Key | Generated when you saved the Integration Record |
| Consumer Secret | Generated when you saved the Integration Record |
| Token ID | Generated when you created the access token |
| Token Secret | Generated when you created the access token |
In the Vault form the two token fields are labelled Access token ID and Access token secret: these are the NetSuite Token ID and Token Secret from the previous step.
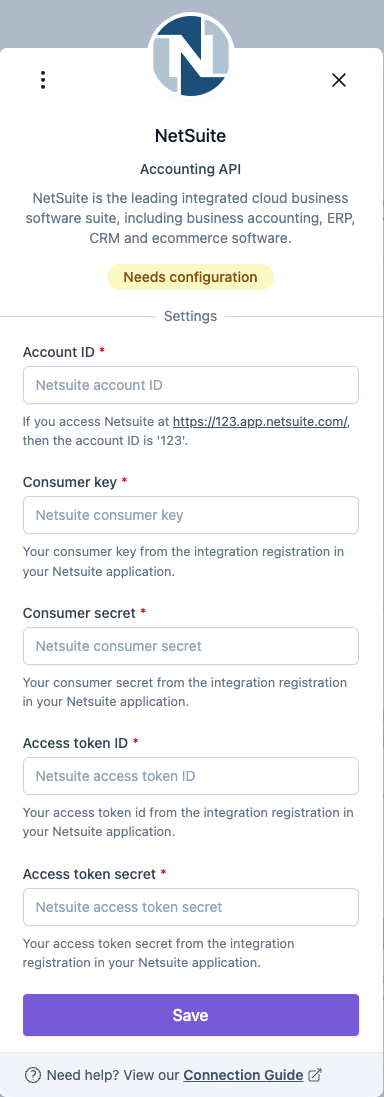
Saving the connection triggers a validation call to NetSuite (a SOAP getServerTime request), which is why the SOAP Web Services and Log in using Access Tokens permissions are required even for a REST-heavy integration.
Optional connection settings
These fields sit alongside the credentials on the same Vault connection form. All are optional, but the first one is required for correct tax data on SuiteTax accounts.
| Setting | When you need it |
|---|---|
| SuiteTax enabled | Set to Yes if the SuiteTax feature is enabled on your NetSuite account. Tax-rate reads are then served from NetSuite's sales tax items, which is where SuiteTax accounts hold that data. Leaving it unset on a SuiteTax account returns tax data from the legacy tax-code records and will not match what you see in NetSuite. Accounts on legacy tax can leave it blank or set it to No. |
| Default Subsidiary | NetSuite OneWorld accounts only. Scopes list requests and the two financial reports (Profit & Loss, Balance Sheet) to a single subsidiary, so callers do not have to pass filter[subsidiary_id] on every request. The dropdown is populated live from your own NetSuite account, so fill in the account and token fields and save the connection first: until the connection can reach NetSuite there is nothing to choose from. Leave it on All subsidiaries (the default) to return records across every subsidiary; that is also the right choice on a single-entity account, where the setting has no effect. Selecting a parent subsidiary does not include its children: NetSuite matches the subsidiary exactly, so a group-level integration that picks the parent sees only the parent's own records. |
| Integration user time zone | Optional IANA zone (e.g. America/Los_Angeles) for the NetSuite user this connection authenticates as. Find it at Home → Set Preferences → Time Zone. NetSuite stores date-only fields (invoice, bill and transaction dates) by converting the value into that user's zone and keeping the date part. Leave it blank unless the integration user is on Midway, Niue, American Samoa (UTC−11) or Kiritimati (UTC+14); dates land on the intended calendar day without configuration for any user between UTC−10 and UTC+13. If you do set it, keep it within 12 hours of the user's real zone in either direction. |
| Attachments folder ID | The internal ID of the File Cabinet folder that attachment uploads default to when a request does not pass parent_folder_id. NetSuite has no folderless files, so set this if your integration does not send a folder per request. Find the ID under Documents → Files → File Cabinet (the folder=NNN value in the folder's URL). |
| Bank Feed RESTlet Script ID / Deploy ID | Only for the optional bank feeds flow. See Bank Feeds below. |
If you also use SuiteTax and write per-line tax on expenses, add the Lists → Tax Details Tab permission to the role. See the Tax Details Tab note. Accounts with SuiteTax enabled also need Lists → Sales Tax Items to read tax rates, because that setting routes tax-rate reads to NetSuite's sales tax item records.
Notes
- Credential ownership. On the bundle path Apideck supplies the Consumer Key/Secret through the installed Apideck Unify Integration Record, so those two fields stay blank in Vault; everything else (Account ID, Token ID, Token Secret) is always yours and never leaves your NetSuite account except into the Vault form. On the manual path all five values are yours.
- Secrets are shown once. NetSuite displays the Consumer Key/Secret and Token ID/Secret only on the creation screen. If a value is lost, create a new access token (or a new Integration Record) and update the connection; it cannot be read back.
- Access tokens do not expire on their own. The connection keeps working until someone regenerates the token, revokes it, or deletes the Integration Record in NetSuite, at which point the connection stops authenticating and needs new credentials.
- Sandbox refreshes reset the setup. Refreshing a NetSuite sandbox does not carry the Integration Record and access token across. Recreate both afterwards and paste the new Token ID/Secret into the connection. This is expected NetSuite behaviour, not a connector fault.
- OneWorld accounts: subsidiary scope is a setting, not a separate connection. One connection can serve the whole account. The Default Subsidiary setting scopes list requests to one subsidiary; All subsidiaries (the default) returns records from every one. When an integration needs more than one entity from a single connection, two per-request overrides are available:
filter[subsidiary_id]on the request, and thex-apideck-company-idheader. An explicitfilter[subsidiary_id]wins over the header, which wins over the connection setting. Subsidiary IDs come fromGET /accounting/companies, which always lists every subsidiary in the account regardless of the setting. On single-entity accounts none of this applies andfilter[subsidiary_id]is ignored. - What subsidiary scope does not cover.
company-infoalways resolves to the account's root subsidiary, whatever the setting says. Writes are never scoped: the subsidiary of a created or updated record comes from the request body, or is derived by NetSuite from the record's customer or vendor, so a scoped connection can create a record its own list requests will not return. Account-level data (currencies, payment methods, accounting periods, subsidiaries, attachments) is always returned in full, and a few resources have their own exceptions. See the NetSuite gotchas. - Changing the Default Subsidiary mid-pagination. A pagination cursor carries the scope it was created under, so continuing an older cursor after changing the setting keeps returning the previous scope. Restart the list after changing it.
- Custom forms can block writes. A custom field marked mandatory on a standard NetSuite form makes API writes to that record type fail, including creates that worked before the form changed. If writes to one record type start failing while others are fine, check that record type's form for new mandatory fields.
Troubleshooting
The connection will not validate after saving
- Confirm the role assigned to the token's user has
SOAP Web Services,REST Web ServicesandLog in using Access Tokensunder Setup: the validation call is a SOAP request. - Confirm the Access Token was created with the right Application and Role (on the bundle path both are Apideck Unify), and that the role is assigned to the integration user.
- Re-check the Account ID exactly as shown in Company Information, including any
_SB1sandbox suffix.
A list endpoint returns 200 OK with an empty data array
This is the silent-permission failure described under SuiteQL access: a missing per-resource transaction permission (Invoice, Bill, Credit Memo, …) filters every row out instead of returning an error. Compare the role against the permission tables above before investigating the data itself.
Profit & Loss or Balance Sheet returns 401
Grant Reports → Financial Statements (View) to the role.
Profit & Loss or Balance Sheet returns every figure as zero
If the Default Subsidiary on the connection names a subsidiary that no longer exists, both reports return 200 OK with all figures at zero rather than an error, indistinguishable from a genuinely inactive entity. Re-open the setting and pick a subsidiary that is still in the list (or All subsidiaries).
The Default Subsidiary dropdown is empty
The list is loaded live from your NetSuite account, so it only fills in once the connection can authenticate: enter Account ID, Token ID and Token Secret (plus Consumer Key and Secret on the manual path), save the connection, then re-open the form. If it is still empty, confirm the role has Lists → Subsidiaries (View or Full), and note the setting applies to OneWorld accounts only.
A scoped connection returns fewer records than expected
NetSuite matches the selected subsidiary exactly, so a parent subsidiary does not bring in its children. Either select All subsidiaries and scope per request with x-apideck-company-id or filter[subsidiary_id], or keep one entity per connection if that suits your integration better. Reference-data lists behave differently: on departments, locations, tracking categories and expense categories, a record marked include children in NetSuite is returned for every descendant subsidiary.
Tax rates do not match what NetSuite shows
If SuiteTax is enabled on the account, set the SuiteTax enabled connection setting to Yes. See Optional connection settings. With that setting on, the role also needs Lists → Sales Tax Items, since tax-rate reads then come from the sales tax item records.
An attachment upload is rejected for a missing folder
Either send parent_folder_id on the request or set the Attachments folder ID connection setting.
Still stuck? Contact Apideck Support.
Bank Feeds (optional)
If you want to push bank statements into NetSuite's Match Bank Data workflow through the Unify bank-feed-statements endpoint, a small amount of extra setup is needed on top of the standard connection above.
At a glance:
-
Install the Apideck Bank Feed bundle in your NetSuite account. Your Apideck contact will share the bundle ID and installation instructions.
-
Install the NetSuite Bank Statement Parsers SuiteApp (bundle ID
293699, published by Oracle NetSuite, free). This provides the CSV parser that the Apideck bundle feeds into. Install it from Customization → SuiteBundler → Search & Install Bundles. -
Create a Format Profile (Setup → Accounting → Financial Institution → Format Profiles) linking the Apideck connectivity plug-in to the NetSuite bank accounts you want to feed.
-
Provide two extra connection fields in the Apideck Vault for your NetSuite connection:
- Bank Feed RESTlet Script ID
- Bank Feed RESTlet Deploy ID
You can find both under Customization → Scripting → Scripts → Apideck Bank Feed RESTlet, on the Deployments tab. Each row's External URL contains
script=<numeric_id>anddeploy=<numeric_id>: those are the values to paste into the Vault.
The full walkthrough, including the extra role permissions you must add to the Apideck Unify role, Format Profile field mapping and formatting preferences, account linking, day-to-day operations and troubleshooting, is in the dedicated Apideck Bank Feed for NetSuite setup guide (see Prerequisites → Role permissions). You only need that guide if you intend to use the bank-feed-statements endpoint; regular NetSuite integrations don't require any of these steps.