How to register an OAuth app for Microsoft Outlook
Register your app with Microsoft Entra admin center
1. Create a new app
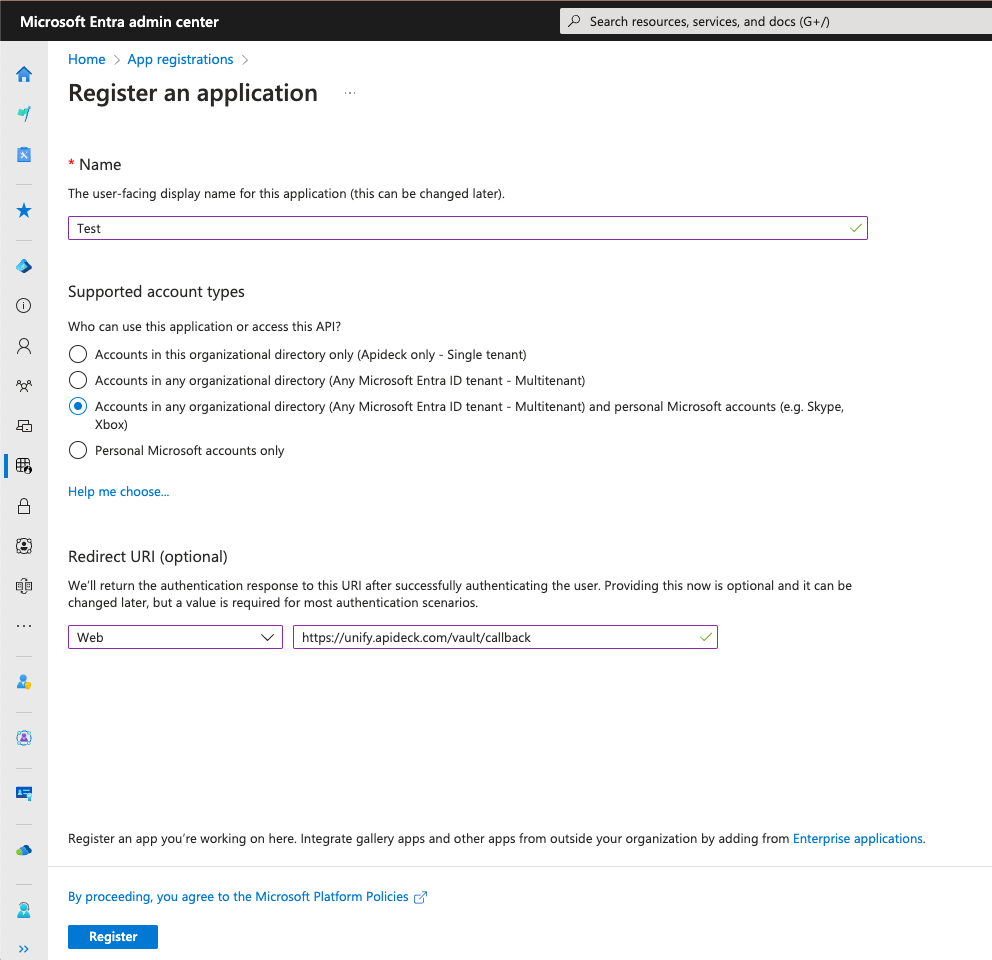
Go to the Microsoft Entra App registration page and click the New registration button

2. Enter app details
On the next page, enter your application's registration information:
- Name - Enter a meaningful application name that will be displayed to your users. Most of the time, this should be your company's name.
- Supported account types - Select Accounts in any organizational directory and personal Microsoft accounts
- You can select other options if they are more relevant for you. This option supports the broadest user base.
- Redirect URI - Set the platform to
Weband usehttps://unify.apideck.com/vault/callbackas the redirect URI. This is the default redirect URI for Apideck.
3. Add delegated permissions
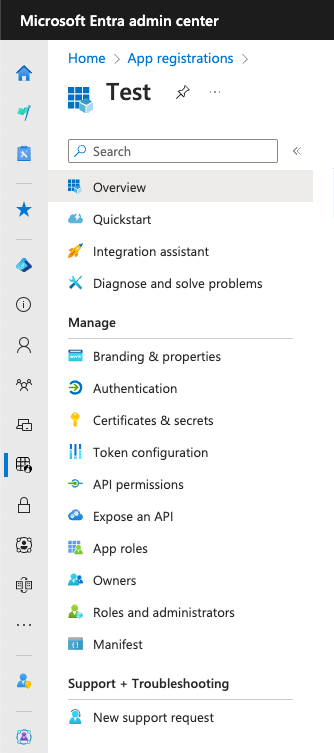
After your app is created, select API permissions in the sidebar.
Select Add a permission > Microsoft Graph > Delegated Permissions
Note: This approach allows your application to access contacts for the authenticated user only (via /me/contacts endpoint).
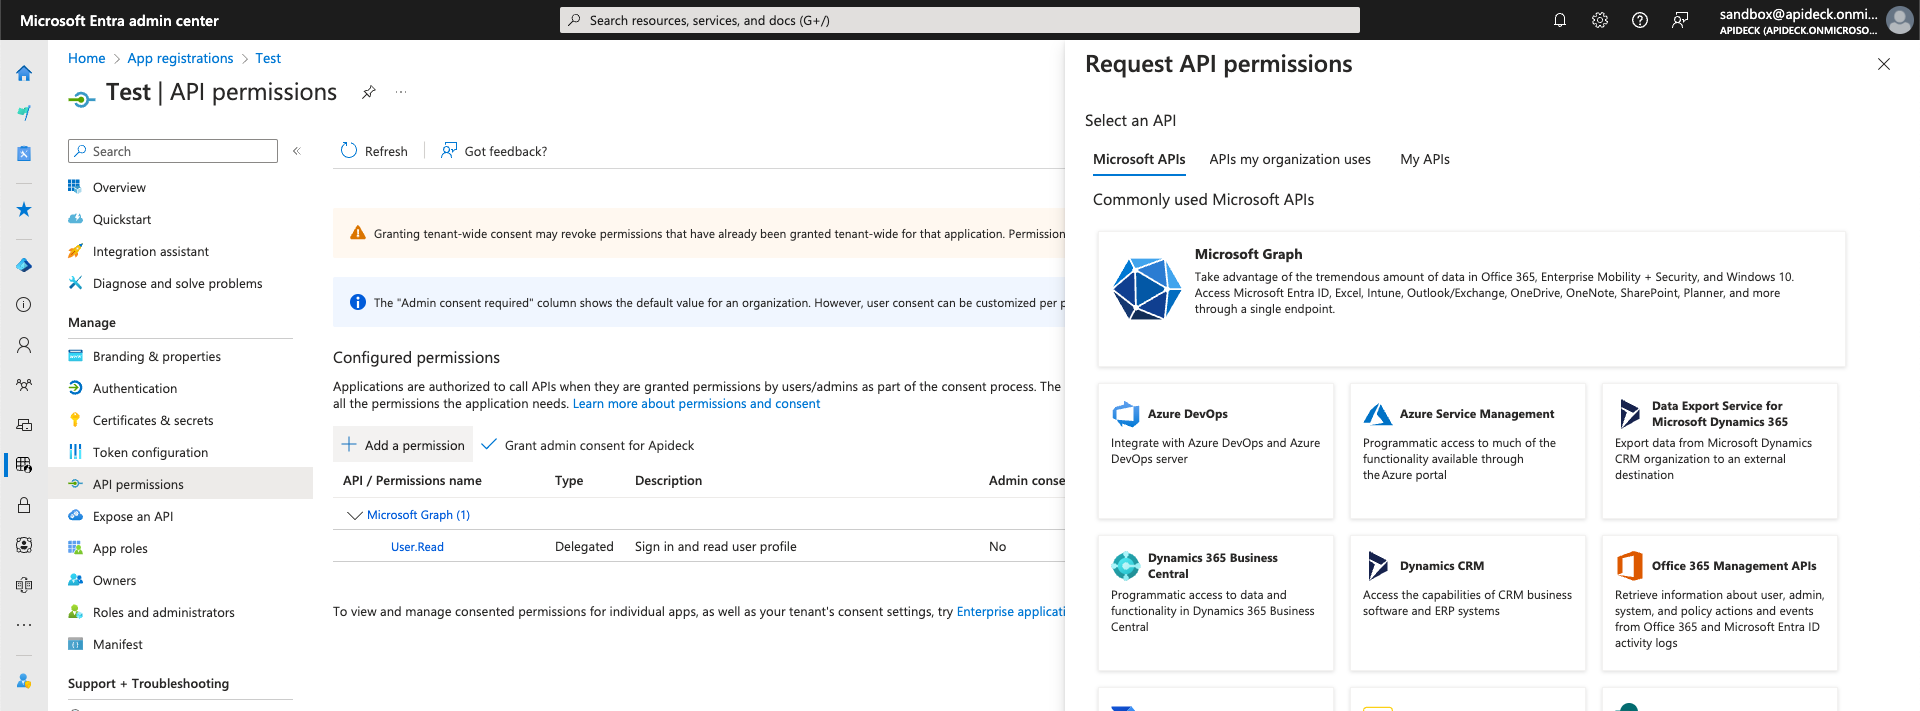
You can use the search option to find the following permissions:
offline_accessUser.Read.AllContacts.Read.Shared
If your app only needs read access to the authenticated user's profile, you can select User.Read.All.
In case you want to create or modify the authenticated user's profile, you can change the permissions to User.ReadWrite.All.
Similarly, if your app only needs read access to the authenticated user's contacts, you can select Contacts.Read.Shared.
In case you want to create or modify the authenticated user's contacts, you can change the permissions to Contacts.ReadWrite.Shared.
Important: With delegated permissions, you can only access the authenticated user's own contacts via the /me/contacts endpoint. If you need to access contacts for other users in your organization using filter[owner_id], see the Alternative: Using Application Permissions section below.
Note: Some permissions will require admin consent.
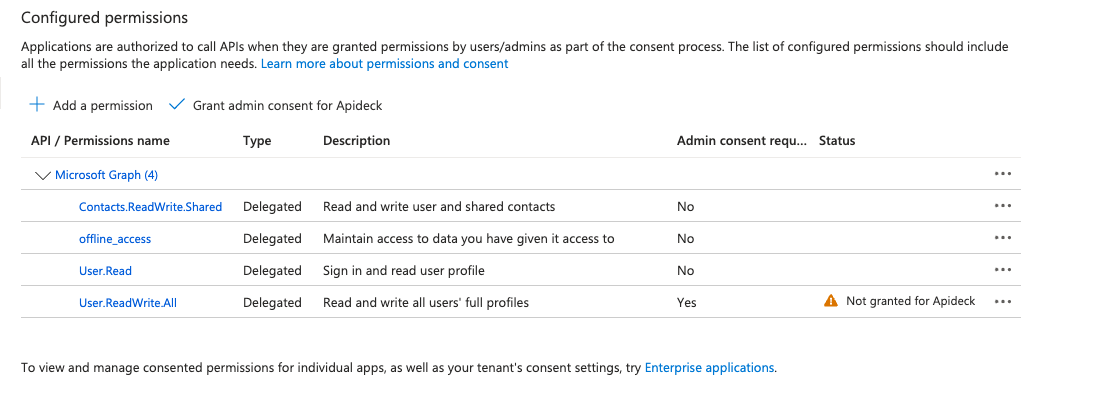
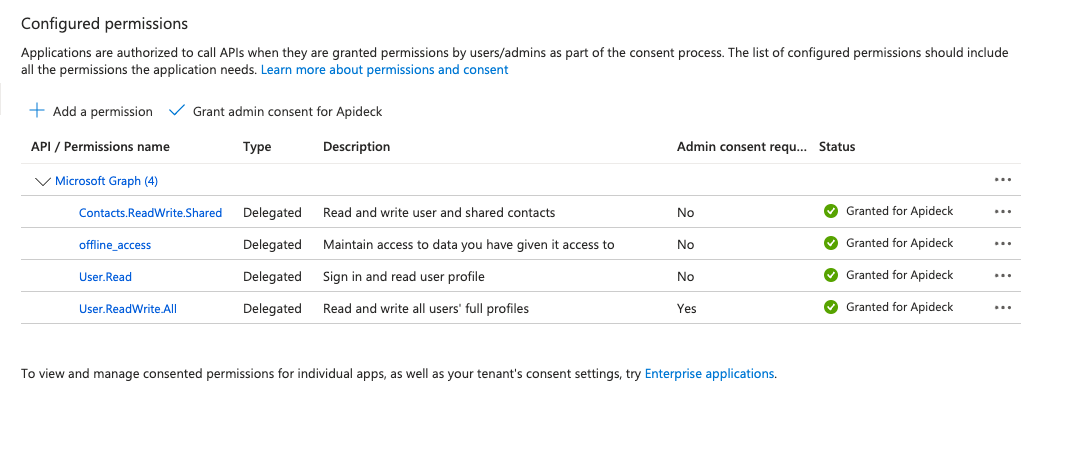
This results in a list of permissions with an approved status:
4. Generate credentials
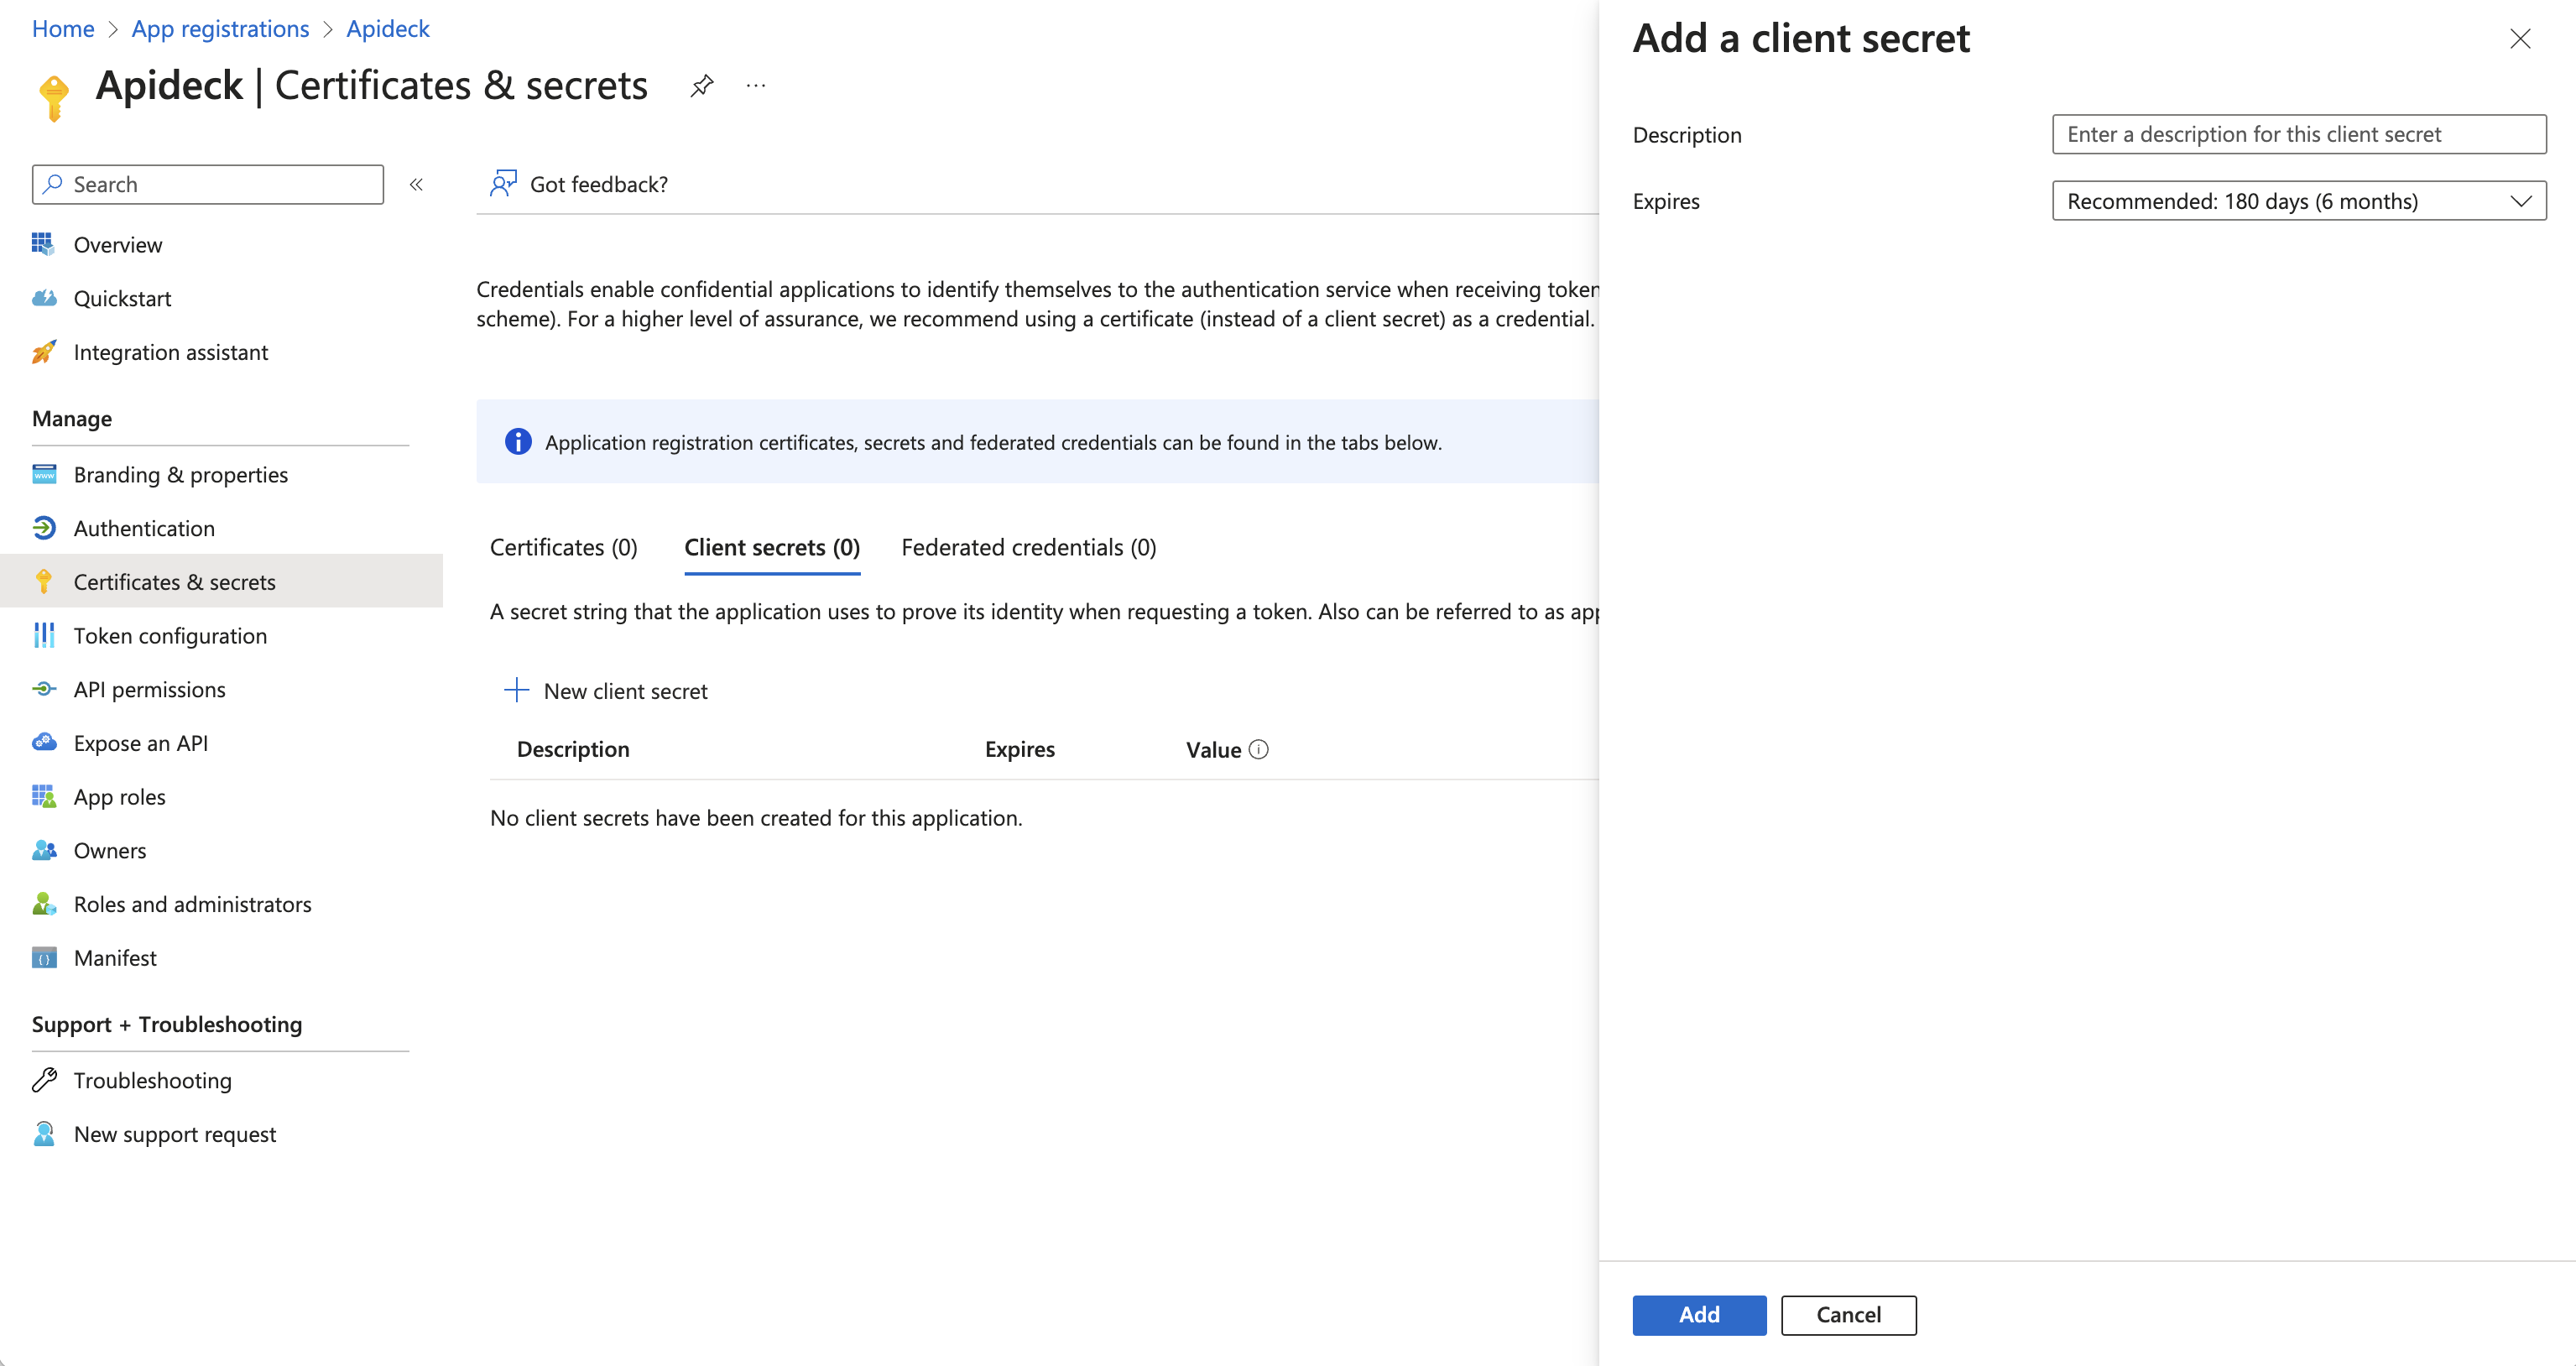
Go to Certificates & secrets > Client secrets and select New client secret.
Enter a description and select an expiry time.
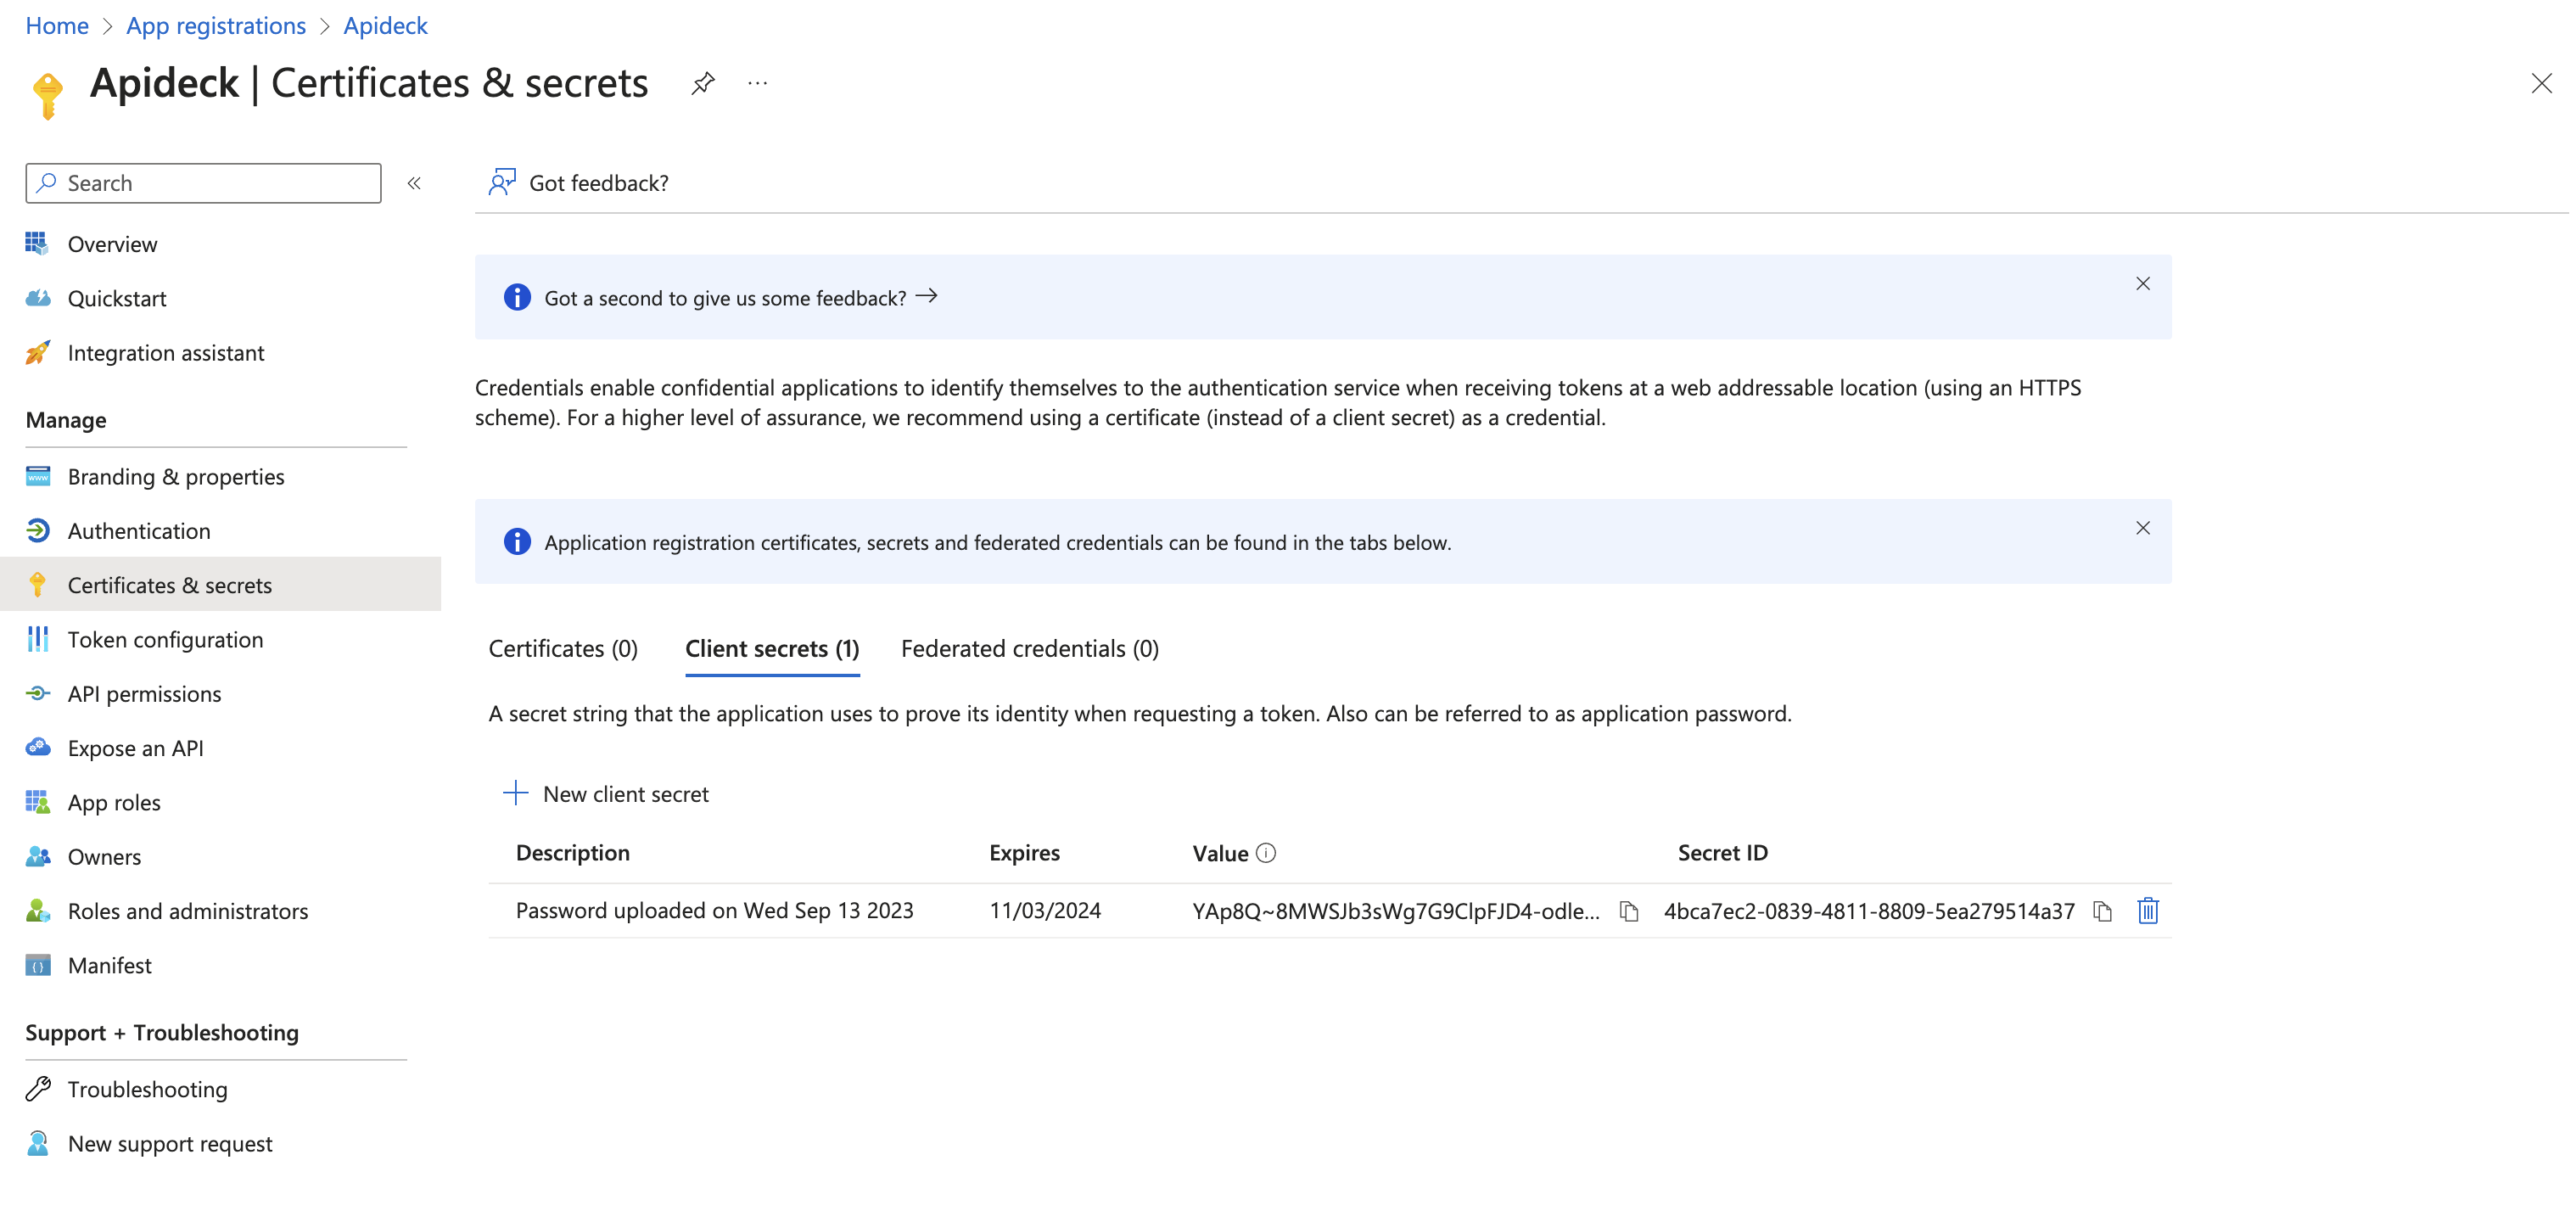
After the secret is generated, make note of the Value and Secret ID for later use. You will not be able to retrieve the value after leaving this page.
5. Configure in Apideck
Head over to the Apideck dashboard for Microsoft Outlook
Enter the following credentials to setup the connection:
- Client ID: Application ID or the Secret ID of the client secret in Microsoft Entra
- Client Secret: Value of the client secret in Entra (Note: Don't use the
Secret IDhere)
Important: Double-check that you copied the correct values from Step 4, as Outlook calls the Client ID the Secret ID, which can be confusing.
Review the scopes to match them with the permissions that are granted with the Microsoft Entra Application.
Once you've entered the credentials, click Save settings. You can now use the connection to retrieve data from Microsoft Outlook.
Alternative: Using Application Permissions for Organization-Wide Access
If you need to access or manage contacts for multiple users across your organization using the filter[owner_id] parameter, you should use Application permissions instead of Delegated permissions.
When to use Application permissions
Use Application permissions when:
- You need to read/write contacts for multiple users in the organization
- You want to use the
filter[owner_id]parameter to specify which user's contacts to access - Your application runs as a service without a specific user context
- You need programmatic access to contacts without user authentication
Setting up Application permissions
Follow steps 1-2 from the main setup guide above, then proceed with these modified permission steps:
1. Add Application permissions
After your app is created, select API permissions in the sidebar, then select Add a permission > Microsoft Graph > Application Permissions

Search and add the following Application permissions:
For read-only access:
Contacts.ReadUser.Read.All
For read and write access:
Contacts.ReadWriteUser.ReadWrite.All
Important: Application permissions require admin consent. After adding the permissions, an administrator must grant consent for the entire organization.
2. Grant admin consent
Click the Grant admin consent for [Your Organization] button in the API permissions page. This step is mandatory and can only be performed by an administrator.
3. Generate credentials and configure
Follow steps 4-5 from the main setup guide to generate your client secret and configure the credentials in Apideck.
When using Application permissions, you can now access contacts for any user in your organization by providing the filter[owner_id] parameter with the user's ID or email address.
FAQ and troubleshooting
Accessing contacts for multiple users
There are two methods to access or modify contacts for multiple users in your organization:
Method 1: Using Delegated Permissions with Mailbox Permissions
This method requires the authenticated user to have explicit mailbox permissions granted by an administrator.
Requirements:
- The user must have the
Contacts.ReadWrite.Shareddelegated permission in Microsoft Entra OAuth app - An organization admin needs to grant explicit mailbox permissions
Steps to grant mailbox permissions:
a. Go to the Microsoft 365 Admin Center
b. Select the target user whose contacts you want to manage
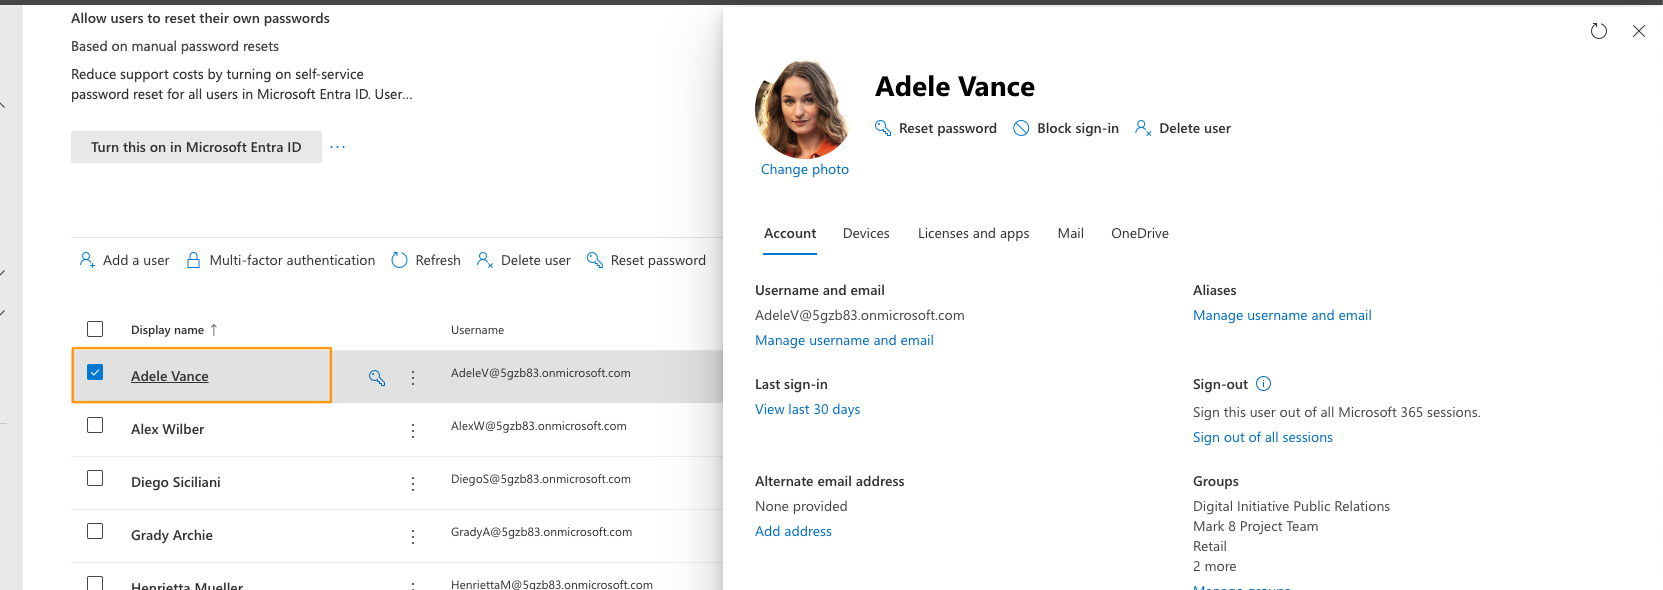
c. Click on "Mail" tab
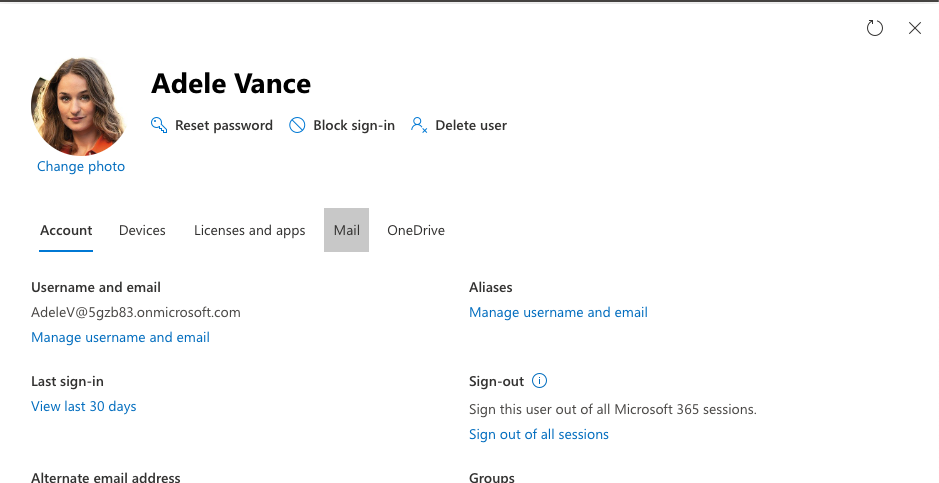
d. Under "Mailbox permissions", click "Read and manage permissions"
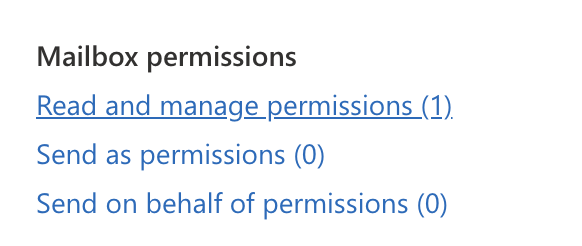
e. Add the authenticated user who needs access to manage contacts
f. Save the changes
Important: Changes to mailbox permissions can take up to 60 minutes to take effect.
Limitations:
- Requires per-user mailbox permission configuration
- Only works for users who have been explicitly granted access
- More administrative overhead for managing multiple users
Method 2: Using Application Permissions
This method provides organization-wide access without requiring individual mailbox permissions.
Requirements:
- Configure Application permissions (
Contacts.ReadorContacts.ReadWrite+User.Read.AllorUser.ReadWrite.All) - Admin consent granted for the organization
- Follow the setup guide in the Alternative: Using Application Permissions section above
Benefits:
- Access contacts for any user in the organization using
filter[owner_id] - No need to configure individual mailbox permissions
- Suitable for service applications and automated workflows
- Centralized permission management
When to use each method:
- Use Delegated Permissions (Method 1) when you need user-specific authentication and limited access scope
- Use Application Permissions (Method 2) when you need programmatic access to contacts across the organization with
filter[owner_id]