Shopware – Connection Guide
Shopware is a trendsetting ecommerce platform to power your online business. Our ecommerce solution offers the perfect combination of beauty & brains you need to build and customize a fully responsive online store.

How to connect to Shopware
Create an API role
-
Go to Settings → System → Users & Permissions → Roles.
-
Select Create new role.
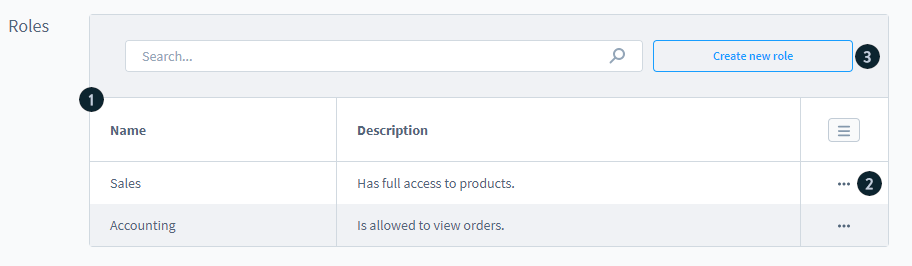
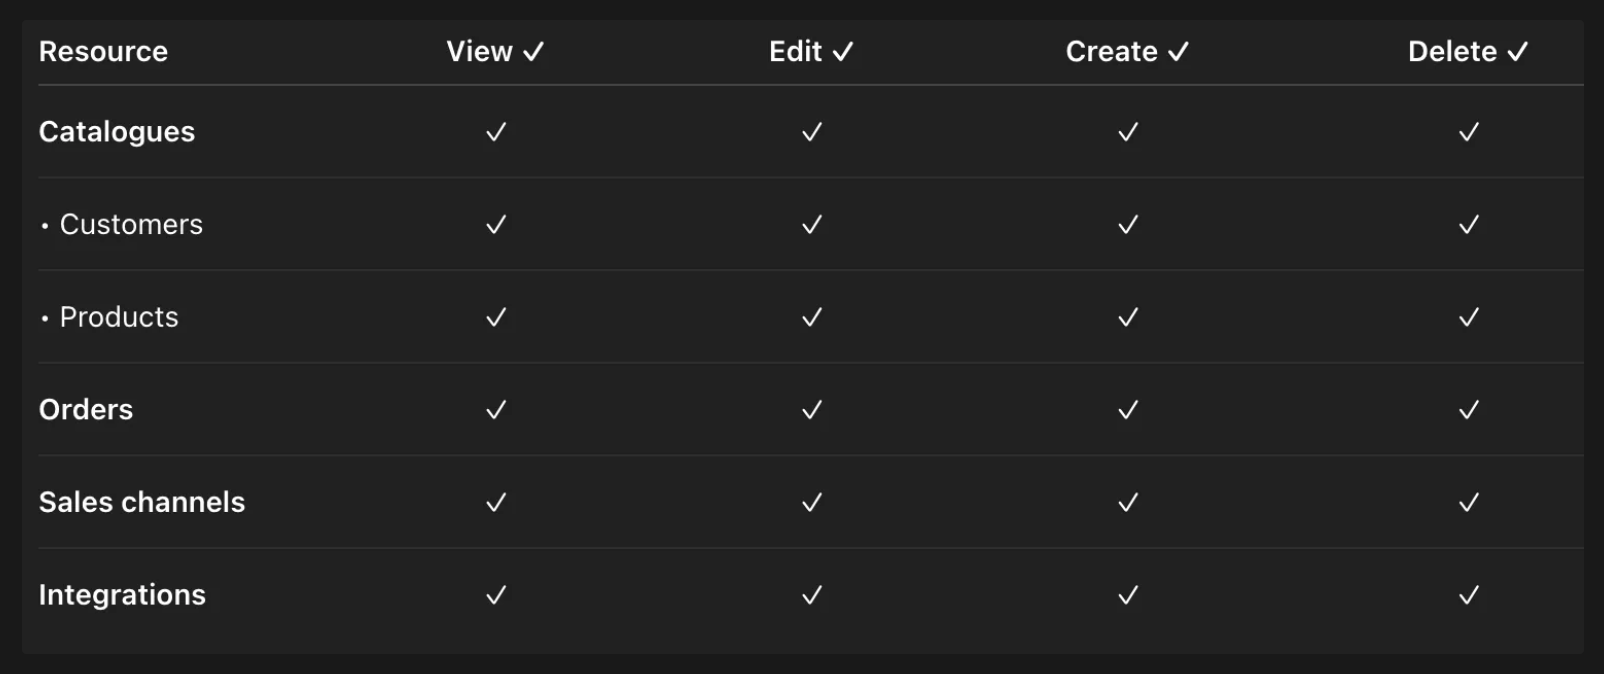
You can select All (View/Edit/Create/Delete) for these entities and save the role afterwards.
Create an API user
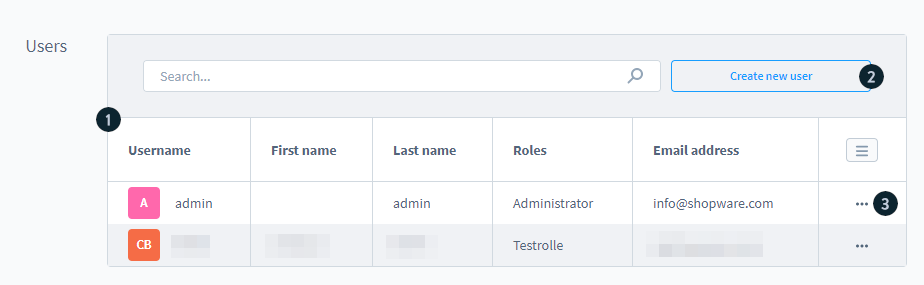
- Navigate to Settings > System > Users & Permissions > Users and select “Create new user”.
-
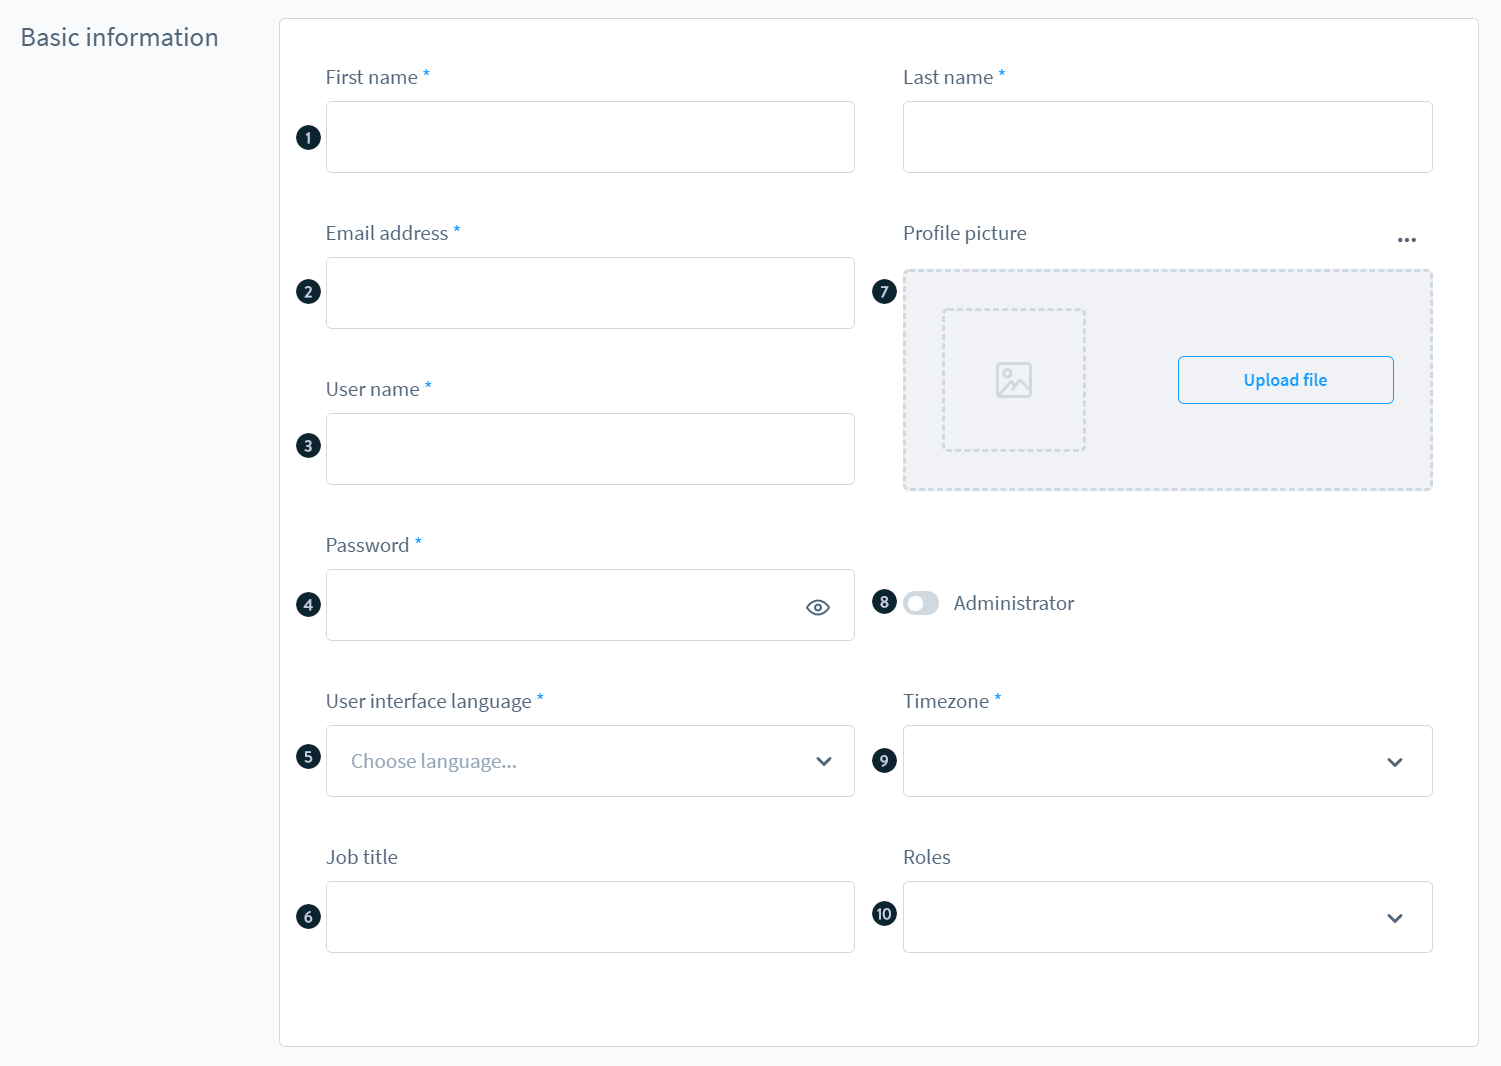
Fill in the basic details and make sure Administrator (8) is not enabled (because users set as administrators have all permissions and no roles can be assigned).
-
Under Roles (10), select the role you created in the previous step.
Create integration
-
Go to Settings > System > Integrations.
-
Click Add integration.
-
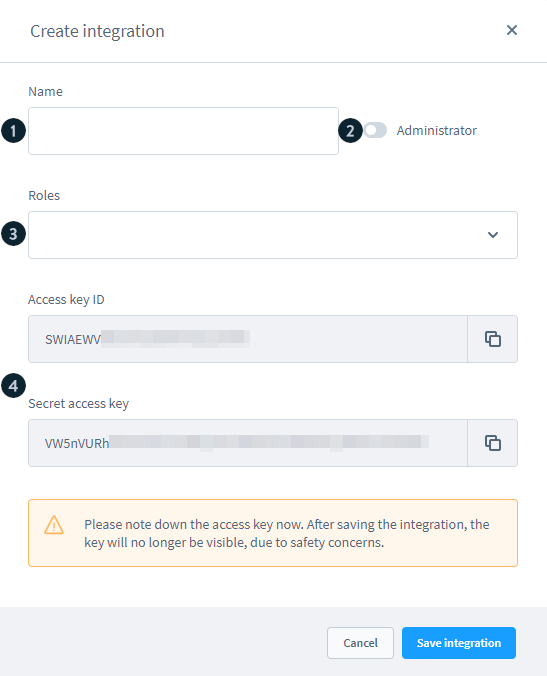
Enter the Name.
-
Select the Role created in the previous step.
-
Copy and note down the Access key ID and Secret access key – they will be displayed only once. These keys will be used later for the Vault configuration.
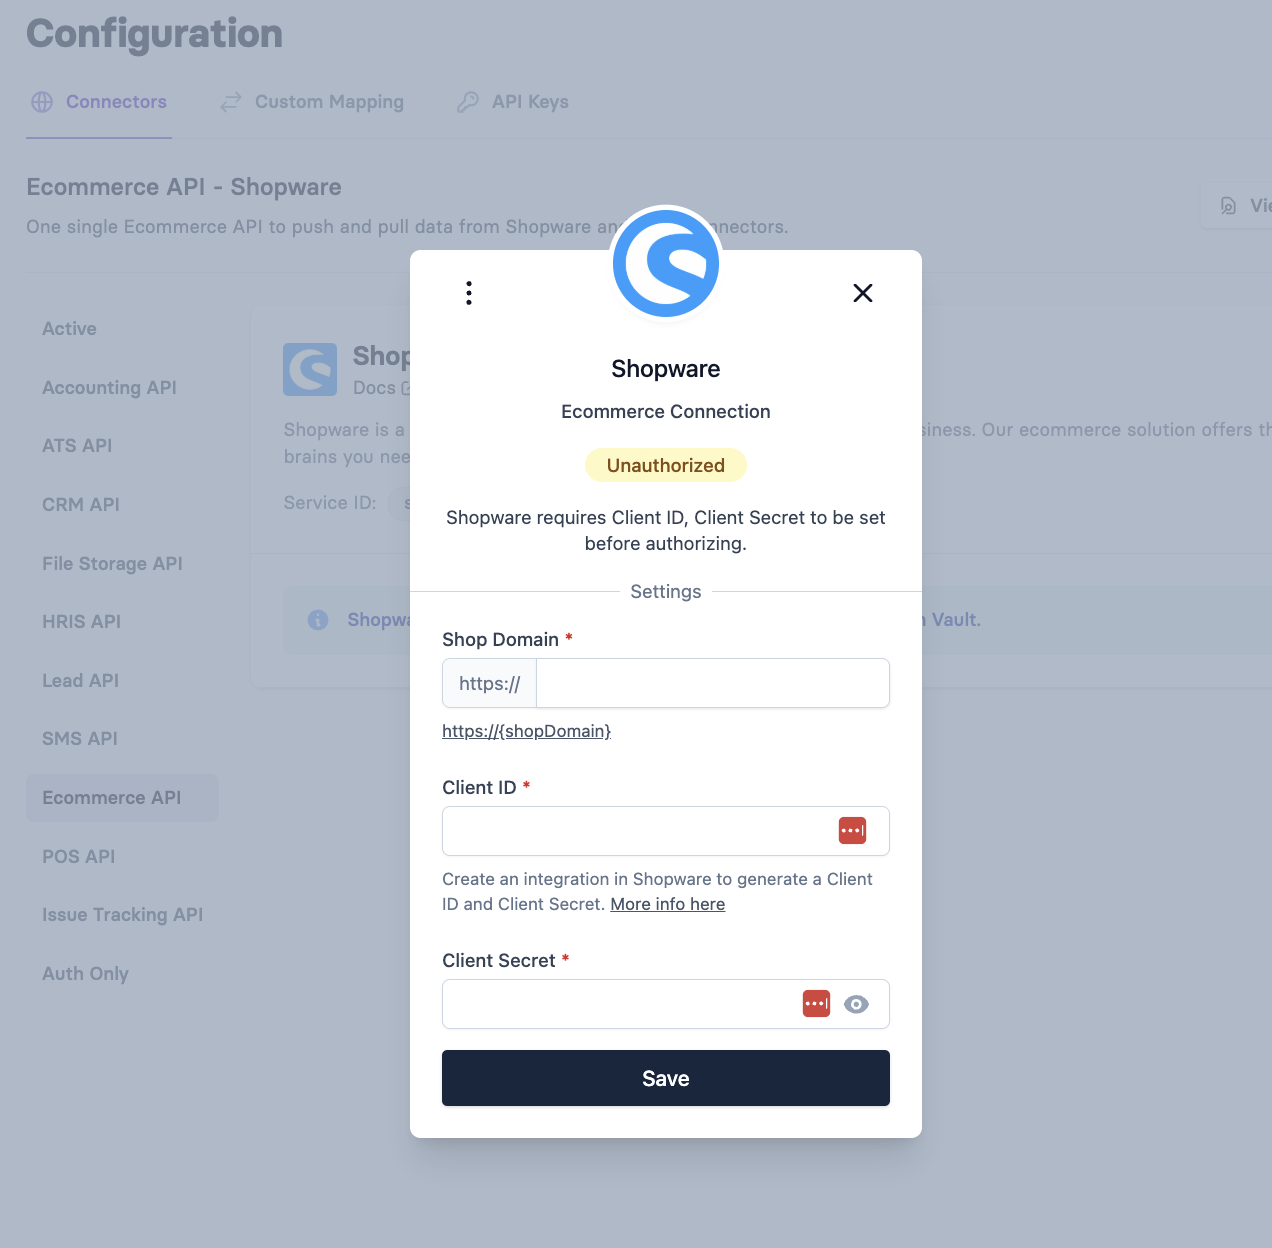
Authorize the connection in Vault
How to find the shop domain
-
In the sidebar, go to Settings → System → Sales Channels.
-
Click the sales channel you’re interested in (e.g., “Storefront”).
-
In the channel’s detail view, switch to the “Domains” tab to see the domain entries.
Note:
Client ID and Client Secret are the Access key ID and Secret access key you obtained in the previous step when creating the integration.
Troubleshooting: no data returned
If your Shopware connection shows as connected in Vault but list calls return no data — or fail with an unexpected error — the request may be blocked before it reaches your store, either by an edge/security layer you control or by Shopware Cloud's platform-level protections. This is not an Apideck or credentials problem.
How to recognize an edge block
- The error body is HTML (or plain text), not JSON. Shopware's API returns JSON for real errors; an HTML page means the request was answered by an edge layer before reaching the store.
- The response headers name an edge layer (e.g.
server: cloudflarewith acf-rayid) rather than the Shopware application. - A direct call from your own machine to the same store URL returns the same block — confirming it happens at your store's edge, independent of Apideck.
Shopware Cloud: platform-level geoblocking
Shopware Cloud can geoblock by region at the platform level, before the shop even loads — so a store or sandbox may be unreachable from the region Apideck calls from. If the store domain does not respond (or is unreachable in a browser from a European location), confirm with Shopware whether region/geo restrictions or a CDN/WAF are in front of the store, and ensure it is reachable from the EU.
How to fix it (self-hosted / customer-controlled edge)
-
Allowlist Apideck's static egress IPs on your firewall / Cloudflare, or add a "skip / allow" rule scoped to your store's API path. Apideck's EU (eu-central-1) egress IPs are:
18.197.244.24718.156.9.33.65.139.215
These are Apideck's current EU (
eu-central-1) egress IPs; support for other regions is upcoming. If you need to confirm the latest list for your region, contact Apideck Support. -
Check which rule fired. In Cloudflare, open Security → Events and search for the
cf-rayvalue from the error — it names the exact rule that blocked the request.
Important: allowlisting IPs is not always enough
On Cloudflare, several protections still block an allowlisted IP. If requests are still blocked after allowlisting, check for Bot Fight Mode (not bypassable by IP rules), Browser Integrity Check (blocks non-browser User-Agents), managed / custom WAF rules, JA3/JA4 TLS fingerprinting, and rate limiting.
Why the connection still shows "connected"
Apideck relays your store's error exactly as received. A 403 is not retried automatically and does not mark the connection as disconnected — so the connection stays healthy while individual data calls fail. Transient edge blocks often clear on retry a little later; to stop them recurring, apply the changes above.