Xero – Configuration Guide
Get paid sooner when you accept payments online straight from a Xero invoice. Give your customers different payment options, including PayPal and Stripe.

Becoming a Xero App partner
As a SaaS product, becoming a Xero App partner can be a valuable opportunity to integrate your software with Xero's accounting platform and offer additional benefits to your customers.
How many Xero organisations can connect to your app is set by your Xero developer pricing tier: the free tier covers a small number of connections, and growing past it means moving up a tier. From the Plus tier onwards, App Partner certification is mandatory. See Xero API pricing for the current tier caps and Xero API Pricing and the App Partner Program for a breakdown of costs, tier comparisons, and optimisation strategies.
Certification is also what gets your app into the Xero App Marketplace, which is an excellent opportunity to reach a diverse range of small businesses and accounting professionals.
Getting certified involves several steps, including onboarding at least 10 active customer connections when your app goes through the review process. It's worth noting that Xero has retired the former Xero App Store revenue-share model: App Store subscription billing (XASS) is being wound down, with partners moving those subscribers to their own billing systems, and the commercial relationship is now the tiered API pricing model that took effect on 2 March 2026.
Xero App partner steps:
- Sign up for Xero
- Create a Xero app
- Onboard at least 10 active customer connections (this takes a paid tier: the free Starter tier's connection cap sits below 10)
- Submit your app for certification
- Wait for Xero to review your application
- Receive your Partner confirmation
- Publish your app in the Xero App Marketplace
Once you're approved as a Xero App Partner, you'll be able to list your product in the Xero App Marketplace and benefit from Xero's extensive developer resources and support services. Xero runs certification as a series of technical checkpoints rather than a single submission, so start it well before the tier move that makes it mandatory: you can keep building against your app while it is in progress, but the free Starter tier cannot hold the 10 active customer connections certification requires. Plan the move to a paid tier before you start onboarding toward that prerequisite. If Xero has already assigned you a partner manager, they can give you a view on where your submission stands.
For more information on the Xero App partner program, see the Xero App partner program page.
To facilitate the process of becoming a Xero App partner and get your Xero app published in the Xero App Marketplace, we strongly advise the following actions:
- Create a Xero app & connect via Apideck
- Onboard at least 10 active customer connections with your Xero app
- Customize Apideck Vault redirect URI
Create a Xero app & connect via Apideck
To create a connection with Xero, you have to complete these steps.
Sign up for Xero
Go to the Xero website and click on the "Sign up" button to become a partner.
Fill out the sign-up form with your details and click "Submit". You should receive a verification email. Open the verification email and click on the link to complete the account setup process. Set a password for your Xero account, and then follow the prompts to set up your business information.
Once your information is set up, click on "Start Free Trial".
Note that you won't need to actively use this trial Xero account - it's only needed to complete the process of adding your Xero app.
Log in to Xero
After you have signed up for a Xero, you can log in to Xero to create an "Application".
You can do this by visiting the Xero Developer Center and clicking on "Log in" in the top right corner. Enter your email address and password and click on the "Login" button.
Register a Xero app
After you've registered for a Xero Developer account and are logged in, go to the "My Apps" page from the top navigation.
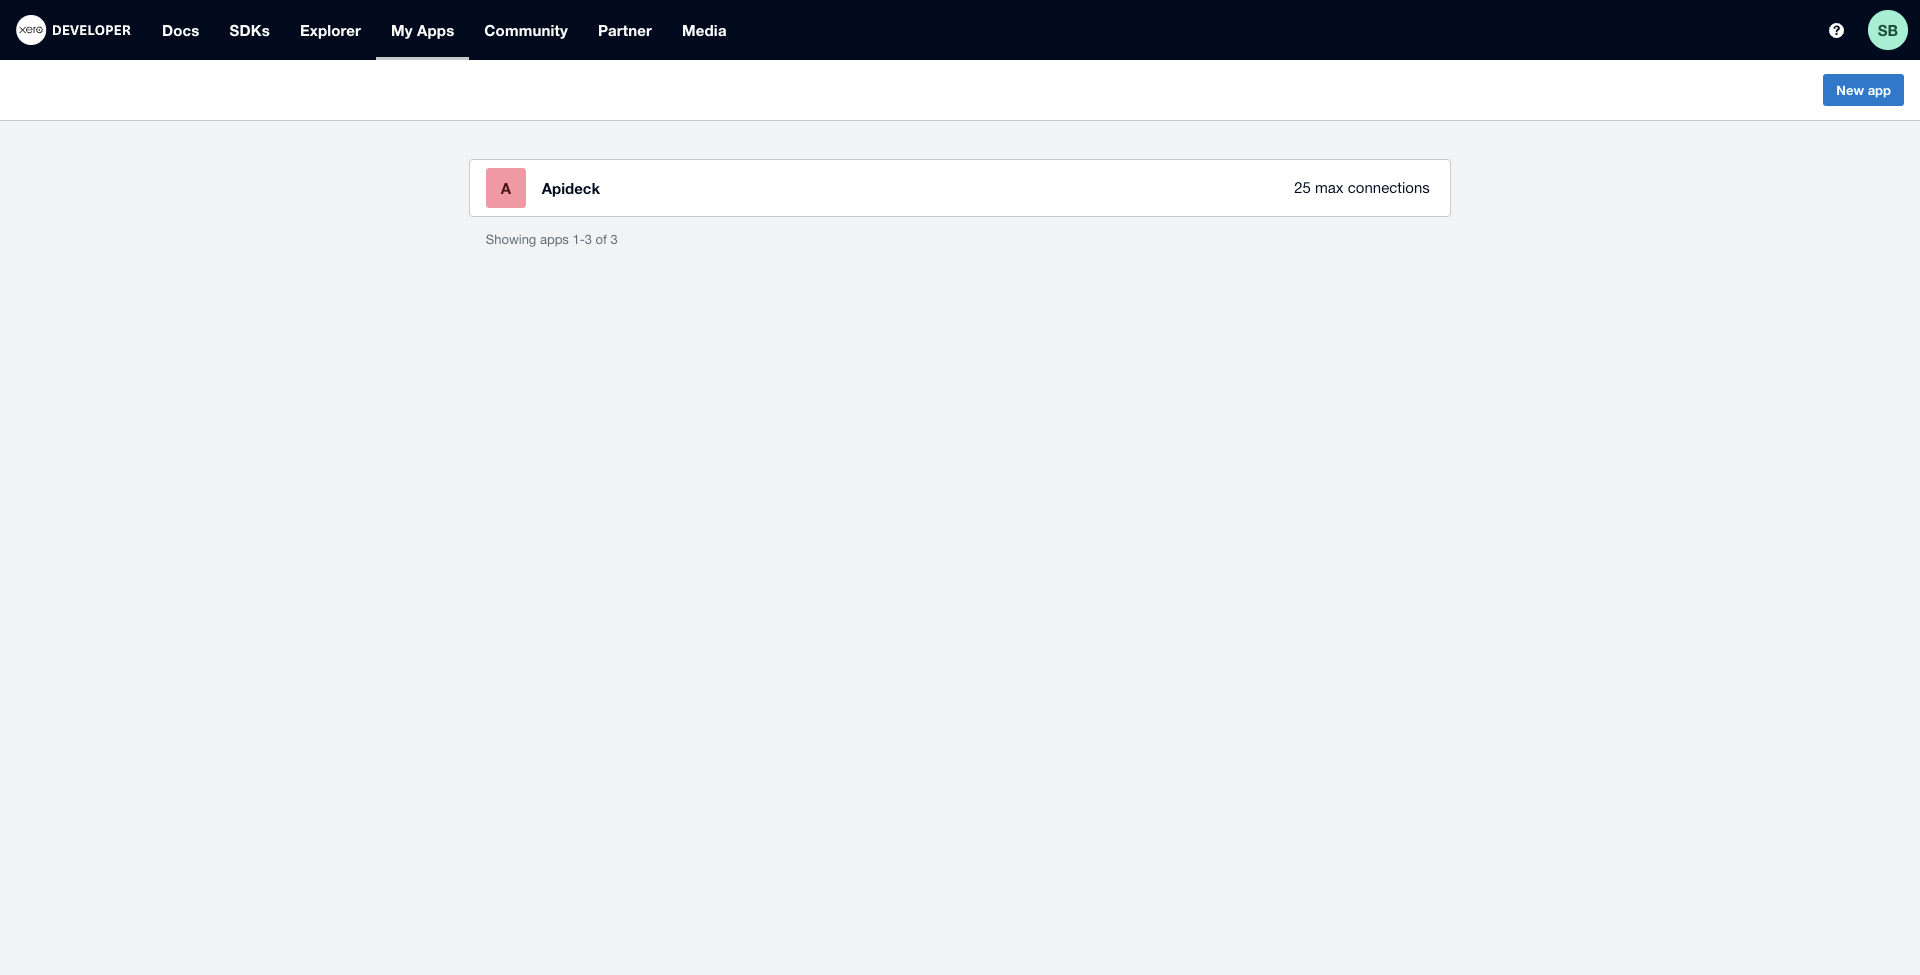
You can create a new Xero application by clicking on the "New app" button on the "My Apps" page.
This will take you to a form where you can enter the required information about your app:

- App Name: Enter a meaningful name (for example, 'Apideck integration'), since when your users link their Xero account, they will see the “App Name” is requesting to integrate with their Xero account.
- Integration Type: Select "Web app" as the type of integration.
- Company or Application URL: The homepage of your company’s website or the URL your SaaS product.
- Redirect URI: The URL where the user will be redirected after granting your app access to their Xero account. This should be
https://unify.apideck.com/vault/callback.
💡 TIP: Note the date you create the app. Xero apps created on or after 2 March 2026 accept granular OAuth scopes only; apps created before that date can keep using broad scopes until 13 September 2027, when every app must be on granular scopes: see Scopes below.
Configure your Xero app
After creating your app, you'll need to configure it by setting up various settings and permissions. This includes setting up OAuth 2.0 authentication, and configuring your app's terms & conditions, branding and icons.
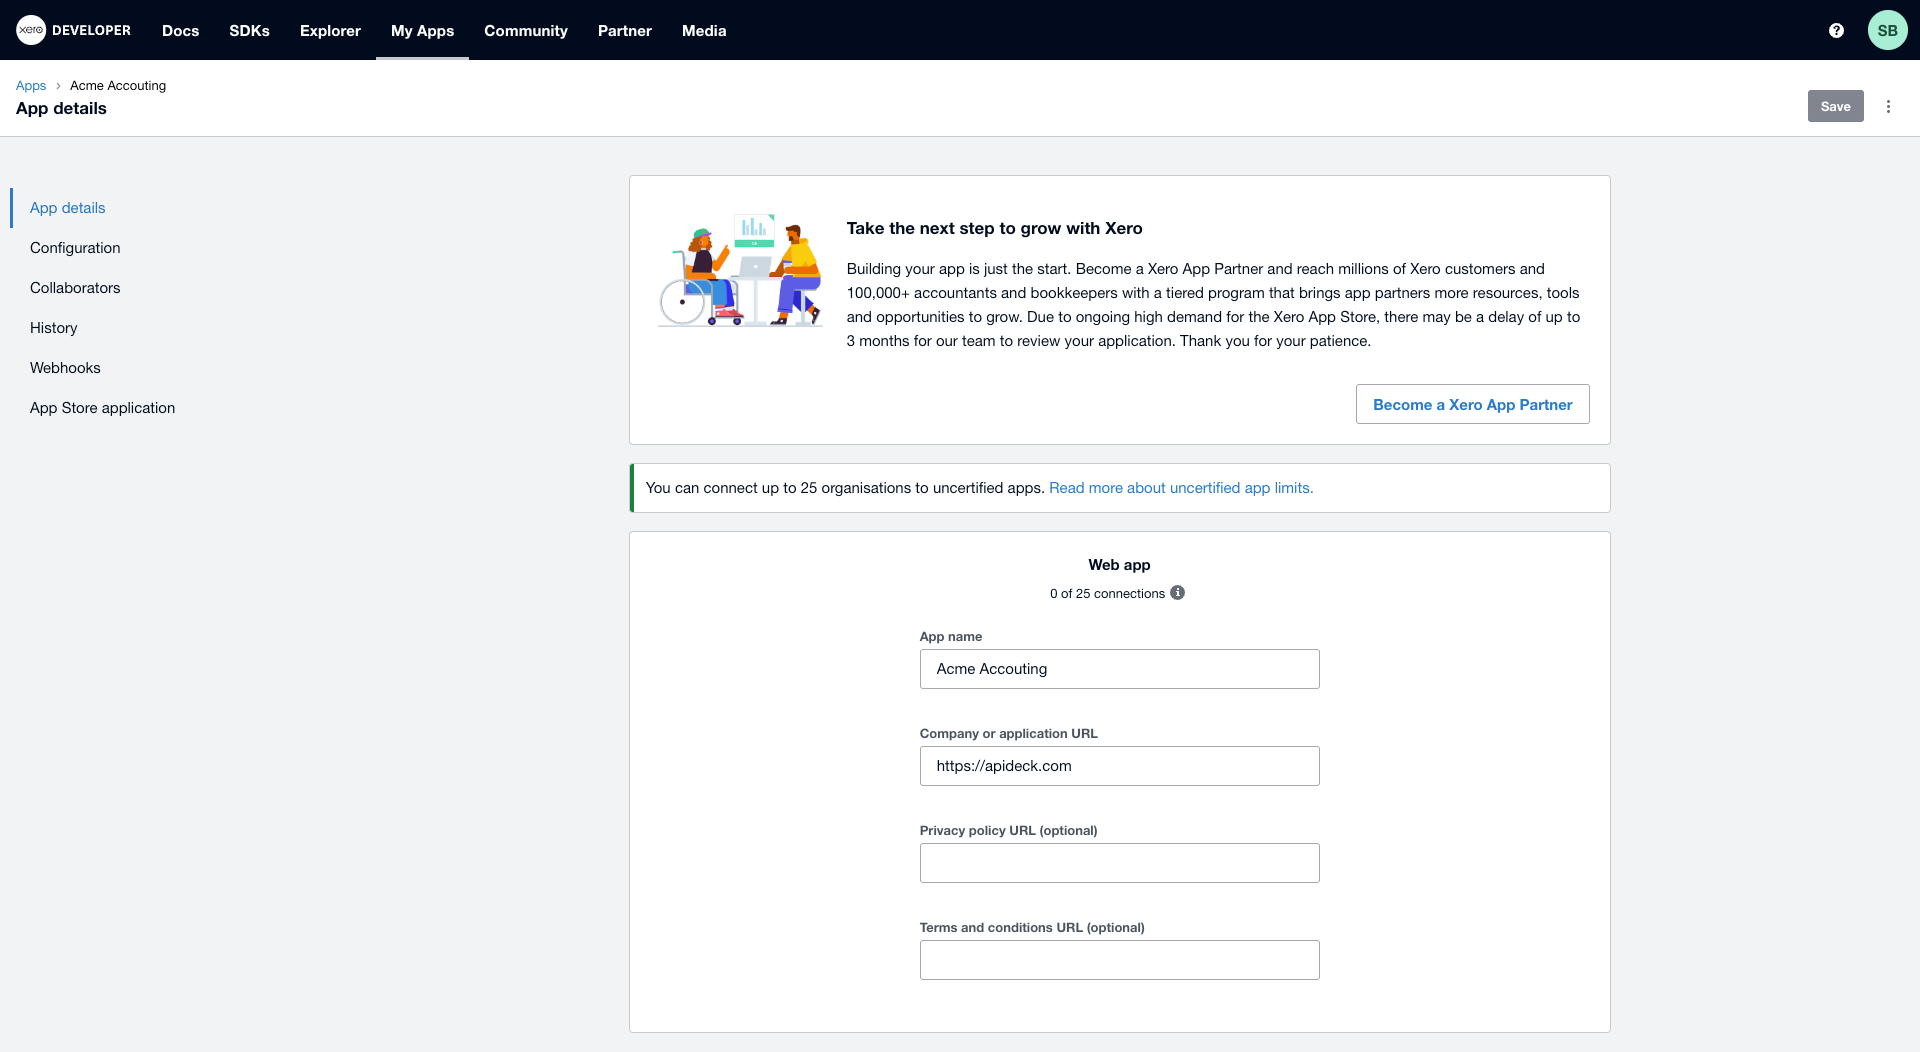
App details
The app details allow you to configure the name, company URL, Privacy policy & Terms and Conditions.
Configure OAuth
The next step is to configure the OAuth 2.0 authentication.
Review the "Redirect URIs" and make sure that the URI refers to https://unify.apideck.com/vault/callback
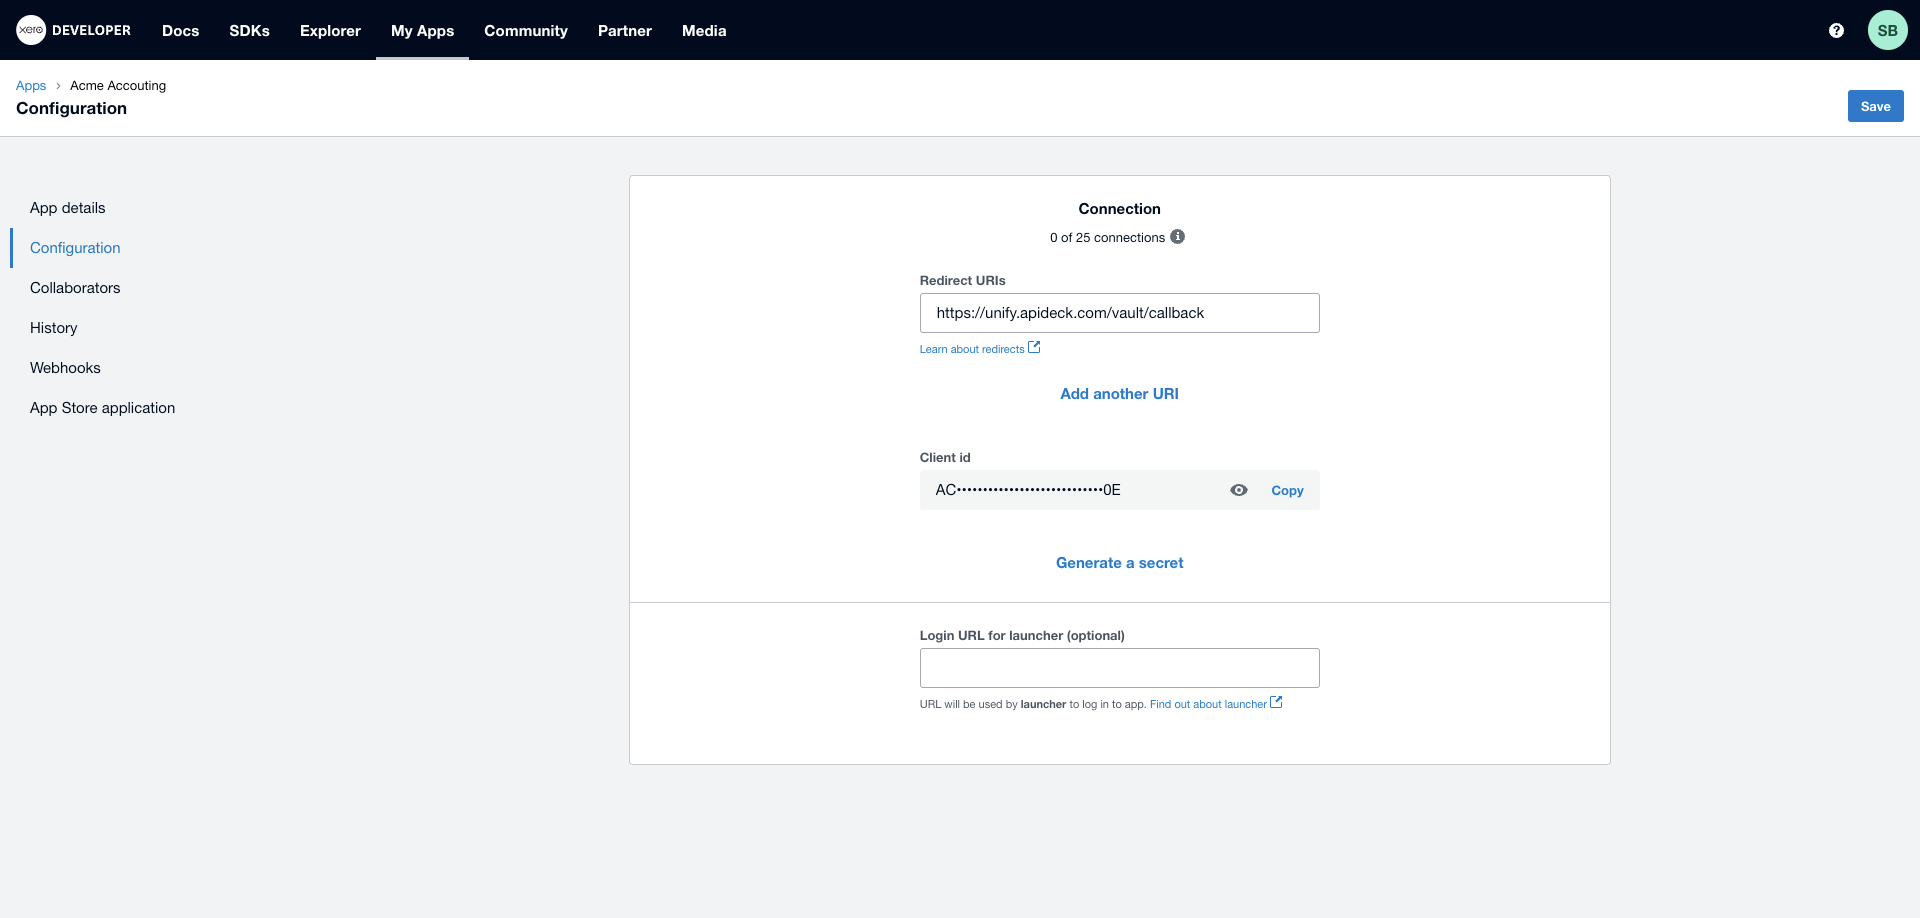
The Client ID is automatically generated. For enabling the OAuth 2.0 authentication, you need to generate a Client Secret.

Click on the "Generate new secret" button to generate a new Client Secret.
💡 TIP: Copy the "Client Id" and the "Client secret". You will need them in the next step.
Vault Connection Setup
Now that you have your Xero App credentials, you can enable the integration to connect to your Xero instance in a secure manner. Once this is done you can start testing it by using Xero's APIs and sandbox environment. You can also use Xero's sandbox environment to test your app's integration with Xero without affecting real data.
Goto the Apideck > Configuration > Accounting > Xero

Enter the OAuth client ID & Secret from Xero and review if the scopes granted in Xero match with the scopes you are requesting in Apideck (see Scopes).
Press "Save settings" to save your credentials.
You can test the connection by clicking "Test Vault", which will check if the connection is working.
Now you are ready and clients can authorize the connection to their Xero account securely.
Scopes
Apideck requests a default set of Xero scopes for every connection, and you can tailor that set under Use your own client credentials in the Apideck Xero connector settings. Keep offline_access in the set: Xero only issues a refresh token when that scope is requested, and Apideck relies on it to refresh access tokens automatically.
A change to the requested scope set only takes effect for new authorisations. Existing connections keep the scopes their consumers already consented to until each consumer re-authorises: when accounting.reports.trialbalance.read entered Apideck's default set on 18 August 2026, for example, connections authorised before that date did not gain it until they were re-authorised. Plan a re-authorisation prompt for the affected consumers whenever a scope change has to reach connections that already exist.
Granular scopes only for apps created on or after 2 March 2026
Xero apps created on or after 2 March 2026 accept granular scopes only and reject the legacy umbrella scopes. Apps created before that date keep working with the broad scopes they already use, or a mix of broad and granular, until Xero's migration deadline of 13 September 2027, by which point every app must be on granular scopes (see the Granular Scopes FAQ).
| Legacy umbrella scope | Granular equivalents |
|---|---|
accounting.transactions | accounting.invoices, accounting.payments, accounting.banktransactions, accounting.manualjournals (append .read for read-only access) |
accounting.transactions.read | accounting.invoices.read, accounting.payments.read, accounting.banktransactions.read, accounting.manualjournals.read |
accounting.reports.read | The per-report scopes, for example accounting.reports.trialbalance.read, accounting.reports.profitandloss.read, accounting.reports.balancesheet.read, accounting.reports.aged.read |
If a consumer of a newly registered app hits an invalid-scope error on the Xero authorisation screen, a legacy scope in the requested set is the usual cause. Replace it with the granular scopes that cover the resources you actually read and write.
Two scopes in Apideck's default request set are worth knowing about, because trimming them out of a custom scope set degrades the affected resources, in two different ways:
- Ledger account balances. The
current_balancefield onledger-accountsis enriched from Xero's Trial Balance report and is only populated when the granted scopes includeaccounting.reports.trialbalance.read(or the legacyaccounting.reports.readon an older app). Without the scope, the connector skips the report call and the field is silently omitted; reads still succeed. - Aged receivables and payables. The
aged-debtorsandaged-creditorsresources read Xero's aged reports, which needaccounting.reports.aged.read. Without the scope, reads on these resources return an error rather than data.
For the full list of scopes Xero publishes, see the Xero OAuth 2.0 scopes reference.
accounting.journals.read and the Advanced tier
From 2 March 2026 Xero's Journals API sits behind the Advanced pricing tier, and Apideck no longer requests accounting.journals.read by default for new connections. Reads and writes on journal-entries are affected differently, so treat them separately:
- Writes work on every tier.
POSTandPATCHonjournal-entriesare backed by XeroManualJournalsand need nothing beyondaccounting.manualjournals, which is in the default scope set. - Manual-journal reads work on every tier when they are filtered.
GET /accounting/journal-entries?filter[scope]=manual(andfilter[status]=draftorpending_approval) readsManualJournals, again covered by the default scopes. URL-encode the square brackets, or send the request withcurl --globoff. - Unfiltered reads go to Xero
Journals. A bareGET /accounting/journal-entriesreturns the full general-ledger view, so on a new connection it returns403untilaccounting.journals.readis in your requested scope set and your app is on the Advanced tier. general-ledger-transactionsneeds the same scope and tier, for the same reason: it is backed by XeroJournals. Add the scope when you move to that tier; without both in place, reads on that resource return an error rather than data.
The journal-entries to general-ledger-transactions migration guide is the fuller story: it covers the transition stages, the filters available during them, and the field-level differences between the manual and general-ledger views.
Adding custom scopes safely
The Apideck Xero connector allows custom scopes, which is what makes the granular sets above configurable. One caution before you edit the list: some Xero scopes are not compatible with the OAuth authorization_code flow that Vault uses (app.connections and marketplace.billing are the ones we have seen), and requesting one of them can make the refresh tokens on affected connections permanently invalid, forcing those consumers to re-authorise.
Apideck does not validate custom scopes against Xero's allowed list, so:
- Confirm in Xero's OAuth 2.0 scopes reference that a scope is valid for the authorisation code flow before adding it.
- Test the new scope set on a single connection before rolling it out.
Bank Feeds
Xero supports Bank Feeds, which automatically import bank transactions into Xero on a daily basis, simplifying reconciliation and reducing manual data entry.
For detailed information on setting up and using Bank Feeds with Xero, see the Bank Feeds for Xero guide.
Do your first API call to the Xero API
-
Connect your Xero account through Vault with a test session.
-
To test the access token, make a query to get your
Invoicesendpoint using the Accouting API.
curl --location --request GET 'https://unify.apideck.com/accounting/invoices' \
--header 'x-apideck-consumer-id: test-consumer' \
--header 'x-apideck-app-id: {APIDECK_APP_ID}' \
--header 'x-apideck-service-id: xero' \
--header 'Authorization: Bearer {APIDECK_API_KEY}' \
--header 'Content-Type: application/json'
Custom Apideck Vault redirect URI options
To enable the connection to your Xero instance and be compliant with the Xero certification, it is required to hide references to any integration platform.
The only reference to Apideck would be OAuth "Redirect URI" after completing the authorization pop-up by customers. The OAuth Redirect URI is hosted by Apideck's Vault.
We have the option to hide the reference to Apideck's Vault callback URL by setting up a custom domain for Apideck Vault.
💡 IMPORTANT: Once you have applied one of the options, don't forget to update the "Redirect URI" in your Xero app configuration.
Setup a custom subdomain for Apideck Vault
Add a custom domain name for Apideck Vault. This will allow you to hide the reference to Apideck's Vault.
- Create a CNAME record
Sign in to your DNS name server host and navigate to your DNS settings.
Add a CNAME record with the value cname.vercel-dns.com.
[REPLACE_WITH_DESIRED_SUBDOMAIN] CNAME cname.vercel-dns.com.
- Contact Apideck
Get in touch with your Apideck contact to let us know about the custom domain you want to use, so we can configure & enable it for Apideck Vault.
- Wait for the changes to propagate
Congratulations! You have now pointed your custom domain to Apideck Vault! When DNS changes are made, you can expect a propagation time up to 24 hours (but mostly much less than that). This is because it takes time for the DNS to take effect across the internet. The actual time of propagation may vary in some locations based on your network setup.
- Update the "Redirect URI"
Update the "Redirect URI" in your Xero app configuration to use your custom domain.
Add an additional "Redirect URI" https://[REPLACE_WITH_DESIRED_DOMAIN]/vault/callback or replace the existing redirect URI from https://unify.apideck.com/vault/callback to https://[REPLACE_WITH_DESIRED_DOMAIN]/vault/callback
Submit your Xero app for certification
Once you've finished testing your app, you'll need to submit it for approval by Xero.
You can do this from the Xero Developer Center by navigating to My apps > App Store Application

Xero has a strict app review process to ensure that all apps meet their quality standards and comply with their usage guidelines. If your app is approved, it will be listed in the Xero App Marketplace and available for other Xero users to use.
Visit the Xero App partner page for more information on the advantages.
Xero Webhook Registration
Register a Xero webhook in Unify
Goto the Apideck > Configuration > Accounting > Xero On the Unify Xero connector settings, at the bottom, you can find the “Webhook Execute URL” (1).

💡 IMPORTANT: Copy the full “Webhook execute URL” since you need this URL to register it in Xero.
Create a webhook subscription in Xero
To register a webhook using the Xero Developer Portal, follow these steps:
-
Log in to your Xero Developer account and go to the "My Apps" page from the top navigation.
-
Select the Xero app that you want to register the webhook for.
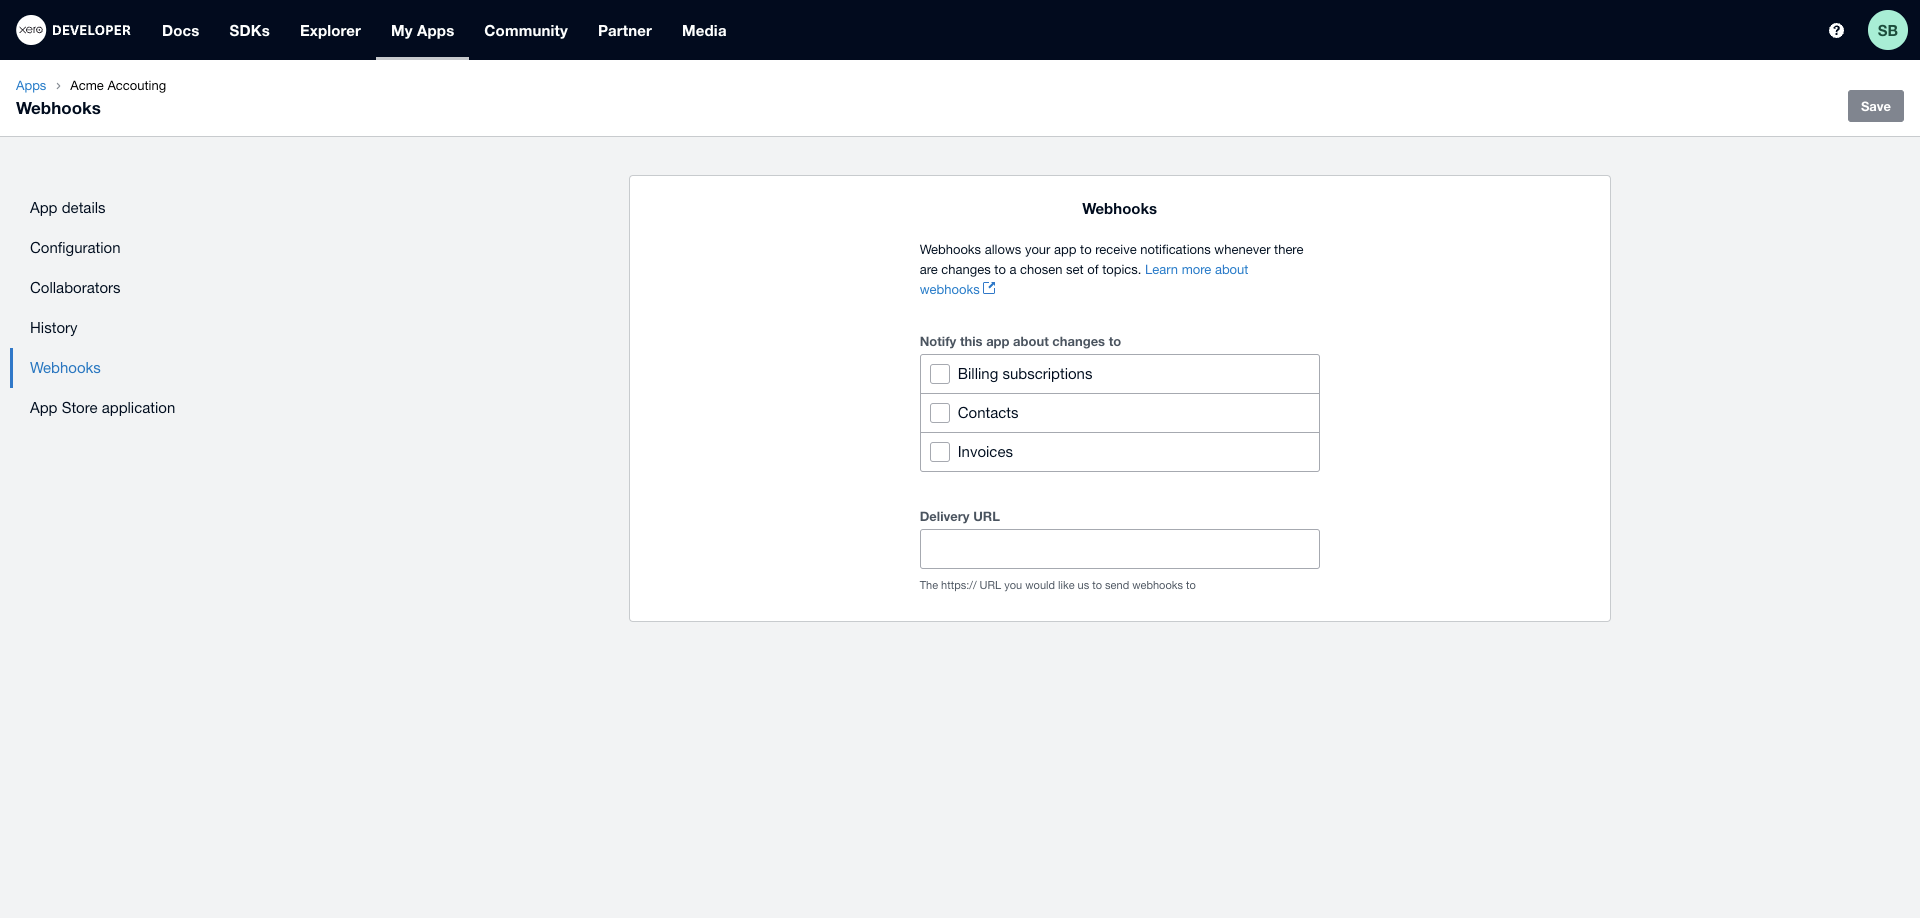
- In the side menu of the Xero, click on the "Webhooks" submenu.
- Subscribe Xero webhook events
To subscribe to Xero change events, you have to enter the Apidek "Webhook execute URL" (1) and press save.

After you have successfully registered the Webhook in Xero, the Webhook key (2) will be generated and displayed on the "Webhooks" page.

Copy the Webhook key (2) from Xero and use it in your Xero Apideck configuration.
- Register Xero Webhook key in Unify
Goto the Apideck > Configuration > Accounting > Xero

Enter the Webhook key (2) from Xero in the signature key (2) field in Apideck and press Save settings.
- Trigger the "Intent To Receive" in Xero
The next step is to trigger the "Intent To Receive" in Xero to let Xero validate the webhook key.

This will be handled automatically by Apideck when you have entered the signature key and updates the status in Xero on success.
Subscribe to Unify events
After you have completed the above steps, you can subscribe to your application to Unify Events.
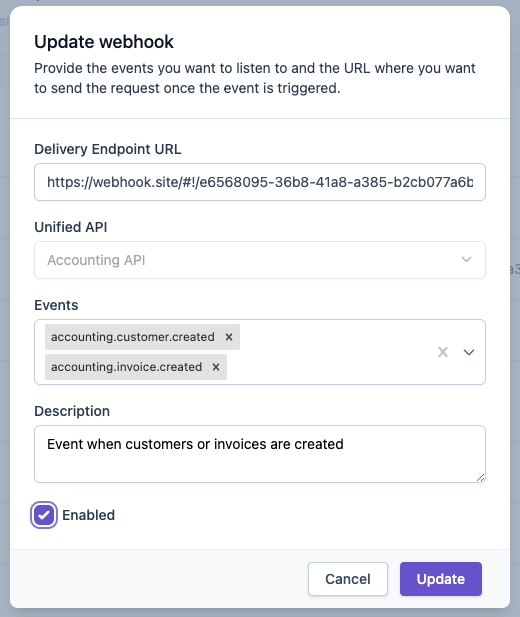
The following guide will explain all the steps to subscribe to Unify webhooks events: How to subscribe to webhook events
FAQ and troubleshooting
1. Limitations and Rules for Updating Xero Invoices
When updating invoices in Xero, there are several limitations and rules you must adhere to:
-
You can only update an invoice depending on the type of invoice, and its payment status.
ACCREC ACCPAY Unpaid Yes Yes Paid (in part, or in full) Yes – with exceptions below No In a locked period No No -
If an invoice is paid in part or in full, you can only update the following fields:
- reference
- due_date
- number
- template_id
- customer object, unless the payment is made with a Credit Note
- source_document_url
- line_items
- description
- ledger_account.code, except for Construction Industry Scheme (CIS) account codes
-
Creating, updating and deleting line items when updating invoices:
- In an update (POST) request:
- Providing an existing line_item with its line_item.id will update that line item.
- Providing a line_item with no line_item.id will create a new line item.
- Not providing an existing line_item with its line_item.id will result in that line item being deleted.
- In an update (POST) request:
2. cURL Requests for Adding and Removing Allocations from Xero Credit Note
Adding Allocations to a Credit Note
To add allocations to a credit note, you can use the following cURL request in proxy with your credit note id and invoice id:
curl --location --request PUT 'https://unify.apideck.com/proxy' \
--header 'x-apideck-consumer-id: {consumer_id}' \
--header 'x-apideck-app-id: {app_id}' \
--header 'x-apideck-service-id: xero' \
--header 'x-apideck-downstream-url: https://api.xero.com/api.xro/2.0/CreditNotes/{creditNoteId}/Allocations' \
--header 'Accept: application/json' \
--header 'Content-Type: application/json' \
--header 'Authorization: Bearer {access_token}' \
--data '{
  "Amount": {amount},
  "Invoice": {
    "InvoiceID": "{invoiceId}"
  }
}
'
Removing Allocations from a Credit Note
To remove allocations from a credit note, you can use the following cURL request in proxy with your credit note id and allocation id:
curl --location --request DELETE 'https://unify.apideck.com/proxy' \
--header 'x-apideck-consumer-id: {consumer_id}' \
--header 'x-apideck-app-id: {app_id}' \
--header 'x-apideck-service-id: xero' \
--header 'x-apideck-downstream-url: https://api.xero.com/api.xro/2.0/CreditNotes/{creditNoteId}/Allocations/{allocationId}' \
--header 'Accept: application/json' \
--header 'Content-Type: application/json' \
--header 'Authorization: Bearer {access_token}' \
3. Invalid scope error on the Xero authorisation screen
Check when your Xero app was registered: apps created on or after 2 March 2026 reject the legacy umbrella scopes. See Scopes for the granular replacements.