Sage Intacct – Connection Guide
Increase ROI and transform your organization with the first and only preferred provider of the AICPA for accounting and financial management software for companies of any size.

How to connect to Sage Intacct
To create a connection with Sage Intacct, you have to complete 3 steps.
- Add Web Services User
- Assign Permissions to the Web Services User
- Authorize your Sender ID on Sage Intacct Web Services
- Vault Connection Setup
1. Add Web Services User
The first step is to set up a Web Services User (WSU) in Sage Intacct. This way all of your Apideck Web Services usage will be logged as one user. This also allows you to limit permissions to Apideck. Select only the required permissions for your integration use case.
If you encounter 403 errors, ensure your WSU has enough permissions.
Navigate to Company > Admin > Web Services users.
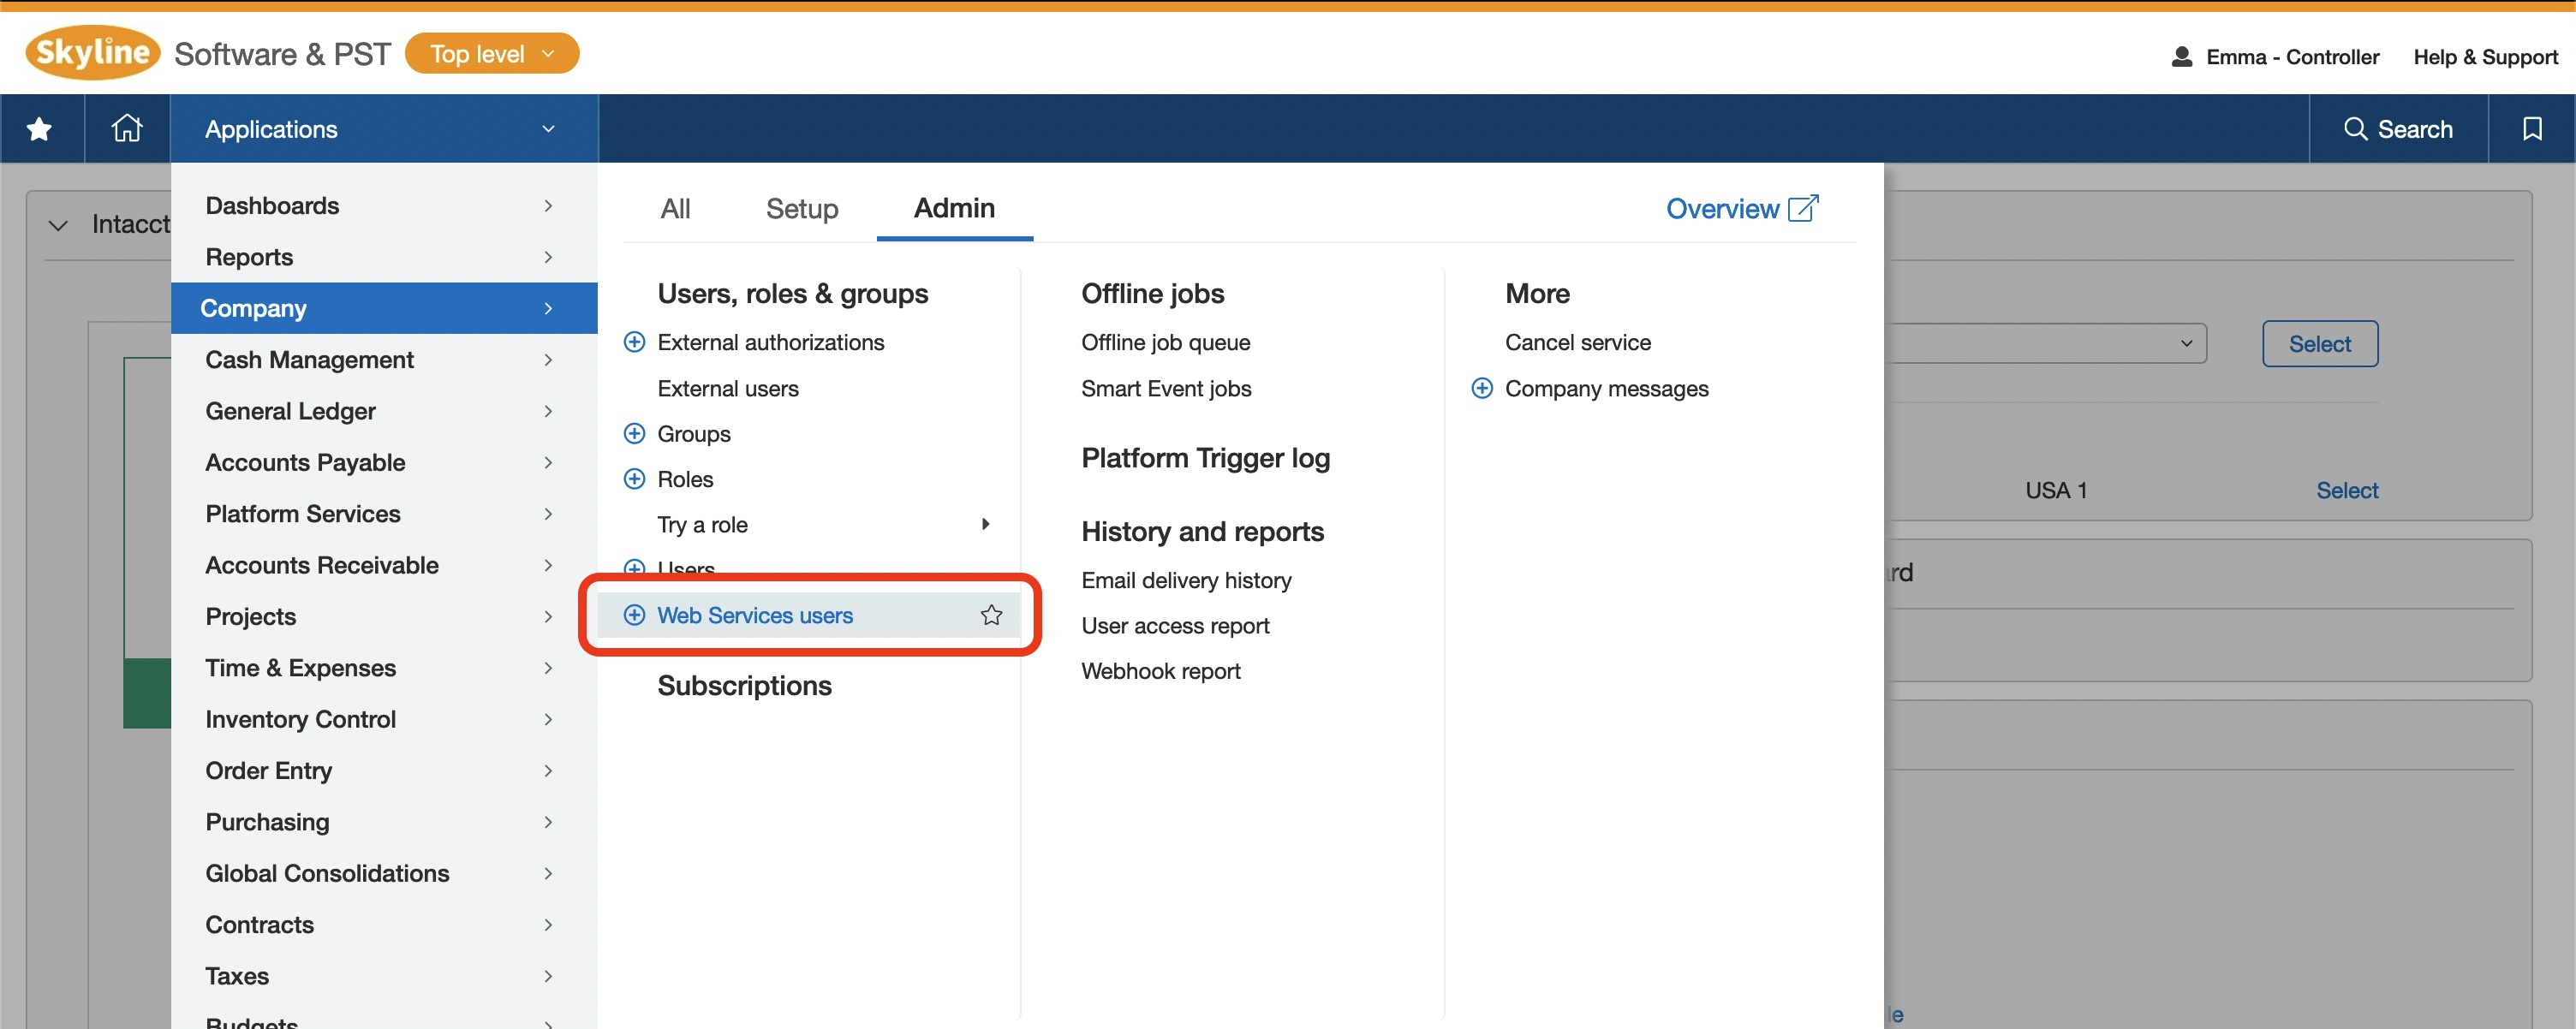
On the Web Services Users page, click Add.

Fill out the required information for a Web Service User.
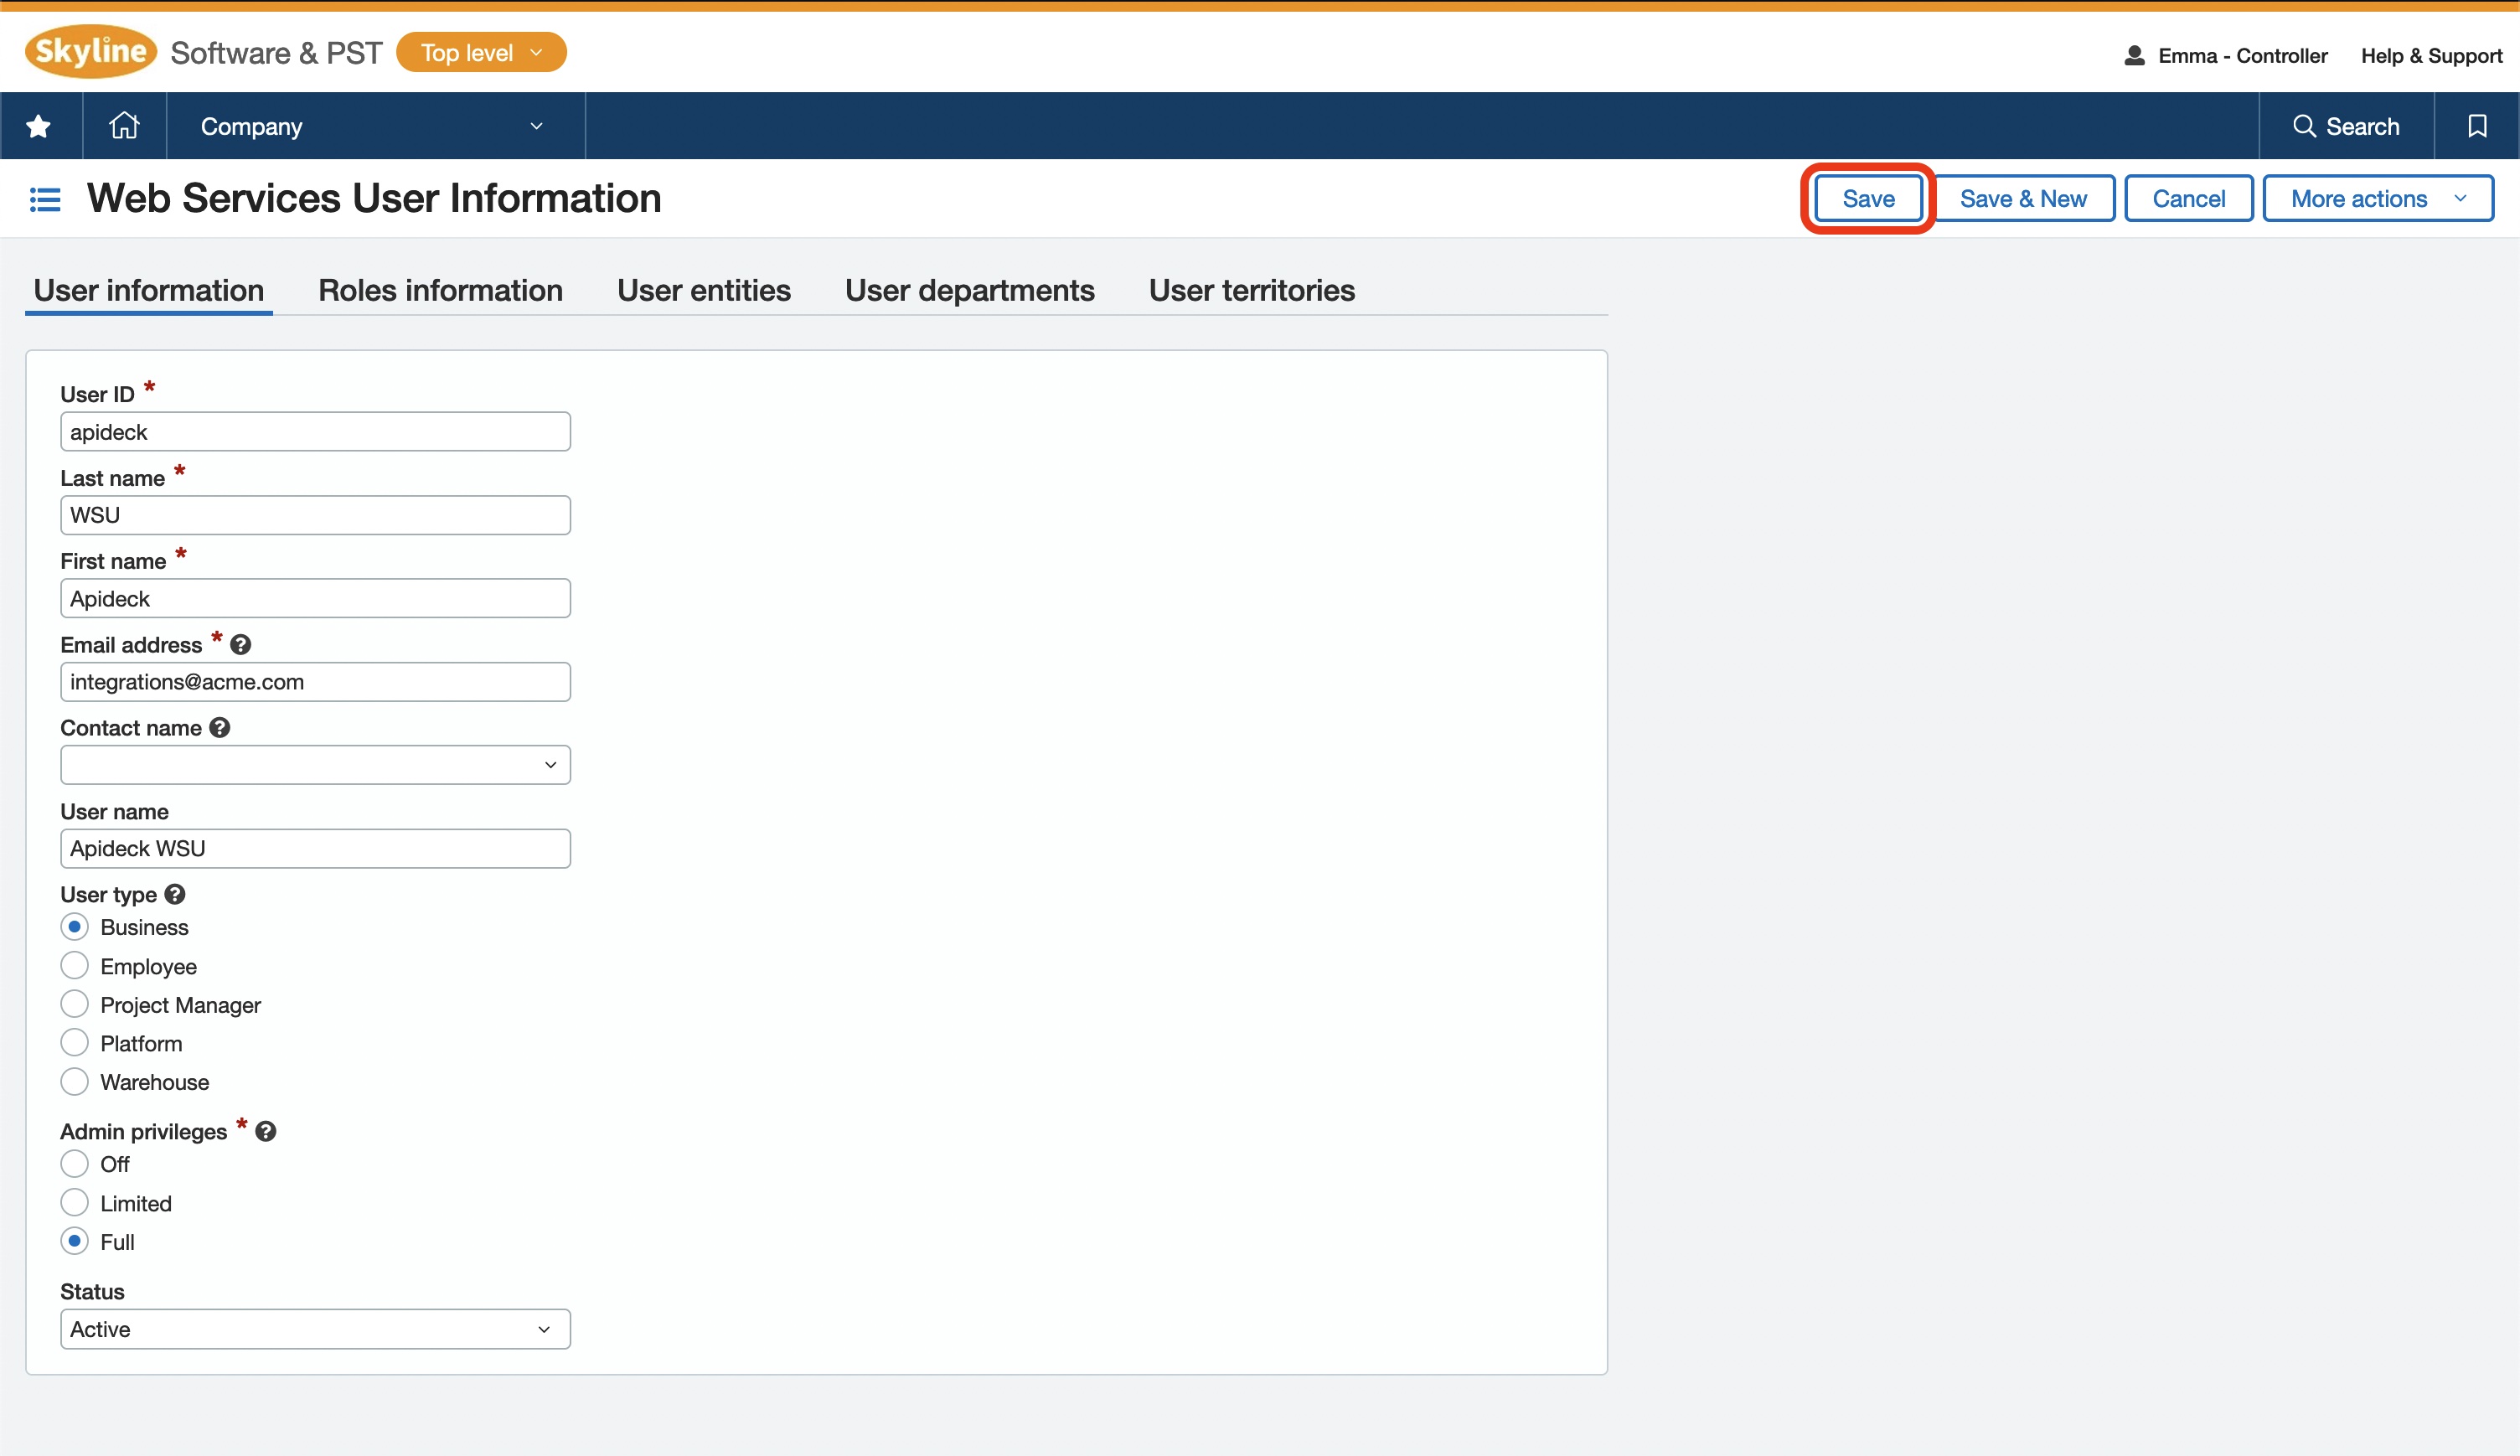
| Field | Description |
|---|---|
| User ID | Unique identifier for this User. For example apideck |
| User type | User type limits the permissions available to a user. Business is recommended, this type gives unlimited access rights. Permissions can be limited later in the user settings. If you choose a different user type, make sure it has the required permissions for your integration use case. |
| Admin privileges | Full is recommended. Only full administrators have complete access to Platform Services features. |
Click Save after completing the form.
2. Assign Permissions to the Web Services User
This step will assign Permissions to the Web Services User. 💡 REMARK: The creation of a new role is optional, if you assign the existing "Admin" role to the Web Services User.
Navigate to Company > Admin > Roles
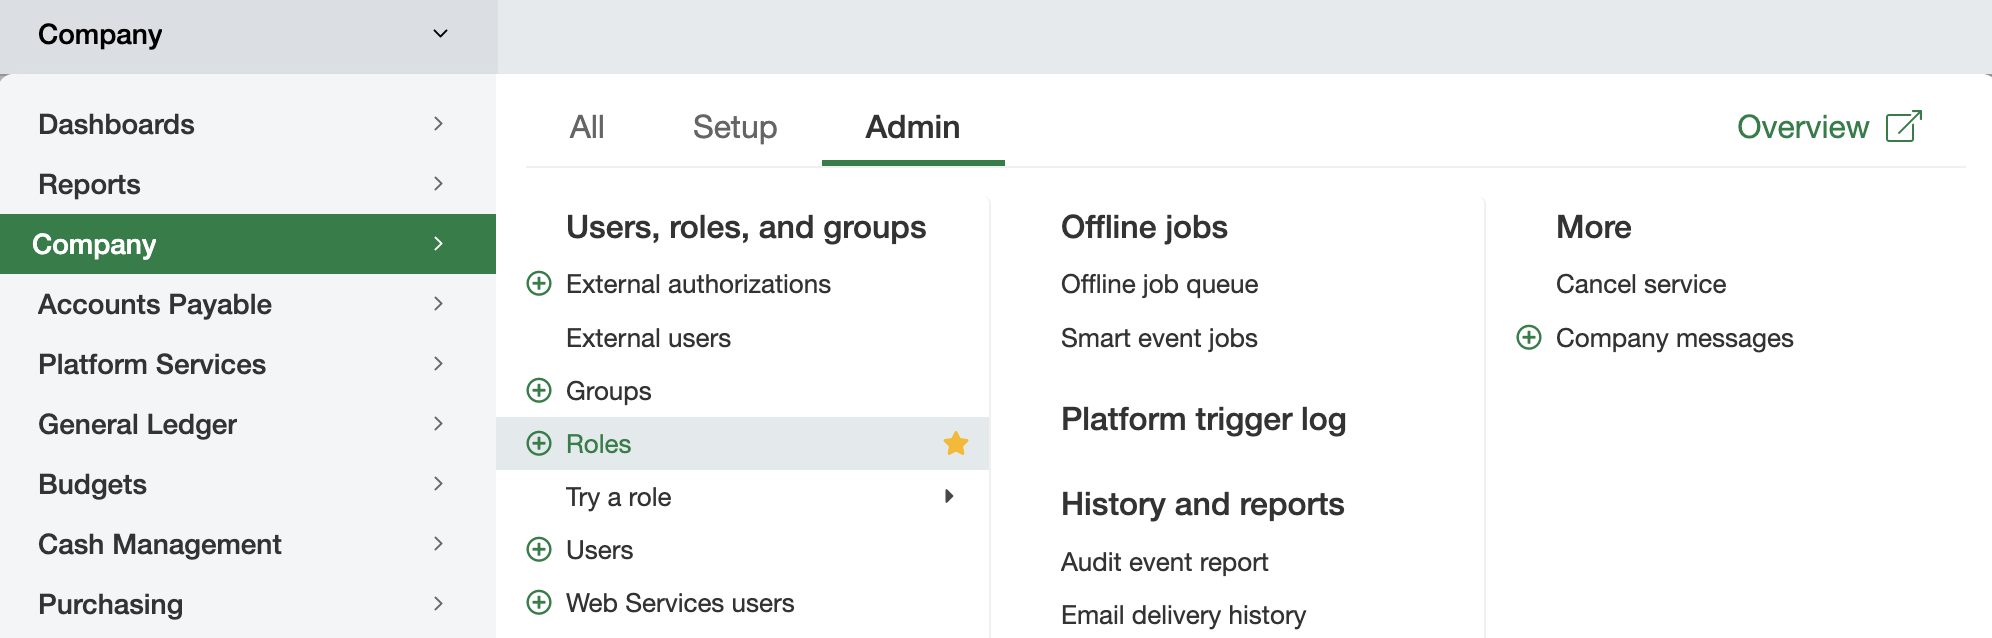
Add a new Role by clicking the "Add" button in the top right of the screen.

Enter a "name" (description is optional) for the Role and click "Save" in the top right of the screen
After saving, the Roles Subscriptions page will be displayed.

Click on "Permissions" per Application/Module to set the required Permissions.

The permissions below are based on best-practices for allowing the "reading" of Sage Intacct data.
For "writing" data, make sure to check the "Add", "Edit", "Delete" options.
| Company | |
|---|---|
| Departments | List and View |
| Entities | List and View |
| Locations | List and View |
| Class | List and View |
| Reporting Periods | List and View |
| Territory | List and View |
| Attachments | List and View |
| Transaction Allocations | List and View |
| Transaction Currencies | List and View |
| Cash Management | |
|---|---|
| Bank Transactions | List and View |
| Deposits | List and View |
| General Ledger | |
|---|---|
| Journal Entries | List and View |
| Accounts | List and View |
| Account Groups | List and View |
| Journals | List and View |
| Accounts Payable | |
|---|---|
| Manual Payment | List and View |
| Vendors | List and View |
| Bills | List and View |
| Adjustments | List and View |
| Posted Payments | List and View |
| Accounts Receivable | |
|---|---|
| Customers | List and View |
| Invoices | List and View |
| Adjustments | List and View |
| Deposits | List and View |
| Posted Payments | List and View |
| Inventory Control | |
|---|---|
| Vendors | List and View |
After setting all Permissions, click "Save" in the top right of the screen.
Navigate to Company > Admin > Web Services Users.
Select "Edit" next to the Web Services User that was created in the previous step.
Navigate to the "Roles information" tab and assign the newly created Role to the Webservice User.
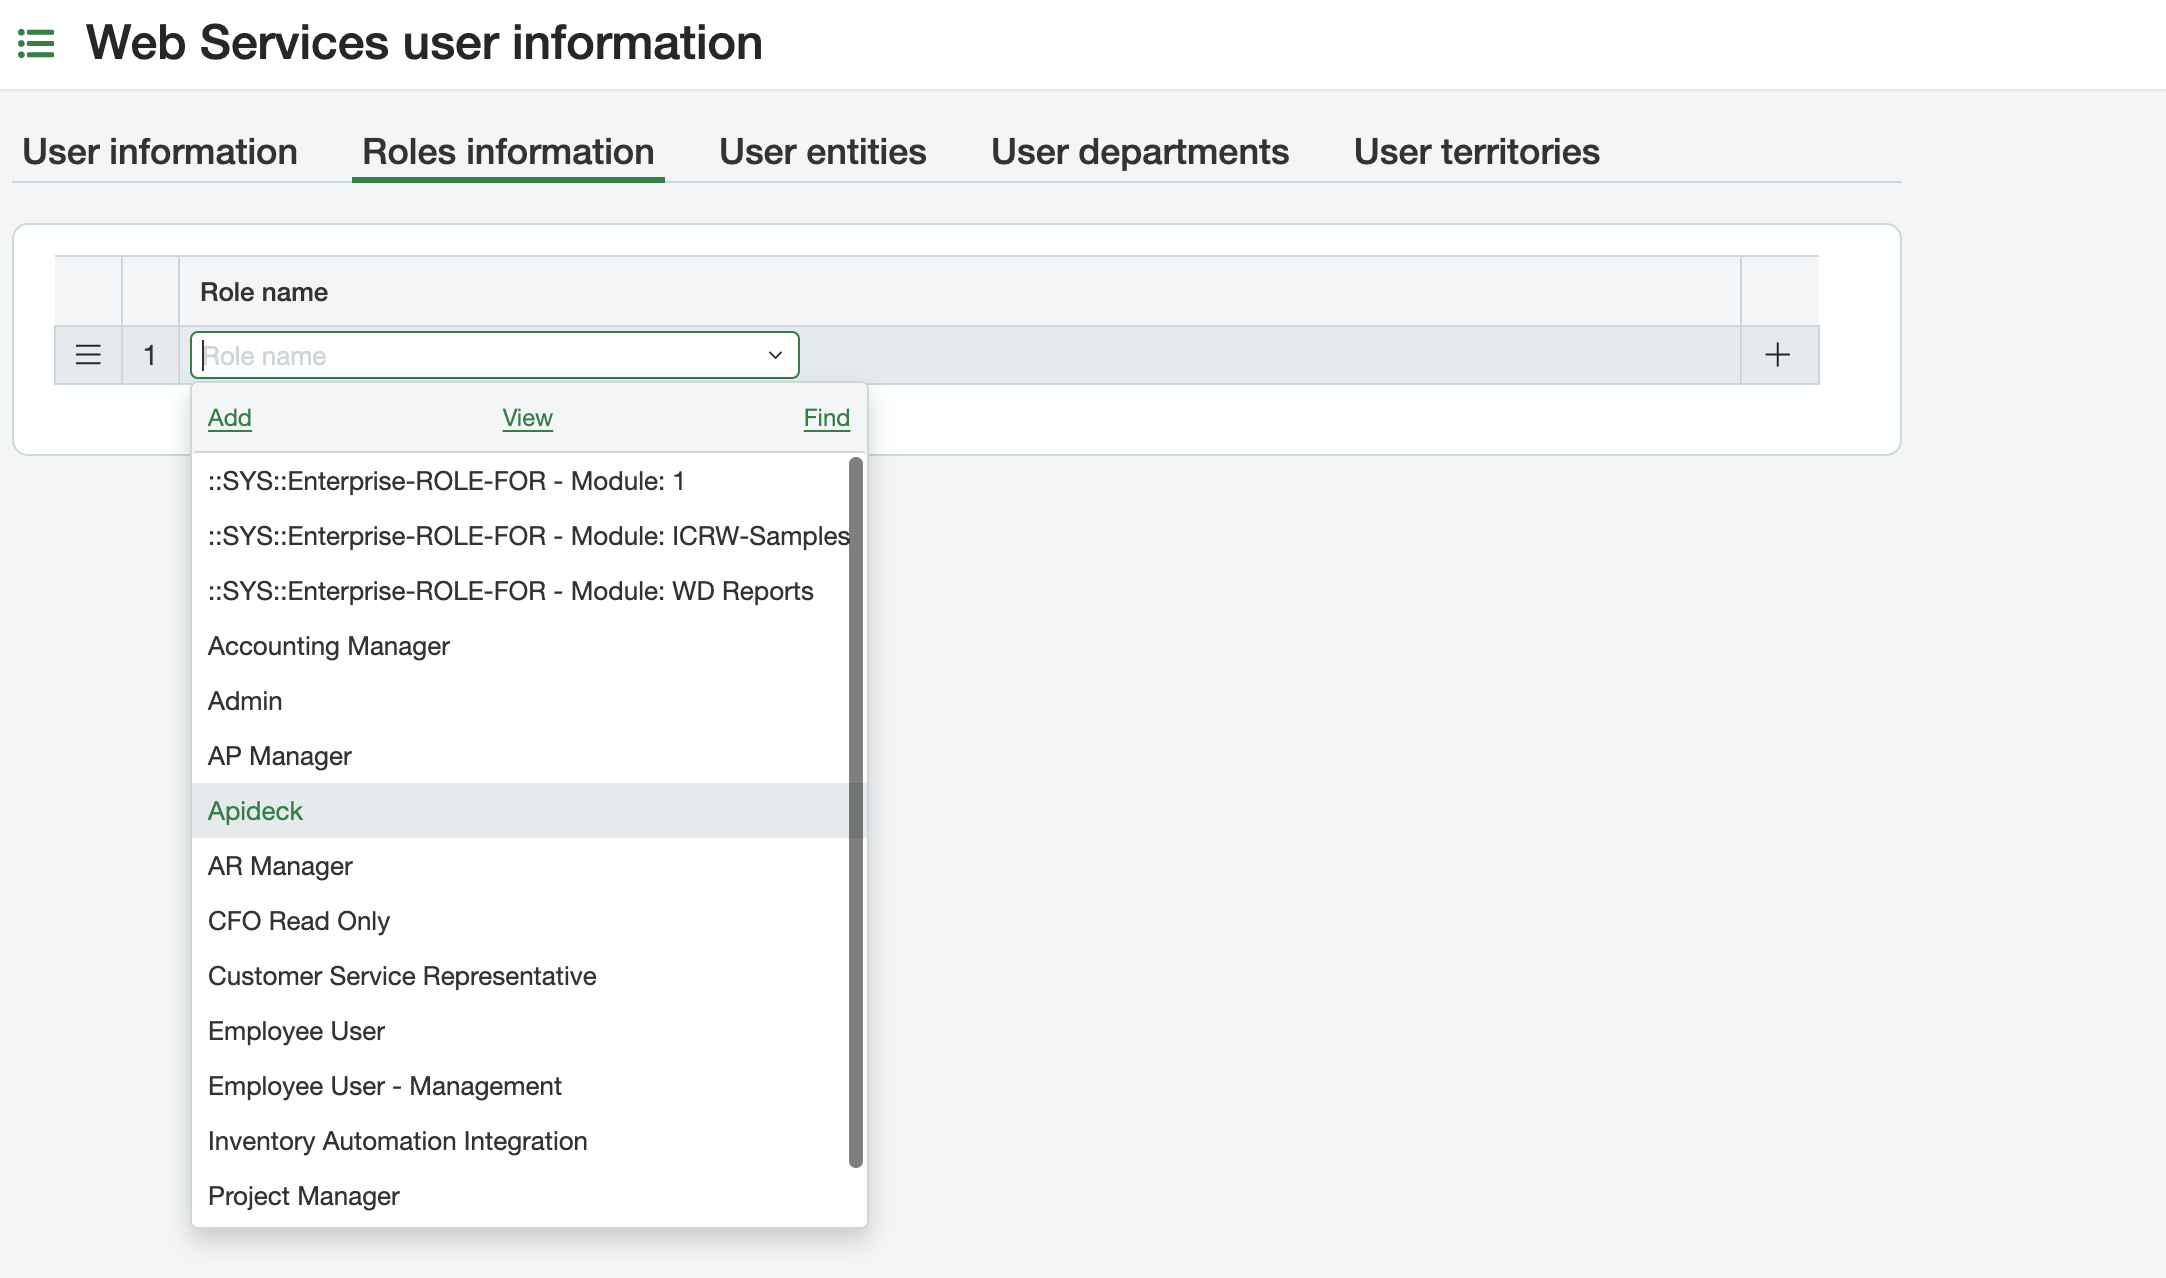
A "Verify your identity" pop-up will appear, which will require you to enter your password to confirm the role.
3. Authorize your Sender ID on Sage Intacct Web Services
To enable the integration, you need to grant access to the Web Service User (Apideck in the example) in Sage Intacct. To do this, you need to add a Sender ID to your Sage Intacct account.
Navigate to Company > Setup > Company.

Go to the Security tab and click Edit.

Scroll down to Web Services authorizations and click Add.

Enter the Sender ID configured for your integration by your integration provider. This authorizes that integration's Web Services gateway to access your company. The provider obtains and configures the Sender ID and its password (these are integration-level gateway credentials, not something you request yourself) — see the application-owner setup guide.
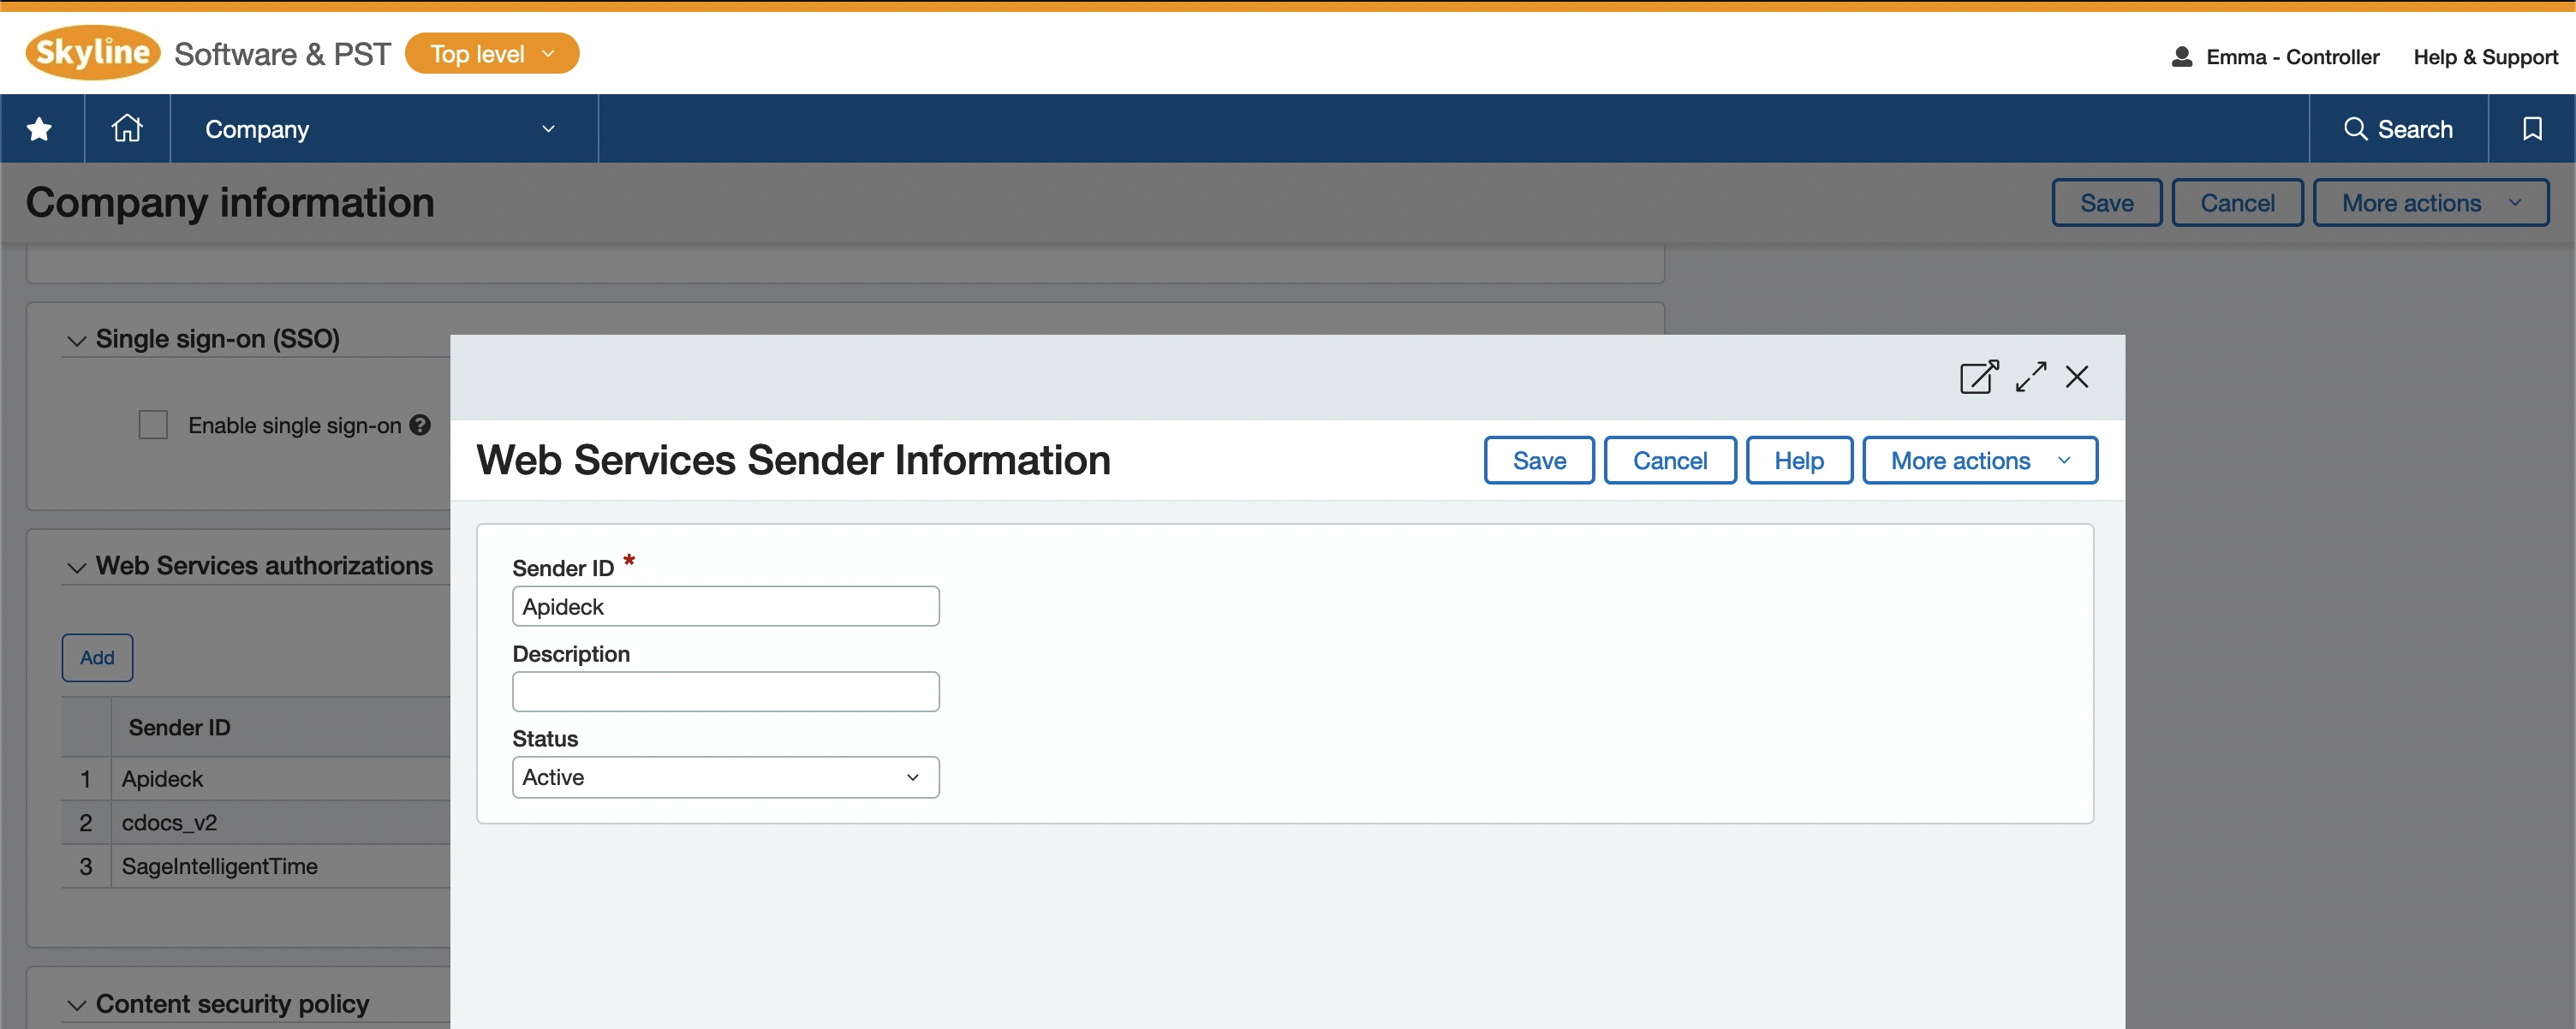
| Field | Description |
|---|---|
| Sender ID | Unique identifier provided by your Sage Intacct contact(case sensitive). |
| Status | Set the status to "Active". |
Click Save after completing the form.
4. Vault Connection Setup
Now that you've created a WSU and authorized Apideck you're ready to fill out your credentials in Vault.
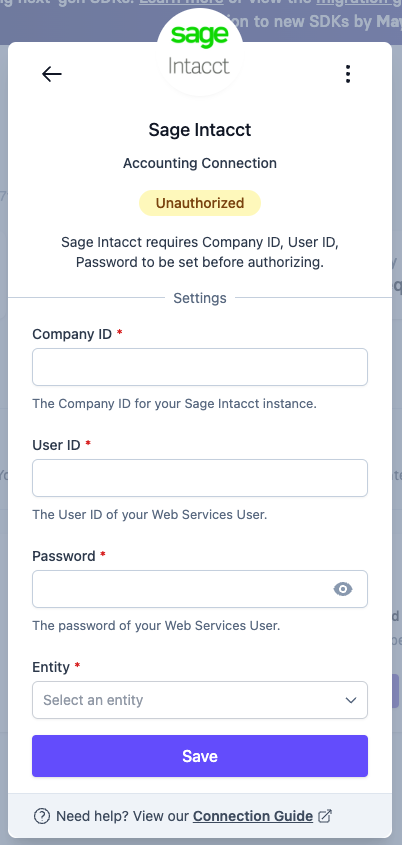
| Field | Description |
|---|---|
| Company ID | The Company ID of your Sage Intacct instance. You can find this ID in the Sage Intacct dashboard. Navigate to Company > Setup > Company, Company ID is listed under Company information. |
| User ID | The User ID of the WSU you created in step 1. For example apideck. |
| Password | The password of the WSU you created in step 1. |
| Default Entity | The entity this connection operates in. Choose Top level to work across the whole company (shared/top-level data), or a specific entity to scope the connection to it. For multi-entity usage — cross-entity reads and per-request entity routing on writes — see the application-owner guide (Multi-entity companies). |
Click Save after completing the form. Your Sage Intacct account is now connected.