Jira Data Center – Connection Guide
Jira Data Center supports the scale enterprise teams need to transform the way they work with high availability, performance, and flexible deployment.

How to Connect to Jira Data Center (On-Premise)
This guide will help you connect your Jira Data Center (self-hosted / on-premise) instance to Apideck's Unified API. Through this integration, you can programmatically access your Jira data such as issues, projects, and users.
Note: This connector is for Jira Data Center / Server (self-hosted). It is not for Jira Cloud. Jira Cloud uses a different connector and authenticates with an Atlassian account API token via
id.atlassian.com— none of that applies here. Jira Data Center authenticates with a Personal Access Token (PAT) created directly inside your own Jira instance.
Prerequisites
Before you begin, make sure you have:
- Access to your Jira Data Center instance (self-hosted / on-premise)
- A Jira user account with appropriate permissions for the data you want to access
- Jira Data Center or Server version 8.14 or later (Personal Access Tokens were introduced in 8.14)
Configuration Settings
To connect your Jira Data Center instance to Apideck, you'll need to provide two pieces of information:
- Server Base URL — The URL where your Jira instance is hosted
- Personal Access Token (PAT) — An API token for authentication
Step 1: Find Your Server Base URL
The Server Base URL is the URL via which users access Jira Data Center. This is typically the same URL you use to log into Jira in your web browser.
- Open your Jira instance in a web browser
- Look at the URL in your browser's address bar — e.g.
https://jira.mycompany.com - Note the domain only — e.g.
jira.mycompany.com. The Vault field displays a fixedhttps://prefix, so you enter just the domain (not the full URL).
Important Notes:
- Enter only the domain — do not type
https://yourself. Vault shows thehttps://prefix for you. - Do not include any path after the domain (e.g.,
/secure/Dashboard.jspa) - If your Jira instance uses a custom port, include it after the domain:
jira.mycompany.com:8443 - If your instance is served from a sub-path (context path), include it:
jira.mycompany.com/jira - Make sure your instance has a valid SSL/TLS certificate — the connection uses
https://
Example Server Base URL values (as entered in Vault, without the prefix):
jira.mycompany.comjira.internal.company.comjira.mycompany.com:8443(if using a custom port)

Step 2: Create a Personal Access Token (PAT)
Personal Access Tokens (PATs) are used to authenticate API requests to your Jira instance. PATs are created inside your own Jira instance — there is no separate developer portal or Atlassian account involved.
- Log in to your Jira Data Center instance with your user account
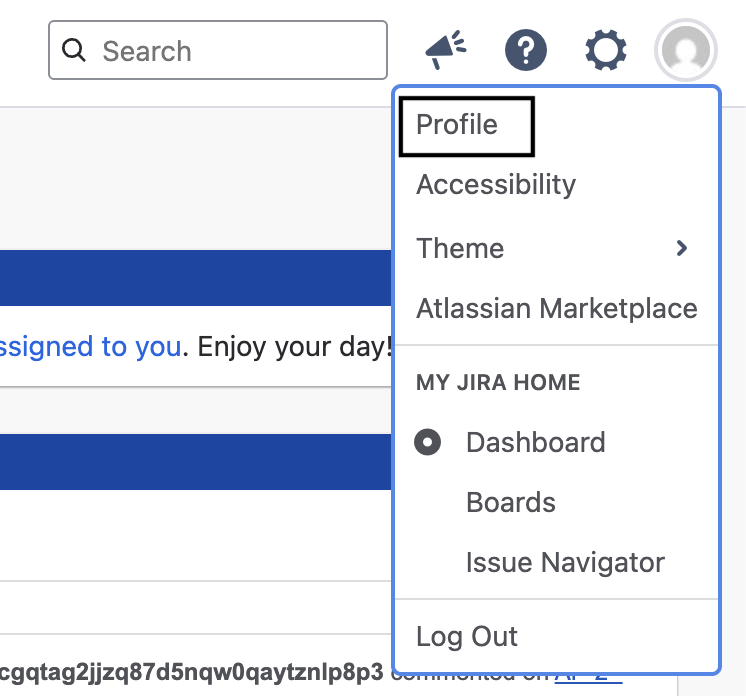
- Click your profile picture at the top right corner of the page and select "Profile"
- In the left-hand menu, select "Personal Access Tokens"
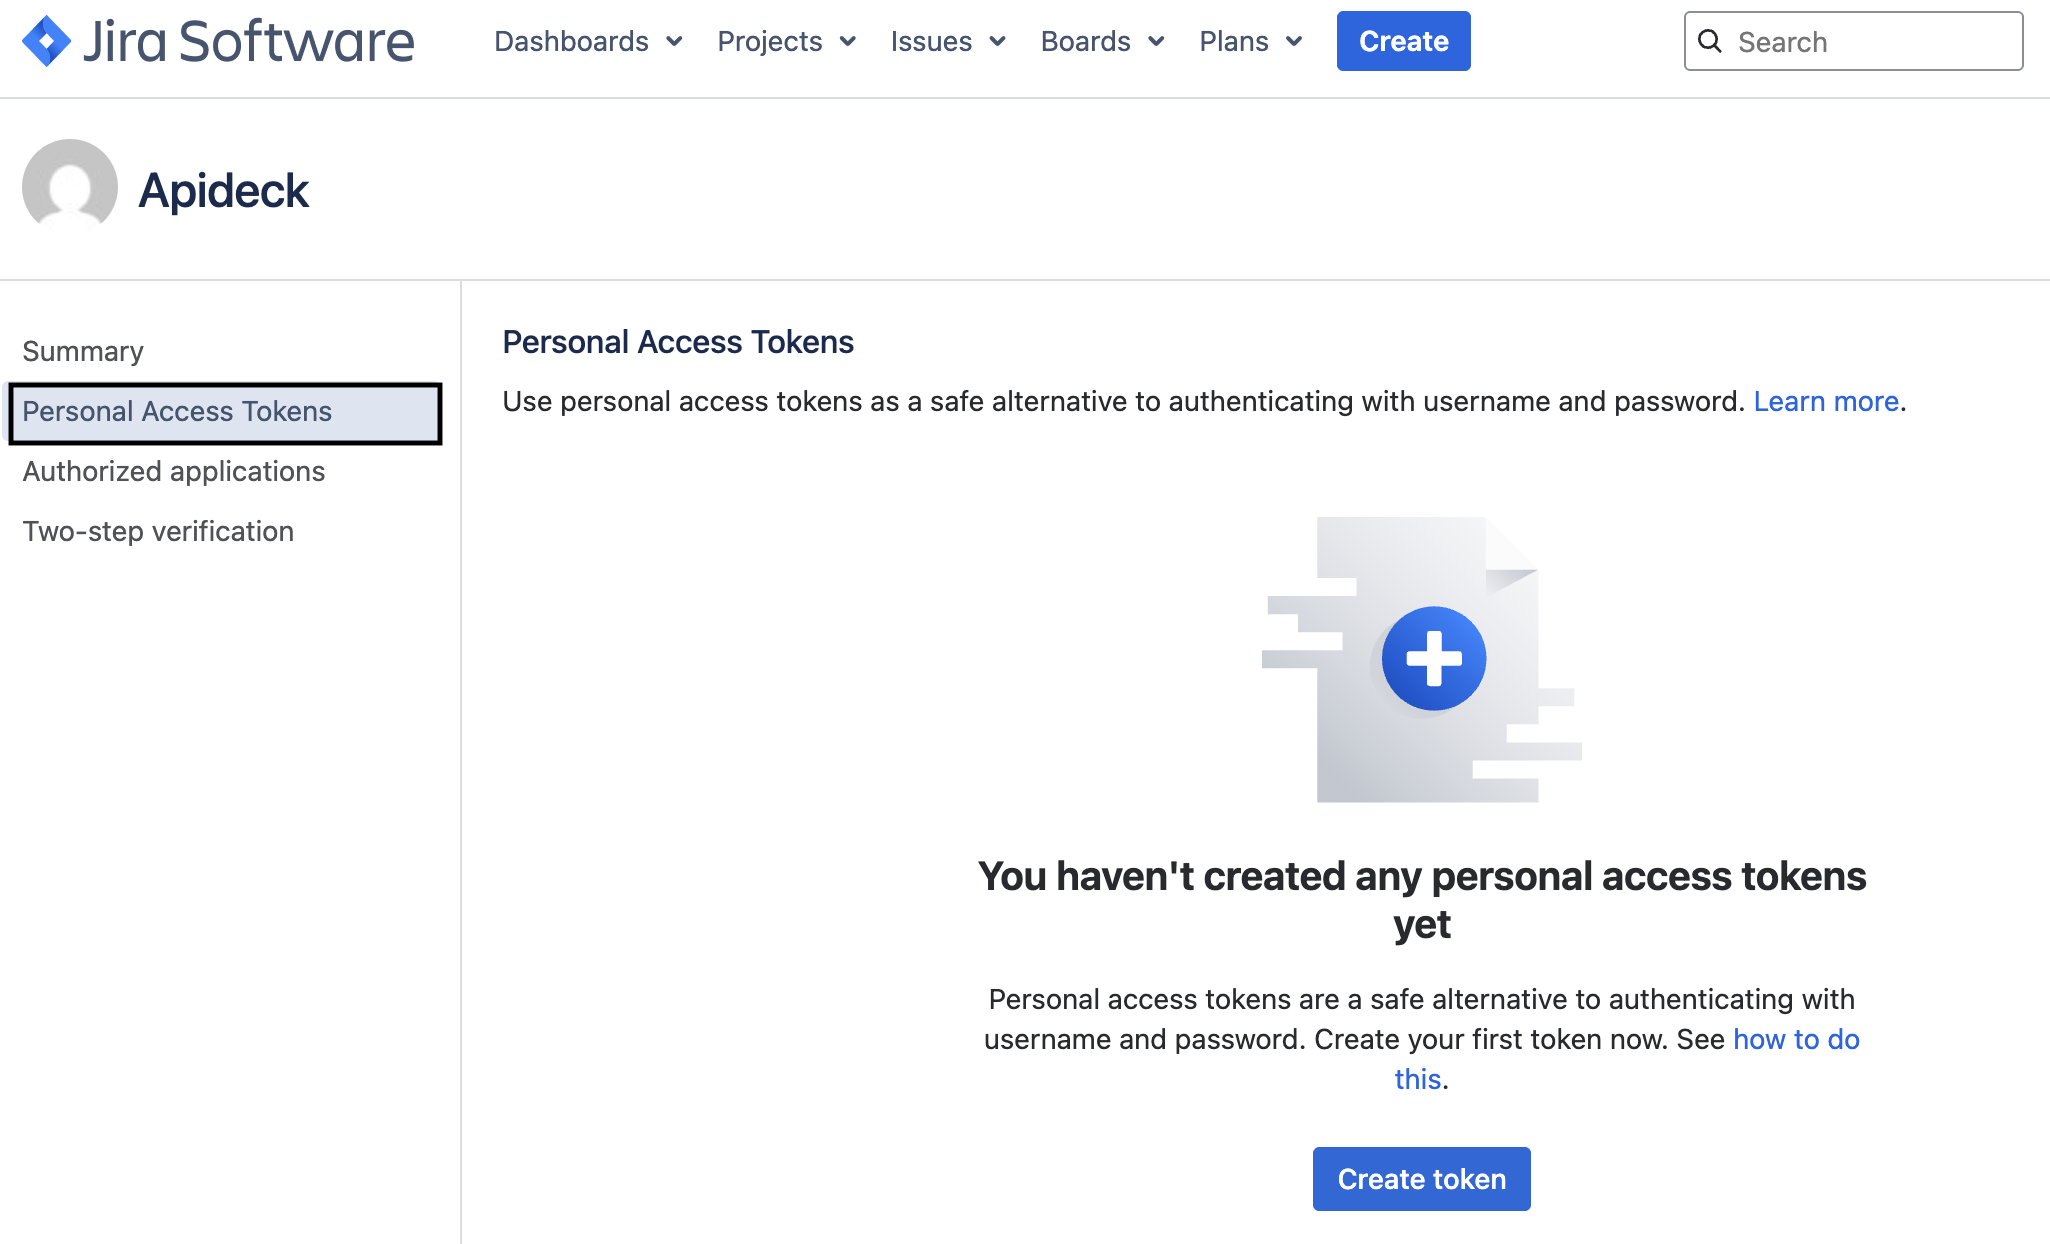
- Click "Create token"
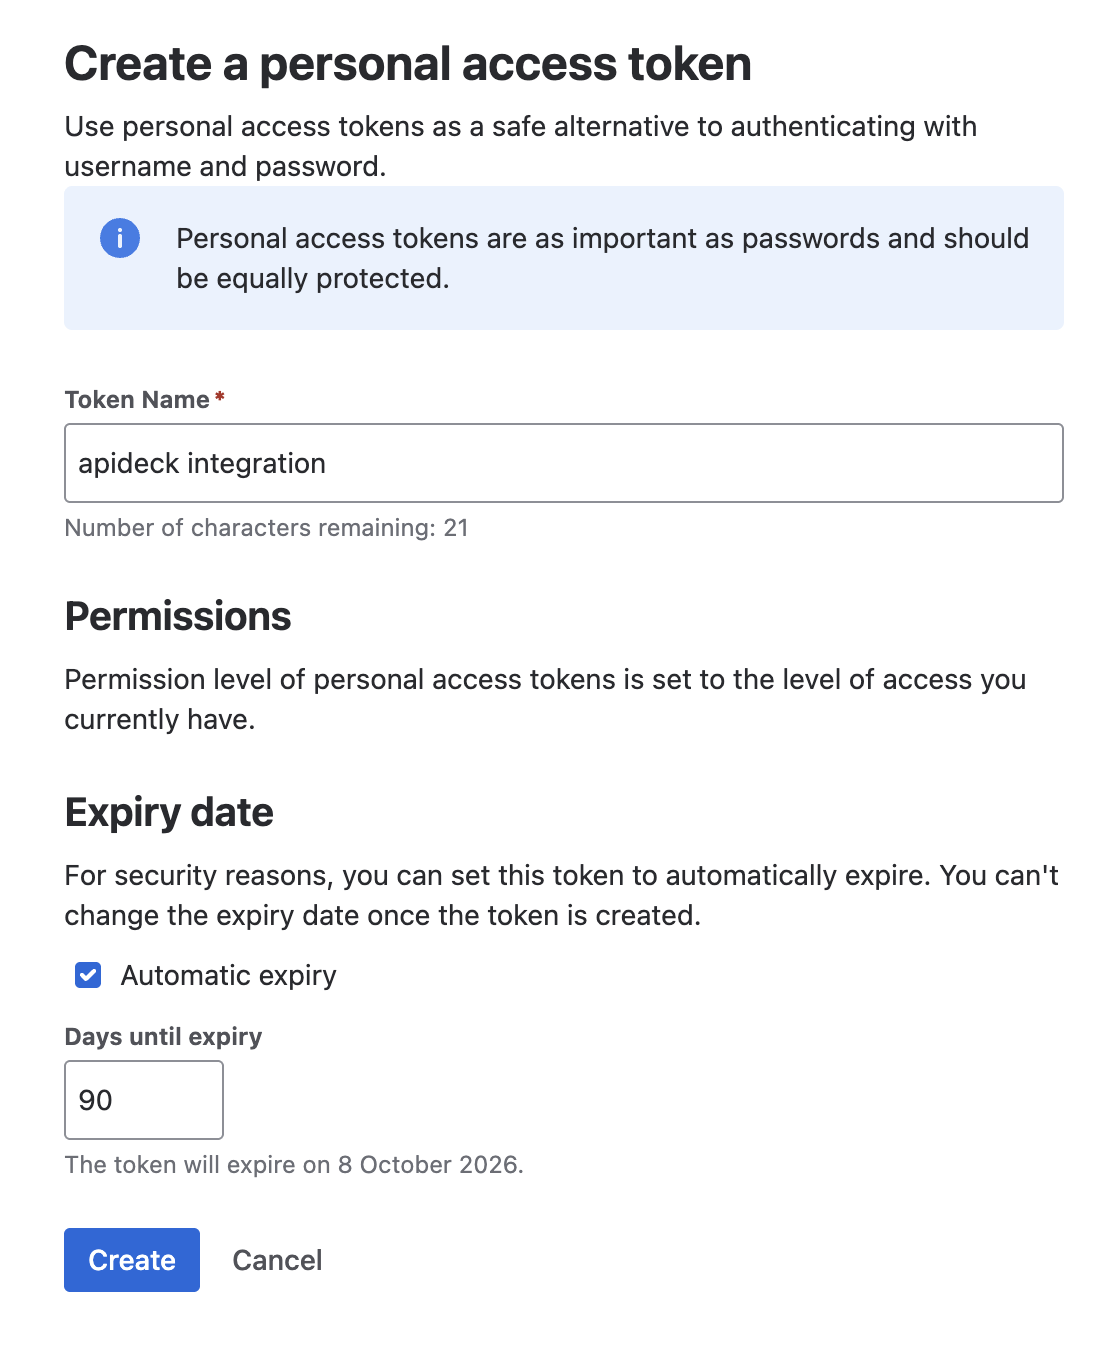
- Enter a token name — choose a descriptive name like "Apideck Integration" or "API Access Token"
- Set an expiration date (optional but recommended) — select when the token should expire for security purposes
- Click "Create"
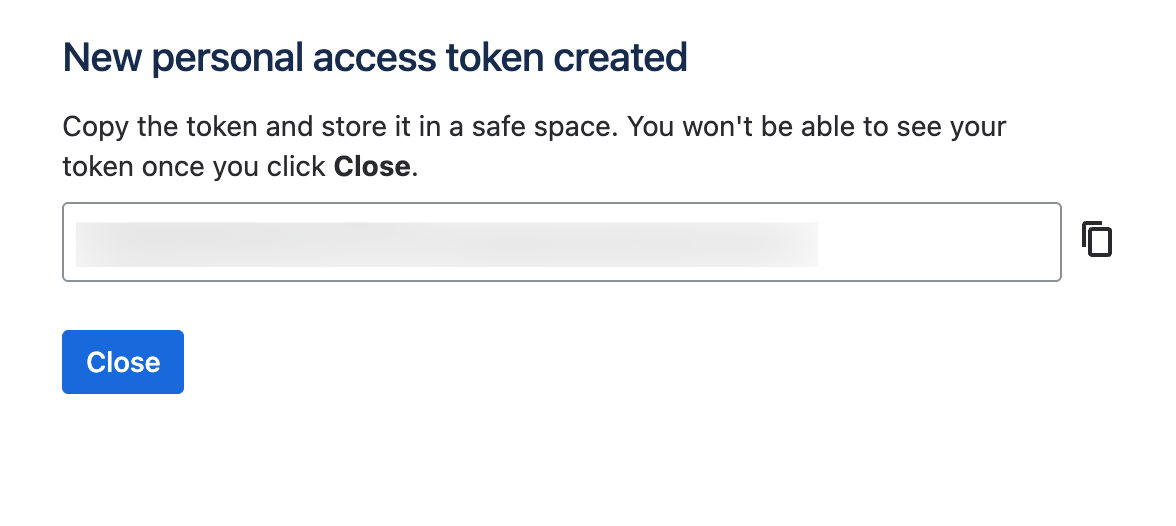
- Copy the token value that appears on the screen — ⚠️ Important: Jira will display the token only once. You must copy it immediately and store it securely. Once you close the dialog you will not be able to see the token again.
Tip: The token inherits the permissions of the user who created it. Make sure that user can access the projects and issues you intend to read through Apideck.
Step 3: Configure in Apideck Vault
Now that you have both required pieces of information, you're ready to connect your Jira Data Center instance to Apideck.
Enter Your Configuration Settings
-
Navigate to the Apideck Vault and find the Jira Data Center connector
-
Enter the following settings:
- Server Base URL: Enter your Jira domain (e.g.,
jira.mycompany.com) — the field shows thehttps://prefix for you, so don't type it yourself - Personal Access Token (PAT): Paste the personal access token you created in Step 2
- Server Base URL: Enter your Jira domain (e.g.,
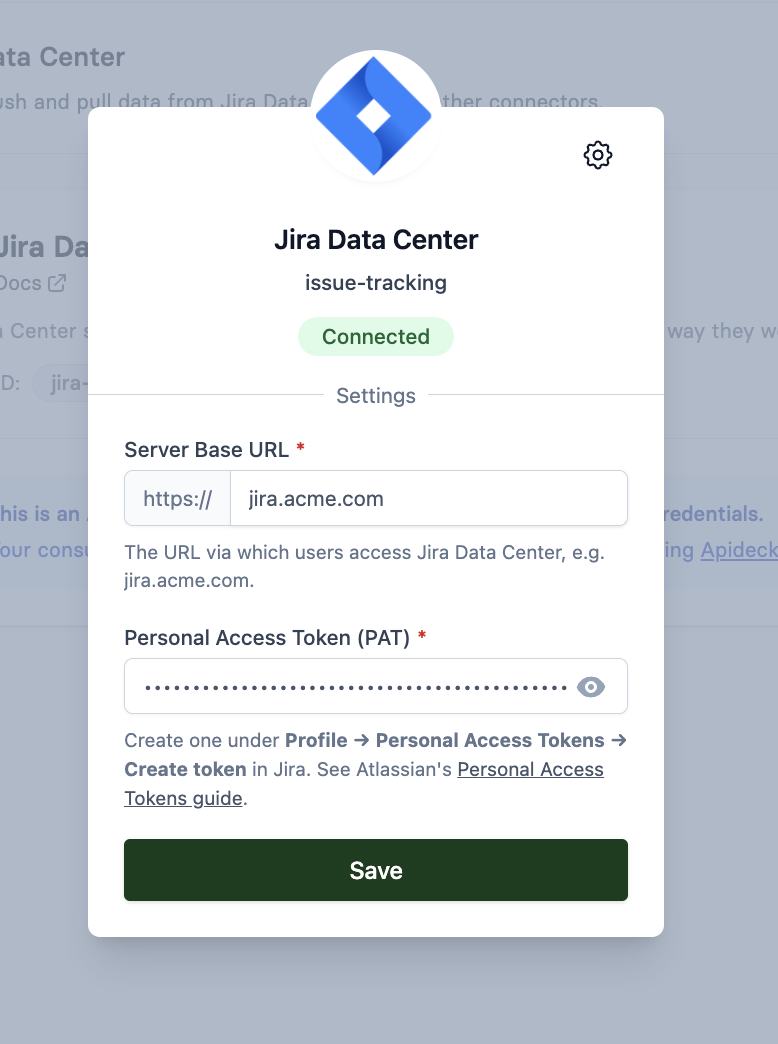
- Click Save settings to save your configuration and establish the connection
- Once connected, you can start using the integration to access your Jira data
Troubleshooting
Error: Invalid Server Base URL
If you receive an error about the server base URL:
- Enter only the domain — do not include
https://yourself (Vault adds the prefix). Typing the protocol will double it up. - Ensure there are no trailing slashes in the value
- If your instance uses a context path (sub-path), confirm it is included (e.g.,
jira.mycompany.com/jira) - Check that the host is accessible from your network
- Verify that your Jira instance is running and accessible
Error: Authentication Failed
If you receive an authentication error:
- Verify that your Personal Access Token is correct and hasn't expired
- Check that the token hasn't been revoked in Jira (Profile → Personal Access Tokens)
- Confirm the user who created the token still has the required permissions
- Try creating a new token if the issue persists
Error: Permission Denied / Resource Not Found
If you can connect but can't see expected data:
- Confirm the token owner has permission to view the relevant projects and issues
- Personal Access Tokens act on behalf of the user who created them — a project the user can't see will not be returned
Error: Connection Timeout
If the connection times out:
- Verify that your Jira server is accessible from the network where Apideck is running
- Check firewall rules to ensure API access is allowed
- Verify that your Jira instance is not behind a VPN or private network that blocks external access
- Contact your Jira administrator to verify network connectivity